Hey! This site is reader-supported and we earn commissions if you purchase products from retailers after clicking on a link from our site.
Regardless of whether you are a full-time RVer, a seasonal RVer or a weekend warrior camper, proper general maintenance is essential for your rig. Some items, such as your water heater can be done once a year, while other components will need more frequent check-ups. In this article, we’ll examine some of the things that I regularly maintain on my 5th wheel and I’ll share some of my thoughts on what components should be regularly maintained on motorhomes as well. For electrical and plumbing components, make sure you pick up an RV monitor panel to keep tabs on all your vitals. While there are numerous components on any RV that all need to be well-maintained, the ones listed below, are what I always look at first.
- Onboard or portable generator
- Smoke and other detectors
- Refrigerator
- Slide out
- Water heater
- Tires
- Roof
- RV batteries
- Window seals
- Axles
Your RV generator
I enjoy boondocking, and I especially enjoy doing that while using solar power. However, I also understand the importance of having a well-maintained generator onboard your RV. These could be a factory installed generator in your RV, or a portable after-market model that will work for you when you’re camping, but they both need to be properly maintained and in working order at all times.
Many seasonal or first-time RVers often overlook the proper maintenance of their generators. Quite often, these RVers stay in places where they have full hook-ups and they simply disregard the proper maintenance of their generators. With that said, start your generator at least once a month and let it run for 30-45 minutes. This will keep your generator well lubricated and it will burn off older fuel that could eventually clog your fuel system if left unattended. With that said, even if you use your portable or onboard generator rarely, you should always plan on changing the oil on an annual basis.
The smoke and carbon monoxide detectors
I like to use the test button on my carbon monoxide and smoke detectors at least once a week to be they are in good working order. I also replace their batteries once a year on a certain date, with that being my birthday. If you’re a seasonal RVer, consider doing this before your first trip of the new season.
Refrigerator
The refrigerator is not something I usually do a lot of maintenance to. If it runs properly and keeps my food cold, then that’s all I’m really looking for. However, I do open the hatch on the outside annually for a good cleaning and inspection. Since I have a combination electric and propane model, I take the cover off the electrical propane ignitor and blow out any dust or rust that may have built up in there over the past year. While this may not be necessary, it never hurts to keep your ignitor clean so that it will work correctly.

- VARIABLE PRESSURE TRIGGER: control the release of clean, filtered, and odorless. Quickly and...
- EASY TO USE: Stoner Car Care Gust Easy Duster will not damage glass, optics, metals, plastics,...
- PERFECT FOR ELECTRONICS: moisture-free and safe for use on your camera lens, computers, keyboard,...
Last update on 2024-07-13 / Affiliate links / Images from Amazon Product Advertising API
Slide-outs
If you follow my column regularly, you may remember that in a recent article about troubleshooting your RV’s slide-outs, I recommended that you inspect and lubricate them periodically too. However, I strongly urge you to visit that column before you begin any inspection or lubrication of your slide-out because it’s essential that you understand that some slide-outs require specific lubricants. For that reason, I won’t recommend a specific lubricant for overall use on all RV slide-outs. Simply put, you should do some research on your particular slide-out and its manufacturer to be sure that you are using the correct lubricant.
With that said, I inspect and lubricate my slide-out twice a year. Especially if I have exposed it to corrosive environments such as camping on the beach of the Gulf of Mexico or driving over Vail Pass in Colorado during the winter. You should take these precautions too.
The water heater
I like to drain and flush my water heater at least once a year, although I have done it twice a year if I was traveling through areas of the country where the water was high in minerals, however if you’re a seasonal RVer, you plan on doing this before you winterize your RV. For this task, you’ll first need to shut off the power to the unit and the propane if that is the type of water heater you are using. Be sure to do this several hours before you plan on draining and flushing the unit so that your water has cooled to room temperature.
To service your water heater, you’ll need to remove the access panel on the outside of your RV. While some water heaters are equipped with a drain valve that is similar to the type installed on conventional homes for outdoor water access, it’s more likely that your RV water heater will have a drain plug that will have a square nut and will need to be removed with an adjustable crescent wrench.
Don’t be surprised if there is an anode rod attached to this fitting as this is quite normal on most RV water heaters. An anode rod is basically a sacrificial piece of metal that is designed to attract minerals such as calcium that will corrode the inside of your water heater. Don’t be alarmed if it looks corroded and rough, that means it’s doing exactly what it’s supposed to do. With that said however, if you’re a full-time RVer, I would recommend changing your anode rod and plug once every two years.
Now that you have drained your water heater, you’ll need to thoroughly flush the tank to clear it of any mineral build-up. For this task, I recommend a water wand that is easily attached to a standard garden hose and equally as easy to flush away any mineral buildup on the walls of your water heater Flush your tank with a wand, then wipe the area clean.

- EXTENDS THE LIFE OF YOUR WATER HEATER: The tank rinser lifts sediment that collects at the bottom of...
- IMPROVES WATER HEATER FUNCTION: This camper accessory helps prevent tank corrosion and also restores...
- EASY TO USE: Simply attach a garden hose to the rinser and insert it into the camping water...
Last update on 2024-07-13 / Affiliate links / Images from Amazon Product Advertising API
Tires
Keeping your RV’s tires in good working order is extremely important when traveling. In one of my most recent articles I explained in great detail why an RVer should have a healthy understanding of your RV’s tires. In that article, I explained the importance of knowing how to read and interpret the markings on the sidewalls of your tires and how important it is to upgrade your RV’s tires when you purchase a new rig.
With that said, in another recent article, I explained how to monitor and maintain the proper air pressure for your RV’s tires. For these reasons, I’m not going to go into great detail here in this article, but I would highly encourage you to review my last two articles to fully understand my recommendations for choosing the proper tires for your RV, and how to best maintain them. Also make sure to read Mike’s guide on the best tires for your RV.
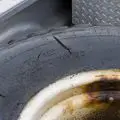
Your roof
Inspecting my roof is a task that I generally do twice a year. What you’re looking here is any cracks around components such as antennas, vents, the air conditioning units, or anything that is connected to your roof.
I also like to inspect my roof seams, and since I have a rubber roof, I reseal it annually with Dicor. This sealant is specifically designed for rubber roof systems, easy to work with, UV resistant, and it’s self-leveling as it dries.
- USE: Well suited for retrofit installations; Protective barrier for extending the life of the EPDM...
- COLOR: White hue for stylish and beautiful RV roof
- COMPATIBILITY: For EPDM and PVC use only; Use with Dicor Rubber Roof Cleaner/Activator for proper...
Last update on 2024-07-14 / Affiliate links / Images from Amazon Product Advertising API
This product is also excellent for restoration projects as well as repairs for those that are purchasing a used RV in need of roof repairs. It is a two-part application, so be sure to read the directions before you begin any repairs or restorations. It’s also important to conduct RV roof cleaning!
RV batteries
Whether you have only a single battery for your RV’s 12-volt electrical system, or a whole bank of batteries such as you would find in rigs designed for off-grid living that rely upon alternative power sources such as solar panels, proper maintenance is key to getting the most out of them in terms of productivity and longevity.
Most likely, your RV will be equipped with leaded and flooded deep cycle batteries designed for RV and marine usage (or a battery specific for your travel trailer). While some RVers may have expensive lithium batteries that require little to no maintenance, deep cycle batteries will need to be checked periodically.
First, you’ll need a hydrometer. This is used to test the charge or gravity of each cell. To begin this task, you should put on some protective gear such as latex gloves and safety glasses. Next, remove the plastic covering of the cells by inserting a flat-head screwdriver under one end of the cover and gently pry them up. Most batteries will have a small tab on the cell covers and that’s just for this purpose.

- BATTERY TESTING: The Performance Tool W1657C Deluxe Battery Tester is designed to test 6V, 12V, and...
- DIAL INDICATOR: Features and easy-to-read dial indicator that provides instant results.
- WARM OR COLD TESTING: Whether your battery is warm or cold, this deluxe battery tester delivers...
Last update on 2024-07-13 / Affiliate links / Images from Amazon Product Advertising API
Insert the hose into each cell and squeeze the bulb once to vacuum some liquid out of the cell and then read the results on the gauge. Once you have read the results, gently pull the hose of the hydrometer just above the liquid level of the cell and squeeze the ball softly to release the test sample back into the cell. Repeat this process for each cell.
After you’ve tested the individual cells of your deep cycle batteries, you’ll need to evaluate those results. Depending upon how much time you rely upon your batteries as a primary power source or how much time you are connected to a shore power source can heavily affect the longevity of the battery. Be sure to use a battery monitor as well to keep tabs on how much power you have left.
For example, always camping and using a shore power source will actually over charge your deep cycle batteries and lower their longevity. On the other hand, boondocking while allowing your deep cycle batteries to be a primary source of power can lower the charge in the batteries less than 50% and this too can damage your battery power supply. You can also use a battery charger, so be sure to read our recommendations on the best deep cycle battery chargers too.
Always monitor the liquid level in your battery cells too. Never let the lead cores be exposed to air as this too will cause the battery to lose charge. If you do see a lead core exposed to air, carefully pour some distilled water into that cell until the core is covered but not overfilled.
Window and door sealings
I’m always checking my window seals as well as inspecting the glass. I usually do this task at least once a month but that may be more than what’s actually necessary. I do this so frequently because I have seen the damage that water can do once it’s inside an RV.
Rubber seals are notorious for cracking, especially when exposed to extremely cold weather or a lot of sunlight. For that reason, I inspect my window and door seals as often as I do. During the course of those inspections, I like to use 3-In-One® slide-out window and track dry lubricant on my seals.

- Quick-drying formula leaves a clear, protective lubricating film to reduce friction, without...
- Provides long-lasting corrosion protection against the elements, helping to prevent future repairs
- Safe to use on most materials, including vinyl and plastic (except clear polycarbonate and...
Last update on 2024-07-13 / Affiliate links / Images from Amazon Product Advertising API
This adds some lubricant to the rubber and helps to prevent cracking due to excessive ultraviolet light from the sun. It also prevents moisture from penetrating the seals too. Simply spray it on the seals, then wipe the rubber with a nonabrasive cloth and you’ll extend the life of the seals.
Also, if you are traveling in a motorhome, always remember to inspect your windshield thoroughly too. A small stone chip in the glass can and will get larger over time. This can be costly, so it’s best to repair any stone chip as quickly as you can.
Axles and springs
Twice a year I climb under my fifth wheel to inspect the axle and springs. Over time and with extended travel, it’s not uncommon for your axle to shift slightly out of position. This will cause your rig to dog track down the road which will in turn cause uneven wear on your tires. Also, your springs wear out over time too and a broken spring can cause a shift in the axle. Some trailer axles are sealed; however, many older models have bearings that need to be greased occasionally. Many people prefer to do this themselves, although I am not one of those people.
Final thoughts
While there’s not a whole lot of things on my RV that I won’t work on, there are a few tasks I won’t do because of limited knowledge or safety factors. For example, I don’t deal with propane issues, if I smell gas, I’ll check the valves or lines (after I have shut the propane off) for the problem, but I’ll have a professional do the repair.
I think the best thing you can do as a responsible RV owner is to know your limitations when it comes to DIY projects or RV maintenance. On the two occasions that I have owned motorhomes, I never worked on the engine or transmission. Why? Because I didn’t have the knowledge or experience to work on those components.
Another thing to keep in mind is the age of your RV and whether it’s still under warranty. Understanding your warranty is extremely important because some DIY projects will void your warranty. In some cases, something as simple as changing your motorhome’s engine oil by yourself will void the warranty and you are required to follow the mandates set forth by the warranty contract that you signed when you purchased the RV.
With that said my friends, thanks again for following my column, I hope our paths will cross one of these days. Stay safe, healthy, and happy.