Hey! This site is reader-supported and we earn commissions if you purchase products from retailers after clicking on a link from our site.
Unless you are living in your RV full-time and taking it south to warmer climates in the winter, you are probably going to need to winterize it and prepare it for freezing temperatures. While this process may seem like an overwhelming and daunting task at first, you will soon realize that with the proper tools and a season or two of winterizing under your belt, it will become much easier for you to master this essential task.
In this article, I will take you through a step-by-step guide for winterizing your RV and some things to look for in this process that relate to preventative maintenance that may save you time and money in the future. Now, let’s get started and before long you will be ready to store your RV for the winter without worrying about any damage being done to it over the winter.
What should I do first to winterize my RV?
Clean the inside
The first thing I liked to do when I would prepare my RV for winter storage was to give it a thorough cleaning inside and out. I would start with the inside and make sure any food products were completely removed to avoid anything that might attract bugs or rodents. Here is how to repel bugs and moths with oils. At this time, I would shut down the refrigerator and give it a good cleaning.
This is also a good time to remove any clothing or dishes you may not want to keep in your RV for the winter. It’s also a good time to organize the things you may want to keep in your unit as well as fix any problems you may notice while cleaning such as any water damage from unnoticed leaks. In other words, give your RV a good inspection while you’re cleaning it.
When to winterize your RV
Some may wonder why I choose to do this in the fall and right before winter sets in and the answer is twofold. First, when I get ready to leave in the spring, I don’t want to spend a day or two cleaning and packing my RV, instead I prefer to have it ready to go so that I can load it with my clothes, food and any other provisions I need and then drive it away. And second, if you do discover something that you may not be able to repair and need to take it to a shop to be fixed, the fall is a much better time to schedule those repairs because RV repair centers are always busier in the spring and wait will be longer to schedule an appointment to get these repairs done at that time of the year.
Inspect the outside of your RV
Now that you have given the inside of you RV a good cleaning it’s time to move outside and do the same thing. Clean all the sides and wipe them down with soapy water. You should have a ladder on hand and inspect all of the seams and window frames. Look for cracked or broken seals around the windows. You should also inspect your roof for any leaks around things like the air conditioning units or vents.
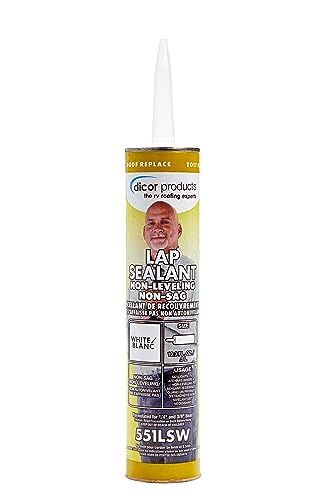
If you do discover some leaks, you should get some good sealant made for this type of problem. I recommend using a lap sealant such as one from Dicor Products which is a much better product than just silicone or plain calk.
- USE: This sealant helps create a watertight seal along a roof's edge, air vents, vent pipes, and...
- COLOR: White hue for stylish and beautiful RV roof
- COMPATIBILITY: Formulated for EPDM roofing but also compatible with most other roofing material,...
Last update on 2025-06-17 / Affiliate links / Images from Amazon Product Advertising API
According to Dicor, this product is intended “for use on TV antennas, skylights, and vertical surface application.” It helps create a watertight seal along a roof’s edges, around air vents, vent pipes, and screw heads. It is also compatible with any other roofing material and it also offers excellent adhesion to aluminum, mortar, wood, vinyl, galvanized metal, and concrete. It improves the ability to continuously seal and remain flexible. It is color matched, and the lap sealant is UV stabilized to prevent discoloration and deterioration and it will not stain or discolor any material to which it is applied.
As I said before, do not use calk to seal these types of leaks. In some case calk will actually corrode your roof if it has a rubber lining and it also will not hold up to certain weather such as prolonged exposure the sun or freezing temperatures.
Now that you have sealed up any potential leaks and looked for any other problems you may have on the outside, be sure to inspect and clean the undercarriage of your RV too. Spray water down there to clear out any excess dirt or mud and check out your axles for any seals that may have be leaking grease. Check your tires as well and make sure they are not weather checked and that they are inflated properly. It would also be a good idea to inspect your hitch at this time if you have a trailer.
Next up: winterize your RV water system
Now we’re ready to winterize your water system. The first thing to do here is to empty all of your tanks. By now you should be familiar with emptying your gray and black water tanks, but you may need to consult your owner’s manual as to the location of the drain plug for your fresh water tank.
Once you have drained all of your tanks, you will need to drain your hot water heater too. Find the outside access panel and remove it. Once removed, you will need to locate the pressure release valve to release any pressure in the tank. After you have done this you can drain the hot water heater.
Most RVs will have a small six gallon steel heater and will not have a traditional valve for draining them like you would find on home models. Instead, near the bottom you will what looks like a large nut. Use a one and 1/16 inch socket wrench to loosen this and slowly remove the anode rod which will drain your water heater.
What is an anode rod?
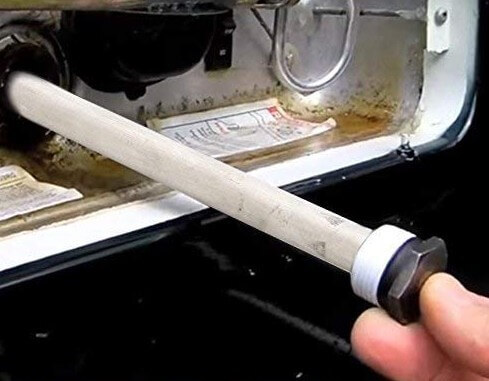
An anode rod is basically a sacrificial piece of metal that is designed to attract minerals such as calcium that will corrode the inside of your heater. Don’t be alarmed if it looks corroded and rough, that means it’s doing exactly what it’s supposed to do.
Leave the anode rod out for now.
Now you’re ready to blow the water out of your system.
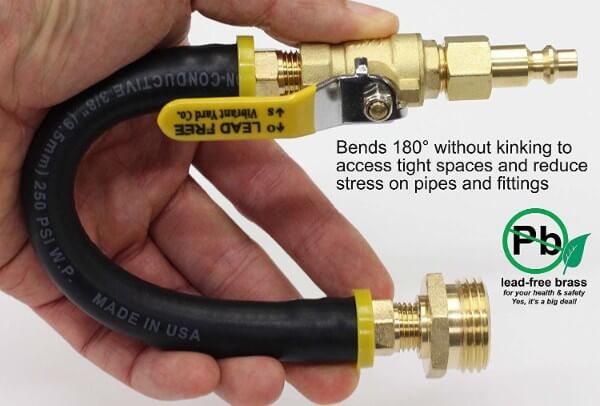
For this task you will need an air compressor with hose and a regulator suitable for this task. You should have these items in your RV essential tools list that I will discuss in another article later. RV winterization kits typically have some of these supplies as well.

- The portable air compressor has a long-life oil-free, maintenance-free pump for convenient use
- 150 max PSI 6.0 gallon tank (22.7 L) and 2.6 SCFM* delivered @ 90 PSI pump enable long tool run time...
- BOSTITCH high efficiency motor of the 6 gallon air compressor is made for easy start up in cold...
Last update on 2025-06-17 / Affiliate links / Images from Amazon Product Advertising API
Once you have the necessary equipment ready to go, the first you need to do is to blow out the extra water that’s in the water heater so you need to energize the water system with air and you will see that water drain out where we removed the anode rod earlier.
Now, shut the airflow off and it’s time to bypass your water heater. On the other side of you water heater you will find a series of water pipes. They are labeled hot or cold, but the main thing to remember is that cold water flows in at the bottom and the hot water flows out at the top. A third line in the series will be a bypass line. Shut the inline valves off on the hot and cold lines and turn the inline valve to the flow position on the bypass line. You have now bypassed your water heater and are ready to blow out the rest of your lines.
Re-energize your system with air
The next step is to re-energize your system with air, so you will need to back outside and reconnect the compressor. Once you have done that you will have to go back inside and go from faucet-to-faucet and turn them on one-by-one until mostly air is coming out of them. You should do this for the hot and cold water lines and remember to get the shower and the toilet. If your RV has an outside shower you will also need to clear this line too. Once you have completed these tasks you are done with the compressor and are ready to move on to the next step.
Back to the anode rod
Now it’s time to go back to that anode rod and either reinstall it or replace it. If you’re spending a lot of time in your RV every summer or living in your unit full-time, I would recommend that you replace it annually if it seems too corroded as they are an inexpensive component. That said; when you do decide to do these next steps make sure you use some Teflon tape to seal the threads of the rod when you complete this task. This tape will keep the seal in the threaded area of the rod and prevent future leakage. Make sure you start this process by hand so you avoid cross-threading and damaging the seal.
Disconnect the water pump
Once you completed this step, you need to access your water pump and disconnect the water line that leads into your water pump. Now you will need a short line of hose that will fit snuggly around the intake to your water pump and to a bottle of RV approved antifreeze.
Why should I disconnect the water pump from the fresh water tank?
I do this for two reasons, the first is to save cost on the anti-freeze and the second is to keep that chemical taste out of my water system. I prefer to not pump in a bunch of anti-freeze into my fresh water tank then pump it through the lines. While not toxic, any RV anti-fluid will leave an aftertaste or odor for quite a while and I bypass my freshwater tank to avoid this issue.
Instead, I prefer to put that flexible plastic line into a gallon jug of the anti-freeze and then I turn on my water pump and draw that fluid directly from the container. Once again, you will need to go throughout your unit and open the faucets until you see that it’s flowing out in a nice pink color. Remember to do this for each line and faucet and you will most likely need 2-3 gallons of anti-freeze for this process.
Reconnect the water pump to the fresh water tank
After you have pumped the ant-freeze through your water lines the next step is to reconnect your water pump to the fresh water tank. Once you have done that, you can go back and undo the bypass adjustments you made earlier at the water heater. This makes it easier to set up in the spring when you are ready to use your RV.
However, you’re not quite done. Now you need to take some of that anti-freeze around your RV and dump it down the drains of your sinks, shower and toilet. This prevents any freeze up in the goose-neck traps below them and also prevents any rubber plastic seals in those fittings from freezing up and becoming brittle.
Final words
Now that you know the essentials of winterizing your RV, there are other things you can do such as wheel covers, snow removal and window or air conditioning covers to further protect your RV but I will address those in a future article. If you have a smaller camper, this is a great read for how to winterize it. Once the weather warms up, be sure to read my recent article on how to dewinterize your RV too. Until then, I hope to see you out there and safe travels.
If you’re thinking about braving the cold weather, read my article on how to survive winter in your RV.