Hey! This site is reader-supported and we earn commissions if you purchase products from retailers after clicking on a link from our site.
Have you ever been traveling down the highway and a passing vehicle throws up a small stone that resulted in a cracked windshield? If you answered yes, be assured that this can be repaired easily if you attend to the task as soon as possible. I’m not saying that you’ll need to pull over to the side of the road immediately to repair this problem, but it probably should be attended to at your next stop if you’re traveling between camping sites or if you’re at a short-term camping location near your home.
Why you should repair chips in your windshield
Most stone chips on windshields will be initially less than ¼” in diameter and the trick is to repair them when they are this size or smaller. They absolutely need to be repaired as soon as possible because the more you drive, the more the chip will expand due to vibrations on the roadway as well as potholes or rough road conditions. Eventually you’ll end up with spider cracks that will cross your windshield and you’ll never be able to repair that damage. Instead you’ll end up paying hundreds of dollars replacing your windshield and it’s likely that this repair will need to be done at an RV repair facility that may or may not have the specific windshield that you need.
In the meantime, you’re grounded waiting for your part to arrive. One couple I met at a campground in North Dakota had a horrible experience with this exact scenario and they shared their experience with me while we were grilling some burgers and having a cocktail or two.
They got a larger stone chip in their windshield and it quickly began to spider crack outward. They knew that a DIY repair wasn’t possible because of the size of the damage, so they immediately looked online for the nearest RV repair center that could accommodate their needs. Since they were in a less populated area of our country, they had to drive over 12 hours to the nearest RV repair facility qualified to replace their windshield.
Once there, they were told that their particular motorhome windshield would need to be special ordered and it would take 5-7 days before it was delivered to the repair facility and then it was likely to take 2-5 business days to schedule an appointment for its installation. While these timelines were inconvenient and they had other travel plans, they decided to have their motorhome repaired as soon as possible from this facility and they stayed at a local campground until the RV repair facility called them to schedule the repair to their damaged windshield.
Once there, they were told to wait while their class A motorhome windshield was replaced. Five hours later, a technician from the shop came out and informed them that the windshield they ordered was not the right windshield and it would be another 5-7 days before their rig would be on the road again.
Now their RV is missing was windshield and they couldn’t stay in it. Instead. They stayed at a local motel for the next six days waiting for the proper windshield to be delivered and installed.
Repairing the stone chip
Depending upon the location on your windshield where the damage has occurred, for most motorhomes, it’s likely that you’ll need a ladder for this repair. Once you have set up your ladder, be sure to clean the surface with a damp cloth being careful not to get any moisture into the chipped area.
Next, you should use an awl to gently remove any remaining glass particles that may still be loose in the chip. This is done so that the resin can adhere within the chip to a solid surface free of any dirt or glass fragments that may hinder its adhesion.
- Simple and Easy to use
- Cost Effective Repairs
- Prevents damage spread
Last update on 2025-06-17 / Affiliate links / Images from Amazon Product Advertising API
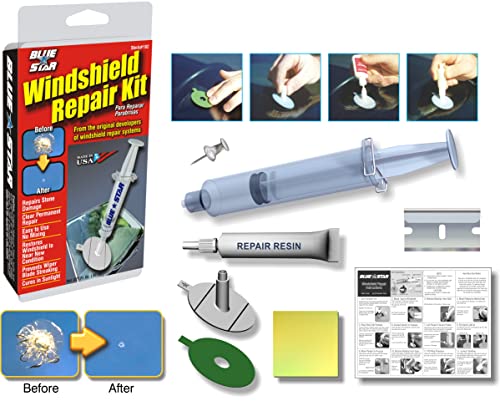
Now you’ll need to get out your repair kit to begin this fix. In your kit, you’ll find a small adhesive pad that has a hole in the middle of it and a tab at its top. Peel away the backing paper and carefully position the hole in the pad over your chip. Remember to position the tab so it’s facing upward. Now remove the other backing paper to expose the adhesive liner so that the applicator tool will stay in place. You’ll see this part also has a tab on it and that should be properly aligned with the one on your pad. Press the applicator onto the pad. Now you’re ready to begin the resining process.
To start this process, open the tube of resin and place the nozzle into the applicator tube and slowly squeeze the resin into this tube. Always be sure to check the product directions as to how much resin to add to the tube. Once you have done this, take your injector out and place it into the applicator tub until it snaps into position. Now, holding the injector with one hand, use your other hand to pull the plunger all the way out until it locks in place. This needs to sit for 10 minutes until we begin the next process.
After your ten-minute break, remove the injector just enough to let in a little air and then snap it back in place. Now push the plunger down until it’s too stiff to go much further. After you’ve done this step, you’ll need to let this sit for 20 minutes.
After 20 minutes, remove the plunger and set that aside. Now take a razor blade around the edges of the pad to work it free from the glass. Don’t be surprised if some uncured resin drips out of the tube, that’s perfectly normal, so just have your paper towel or soft cloth handy to wipe it up.
The final step is applying the curing pad supplied in your kit. First, put a couple of drops of on your repair and on the pad. Place the pad over the repair and smooth out any air bubbles. This part of the curing process will need to sit for one hour.
However, if it’s warm outside, and you are in direct sunlight, the ultraviolet rays of the sunlight will shorten this last step to less than an hour, though it’s probably in your best interest to wait the recommend curing time in the manufacturer’s directions.
Now that you’ve let the chip cure for an hour, use your razor blade to remove the pad then wipe away any excess resin. You may see a small pit or two in the repair, and you can repeat the process if this really bothers you, but if you did this inside, I would wait until warmer weather and direct sunlight to repeat this task. The main and most aspect of this repair was filling that chip and stopping it from spider cracking across your windshield which would require a new and costly windshield installation.
I hope this guide was useful to you, and if you need more maintenance advice, read my guide on maintaining your RV’s most important components. As always folks, happy RVing and I hope to see you out on the road someday.