Hey! This site is reader-supported and we earn commissions if you purchase products from retailers after clicking on a link from our site.
As a rule, you’re unlikely to encounter many problems with your RV’s water system, especially if you are a part time RVer. However, full-time RV users may have some issues during their travels simply because they are on the move more often than part-timers which put their systems at more of a stress.
In this article, I’ll share some of my preventative maintenance tasks when dealing with RV water systems and why you should do these tasks too. We’ll also look at how often these tasks should be done, and the signs to look for when your system needs some care.
Understanding your RV water system and components
Most RV water systems operate the same way and with the same components. Let’s begin by reviewing those components.
- Water fill valve: Usually located on the driver’s side of your RV, this is where you hook your hose up to a well or city water if you’re are camping at a place that has hook-ups. It is also where you fill your fresh-water tank before you do any self-contained camping.
- Fresh Water Tank: A holding tank for water use while camping.
- 12-Volt Water Pump: This is used to distribute your water throughout your RV when dry camping. It is not needed if you are hooked up to a continuous water source.
- Water Heater: Used to heat your water for bathing and cleaning. These can be either powered by electric or propane.
- Kitchen Sink, Bathroom Sink and Shower: Used for bathing and cleaning. Some rigs may also have an outdoor shower too.
- Toilet
- Gray Water Holding Tank: This tank holds your wastewater from sinks and the shower.
- Black Water Holding Tank: This tank holds raw sewage.
For a full breakdown, make sure to read my guide on understanding your RV water system.
Water pump maintenance and troubleshooting
Because most manufactured RVs are designed to be self-contained, they are equipped with a 12-volt pump to distribute water throughout the water system.

- Product Standard: UL778 & CSA22.2 Certified
- Performance: Self-Priming up to 9.5 feet.
- Specification: 115V AC Current Draw, 4 GPM Flow Capacity, 1.3Amps.
Last update on 2025-06-18 / Affiliate links / Images from Amazon Product Advertising API
When turned on, this pump should run when water is being disbursed. If it periodically runs when water is not being disbursed then it’s likely that you are losing water pressure somewhere in your system, so check for leaks.
Also, according to RV pump manufacturers, scale buildup caused by minerals in the water can accumulate within your pump’s diaphragm as well as your system’s lines and this is the number one cause for a water pump failure. With that said, be sure to regularly clean the trap and screen located just before your water supply enters the pump, and prime your RV water pump if it’s a new one.
To do this, turn off your water supply to your RV and be sure your pump is not turned on. Next, open a faucet to relieve any water pressure. Now, disconnect your incoming water line and then remove your trap and screen. Once you have done this, use a small brush to thoroughly clean the screen and the valve. The next step is to completely sanitize your water system.
Cleaning and sanitizing your RV water system
When sanitizing your RV’s water system, start by draining your system completely. To do this, I recommend taking your RV to a dump station or to a campground will full hookups. This will allow you to clean your black water tank at the same time which we’ll discuss later in this article.
While there are numerous cleaners and sanitizers on the market and in camping supply stores, I prefer to use common bleach. The trick to using bleach is knowing the correct amount of the solution to use in terms of the amount of water your RV’s freshwater system holds. As a rule, you should plan on using one cup of bleach per 10 gallons of water. So if you have a 50-gallon tank, you’ll need five cups of bleach. However, I usually add extra cup because my water heater holds an added five gallons as does my water lines.
First, pour the correct amount of bleach into your system. This can be easily done by poring your bleach into the inlet using a small hose and funnel. However, if your RV has a city water fill valve, putting the bleach into your system can be a bit more challenging.
You can use a small bucket of water with your bleach solution and using a small electric pump and two short hoses to pump that mixture into your tank. Another solution to this problem is to hook up your hose to the RV like you would normally do when filling up your tank, then pour your bleach into the hose before you connect it to he water supply.
Now fill your tank as normal and be sure to open a valve on each sink in your RV and the shower. Once you have blown the air out of your lines and water is flowing normally, turn the valves off. Now set your system sit for 24-hours to properly sanitize your system.
After you have waited the proper amount of time, drain your system until your gray water tank is filled and let that sit for a few hours to remove any odors that tank may be holding as well. Once you have completed this task, completely drain your system. Now you’re ready to fill your system again. If you taste chlorine in the water, drain your system and refill. Repeat this process until you can no longer taste the chlorine.
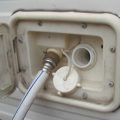
Black water tank cleaning and troubleshooting
To clean your black water tank, I recommend using a high-pressure waterpower wand for this task. First drain your tank, then insert the wand through your toilet and then rotate around to remove any waste particles that may be remaining in the tank.
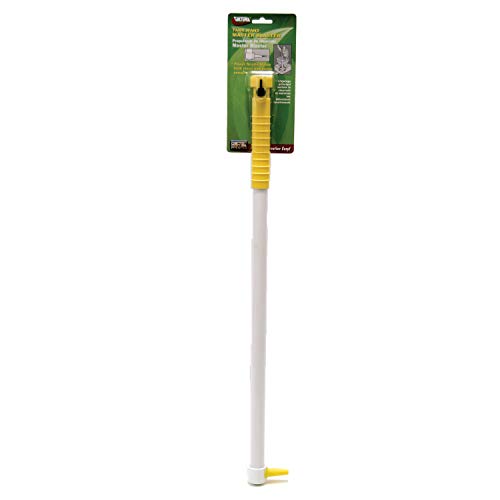
- Package Dimensions: 27 L x 2 H x 3.75 W (inches).Fit Type: Universal Fit
- Package Weight: 0.5 pounds
- Country of Origin : Mexico
Last update on 2025-06-18 / Affiliate links / Images from Amazon Product Advertising API
Now that you have thoroughly flushed the black tank, close the drain valve and fill it up with water too. Next, pour in a couple of cups of bleach and let this sit for several hours too. This should help to remove any residual odors remaining in the black tank. After this, drain your black tank as you would normally, and you have successfully sanitized your system.
Some other things to check in your system for potential problems
Be sure to check all your lines and their respective fitting for any leaks. You should also check faucets for this issue too. It’s also a good idea to troubleshoot your water heater as well. And finally, get under your RV and visually inspect your tanks. Do you see any cracks or holes in them? If they’re held in place by straps, how do they look? Are they in place and free of excess corrosion? If they’re not, consider replacing them too.
Final thoughts
Maintaining your water system is crucial to avoiding any problems while you’re on the road. No one likes unexpected problems while traveling, especially if they’re likely to spoil your trip. As always, my friends, stay safe, stay healthy and enjoy your trip!