Hey! This site is reader-supported and we earn commissions if you purchase products from retailers after clicking on a link from our site.
In this tutorial, we’re going to be wiring the inside of your teardrop camper’s living space with 12-volt wiring for low voltage lighting and we’ll also be installing a line of 110-volt to be used when you are hooked to shore power or an alternative source of electric such as solar power.
We’ll also look at where you should locate these components to best conserve space in your camper as well as certain safety protocols you should follow when wiring your camper.
If your trailer frame tongue is long enough, I would highly encourage you to a build a box to house your electrical system’s components in this area. This box will save space in your interior, and it will keep those components away from your living space.
First, let’s take a look at the battery and other materials you need.
Equipment and Materials
While I would recommend using a deep cycle marine battery for this build, it’s important to note that if you choose to use a battery that’s a lead cell, and needs to be maintained by adding distilled water on occasion, that battery should be located outside of your living space as they will emit toxic gases.
For that reason, I would recommend a battery such as the Renogy 12V 100Ah rechargeable deep cycle pure gel battery which can be used outside of your build or within it as well.

- Connects an aftermarket stereo to the factory amplified system
- Not Compatible with non-amplified factory systems
- Direct Connection to the factory harness without cutting any wires
Last update on 2025-06-18 / Affiliate links / Images from Amazon Product Advertising API
These batteries, while being a bit more expensive than the standard deep cycle marine batteries routinely sold at big box discount stores, are well worth the added expense. Most of them come with a 10-year warranty and they are far better than an average deep cycle marine battery that you would use to power a trolling motor while you’re fishing for perch or walleye.
The best feature of this battery is that you can drain the power out of it much lower than other batteries and it will recharge with no problems. Many batteries don’t do that and once you have drained the power out of them, they become almost useless as they won’t fully recharge again.
Related: Best RV deep cycle batteries
Now that you’ve chosen your battery, you’ll need a charge converter and I would recommend the 45-amp Progressive Dynamics PD9245CV Inteli-Power 9200 series converter charger with charge wizard. What this device does is to convert a 110/120-volt power source into a 12-volt electrical system. It’s also called a charge wizard which means that it will start working when it needs to as well as stop working as needed so it won’t overload your battery. Some converters don’t have this feature and you must remember to turn them off and on which can become problematic if you forget to check your power supply from time to time.

- Includes built-in Charge Wizard
- Reverse battery protection prevents damage from improper battery lead connection
- Filtered DC power delivery provides safe and reliable service
Last update on 2025-06-18 / Affiliate links / Images from Amazon Product Advertising API
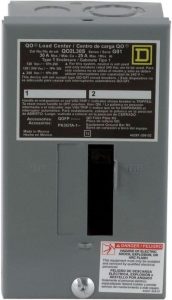
Next, you’ll need a fuse block or distribution panel and the Parallax power supply FB9 fuse block is a good choice for this component. This particular model shown here will handle up to nine circuits, which for this teardrop build will be more than enough to handle all your needs.

Last update on 2025-06-18 / Affiliate links / Images from Amazon Product Advertising API
You’re going to also need fuses to fit that distribution box and I would consider purchasing a set of fuses such as these. While this set may be more than you need for this build, it’s always a good idea to always have extra fuses on hand in case you blow one in your camper or tow vehicle, especially if you are boondocking off grid where a replacement fuses may be hard to find.
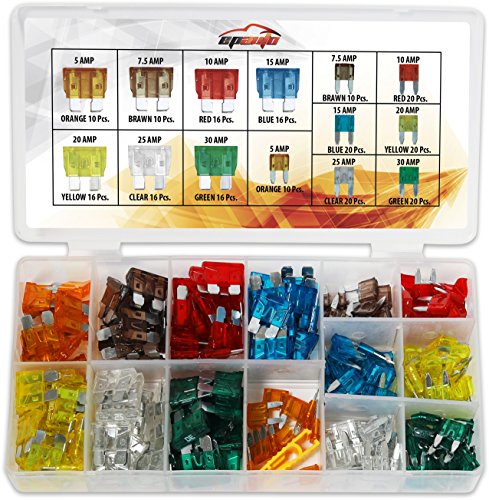
- Easy Identification - Color Coded
- Seven most common fuses - 5, 7.5, 10, 15, 20, 25, 30 AMP
- Fuse Puler Included
Last update on 2025-06-18 / Affiliate links / Images from Amazon Product Advertising API
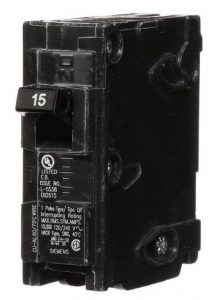
Since most are RVs are based upon a 15, 30 or 50-watt system, in this build we’ll be looking at designing your system based upon 30 watts.
For this system, you’ll need a 30-amp distribution box and two 15-amp poles better known as breaker switches. This part of the design will handle your 110/120-volt loads to supply power for kitchen appliances or lighting via shore supply or alternative power supplies such as solar panels as part of your RV electrical system.
In the system we’re installing here, the loads leaving the distribution box will be designed to power any 110/120-volt line that will power your outlets in the interior of your camper. These can include small lamps, exterior lighting, refrigeration, air conditioning, a television or even a heating supply such as an electrical furnace. As a rule, this system is designed to operate from an off-shore power supply and if you intend to boondock using many of these components then you will probably have to upgrade your system to include multiple batteries and power sources such as solar panels.
That said, you’re also going to need a few 110/120-volts plug sockets and switches as well as the appropriate wiring. Since the walls of your teardrop are not the standard size of most home construction projects, you’ll need to shop around and purchase these receptacles that are suitable for RV installation and it’s likely you’ll find them more easily at camping and RV supply outlets as opposed to the big box stores which are geared more toward brick and sticks home improvement as opposed to those of us that travel over the road.
You will also need to understand the appropriate wiring to handle your electrical wiring for the 12-volt system and the 110/120-volt system and you’ll need to understand how to tie the two systems together so you can best optimize harvesting electric as you travel with your teardrop build.
All of this can be confusing, and it took me a long time to get a handle on some of these concepts. Next, I’ll walk you through the wiring process for off-shore power and power using your 12-volt system. We’ll look at how these two systems can work efficiently and coherently with each together and we’ll begin the process of wiring them together. Let’s dive in.
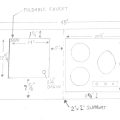
Setting Up Your Box
As I said before, I highly recommend that you build a box that is permanently attached to the tongue of your trailer to hold your electrical power components. This box doesn’t have to be anything too elaborate and if you’re able to build this camper then should be able to design a simple wooden box capable of holding your electrical systems control center without much effort. However, it’s important to note that when you do design this box, you should have the top beveled to drain any rain water, snow buildup or even dew off it’s top to prevent any water from coming inside during inclement weather or while traveling down the road.
It is equally important though, to install a couple of small vents on the sides of the box that will allow for any excess heat or gasses from any batteries or the converter to be properly released. This will ensure that there isn’t any excess heat or a toxic gas buildup which could cause a fire. I would also recommend that the top of the box be hinged, and you may even consider installing an access door on the front of the power box that will make it easier to replace fuses or other components if that is needed.
However, if you should decide to locate your power center within the living space of your camper or in the cooking area, it should still be vented for the same reasons.
Let’s Start Wiring
The first thing you should start with here is locating where your battery or batteries should be installed within your power supply box. I would recommend that you locate it or them next to each other on the driver’s side of the box and nearest to the tow vehicle. You should also consider using your table saw to create a few 1” x 1” furring strips and either nail or staple them to the floor of the box around your battery or batteries once you have decided where to permanently locate them. This will prevent them from sliding around or shifting while you’re on the move and it will ultimately prevent them from falling over or worse yet, shorting out your entire electrical system.
Now that you have done this, you’ll need to mount your distribution box, as well as the converter and inverter boxes. Always keep in mind that these outlets need to be readily accessible should you need to change a fuse, breaker or any other type of routine or unexpected maintenance that may occur during your travels. That said, it’s very important that you have access to these components where you can manually remove and replace them, or you can use the necessary tools required to get the job done.
Installing Shore Power
If you’re traveling around and staying in campgrounds or even with friends that are letting you stay at their home, you’re going to need shore power. While I originally designed this build with the idea that the shore power should be located toward the rear of the teardrop so as to provide easy access to your refrigeration or lighting in that part of the build, it’s important to note that it might be in your best interest to install that power source closer to the front of your build and within your power box. This will help to conserve on some wiring.

- SAFE & DURABLE: Constructed with high-quality marine-grade materials the unique and industry-first...
- QUICK INSTALLATION: Threaded strain relief makes installation faster and easier while pulling the...
- HIGHEST SAFETY STANDARDS: Designed and tested to meet rigorous global industry standards including...
Last update on 2025-06-18 / Affiliate links / Images from Amazon Product Advertising API
The first component you’ll need for shore power is a 30 amp 125-volt, shore power inlet such as the one shown here. I recommend buying the marine grade version as it has a gasket that will prevent water from leaking into your electrical access box.
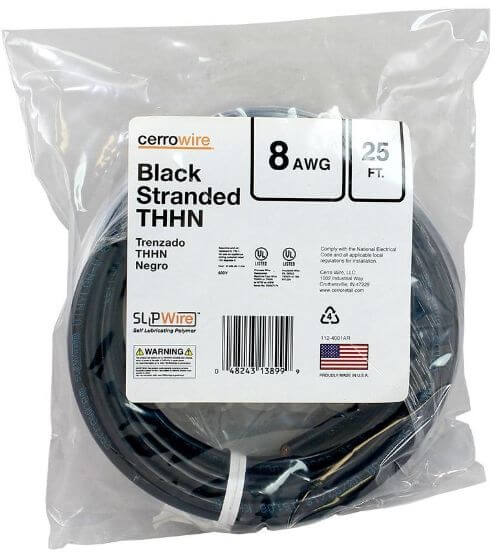
You’ll also need some #8 wire. Specifically, you’ll need this wire to be in black, white and green as those are the three terminal specifications for this power inlet.
Next, you’ll need to dismantle your inlet to give you access to the wiring terminals. This is a simple step and you should follow the directions on the packaging of that component as to how to properly prepare it to be wired.
Once you have prepared the inlet to be wired, you’ll see that there are three terminals that are each marked with the color of the wire that needs to be connected to them. The next step here, is to take your wire strippers and clear off approximately 5/8” of an inch of the plastic wire coating on each one of the three color-coded wires.
Now that you have done this, insert each wire into their color-coded slot and then tighten down the set screws to secure them in place. While the directions to this inlet component recommends that you torque the set screw in place, and that’s not necessary. My best advice here is to simply tighten down the set screw until the wire cannot be easily pulled out of its terminal and you’ll be within the manufacturer’s recommended requirements.
Run Wires to Your AC Distribution Box
After you have completed this step, the next thing to do is to run these wires to your AC distribution box. At this point you should have located an appropriate place to mount your AC breaker box and you’ll be running these power supply wires through the bottom of the box to their appropriate terminals. You’ll notice that that there are several knockouts on the box, and you’ll need to knock out at least three of them to run your Romex wire through them. You can do this by taking your wire cutters or “dikes” and hitting the partially pre-cut opening which will break them loose. Now you’ll need to put a knockout receptacle with its nut in place to hold the it tight. This will prevent the wires from moving and prevent any friction on the plastic coating which could eventually cause a short. Once you have done this the last step will be to in install a Romex clamp as well.
Connect Your Breaker Blocks
The next thing you’ll want to do is to create a small jumper wire that will connect your two breaker blocks. This is installed using your #8 black wire and it will connect the breakers to provide a continuous supply of power into your loads. This small line will be located at the bottom of your breaker switches and you’ll see a couple of terminals like the ones in your inlet fixture. Install this line just as you did before and then start installing your three lines to the AC distribution box.
On a standard 30-amp distribution box, in the upper left of the box you’ll see a series of terminals. The first thing you need to do now is to strip your white wire end and secure it to the terminal furthest to the left just like you did when you secured the inlet wiring. This is called a neutral bus bar.
Now that you have done this, the next step is to take your black wire and repeat the process except that you’ll be connecting this wire into the bottom of the left breaker terminal in the same terminal as your jumper wire. Secure that wire down tightly just as you have done before and then will move on to the green wire.
Preventing Unintentional Grounding
The next step is to install your green wire which is known as a chassis ground wire. This prevents unintentional grounding and you will need to install an inexpensive bus bar designed for this. In fact, your distribution box is set up for this component and you’ll see that as you continue with the installation. Once you have that part installed, you’ll want to connect the green wire into that terminal, and this will secure your shore power into the distribution box. I recommend securing this wire near the bottom of that bus bar. This will help to prevent friction of that wiring as your traveling and any bare spots in your wiring which could result in a short.
Now that you have installed this part of your shore power installation, our next step is tying those loads into your AC and DC electrical systems. Nex, I’ll show you how to properly install your electrical system, how to tie those systems together, and the only way to wire them.
Installing the Electrical System
Alright, let’s start tying your shore power into the DC and AC power systems. We’ll also begin the process of wiring your teardrop camper with the appropriate outlets that you’ll need for extra accessories such as refrigeration, lamps or cell phone and other electronic device chargers.
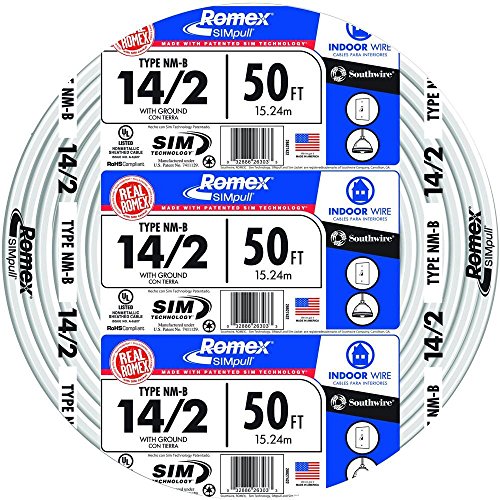
Now that we’ve got power supplied to your distribution box, we’ll need to distribute that electric through power lines known as loads. To do this, you will need an electrical line known as a 14/2 solid Romex. Romex is the manufacturer’s name and 14/2 refers to the gauge of the wire and the number of induvial wires contained within its protective covering. This can be confusing, because while there are two wires encased in this combined wire dedicated to the distribution of the power and its return, there will be a third wire that is not color-coded and that is dedicated to grounding the circuit.
- Coated in patented SIMpull Cable Jacket for easier pulling, stripping, and installation
- Romex Type NM-B Copper Building Wire is commonly applied in residential building wiring as a branch...
- Installation above ground and in dry locations only
Last update on 2025-06-18 / Affiliate links / Images from Amazon Product Advertising API
While 14/2 wire works well with your camper’s 30-amp electric system, if you plan on wiring in a refrigerator based upon 110-volts, it might be wise to install a 12/2 wire to this outlet because this type of appliance tends to run longer and pull more load continuously which in fact could cause a blown breaker or worse yet, overheating and causing a fire. I would highly recommend that you do some research about the refrigerator you plan to install prior to wiring your camper and then pick a model that will be appropriate to handle the load that it will require once it’s in service.
Let’s wire our interior outlets
For this trailer, I intend to run one-line of 14/2 Romex wire to handle load going to three 110-volt outlets with one being in the electrical box and the other two located along the passenger side of the trailer. The other line of Romex will be 12/2 and this will supply load to an outlet in the hatch dedicated for powering a microwave and refrigerator and another outlet that will also be located on the passenger side wall but will be used for outside access. Both lines are what is referred to as cascaded and I will explain that later in this tutorial.
However, before we install your first Romex line, we’re going to install a frame ground wire from the AC box to your trailer frame. You’ll need to attach this directly to the frame of your camper and if you have a metal skin attach this lug so that one side meets the skin of the camper and the other side makes contact to the frame. For this task you will need a 5/32” allen wrench and I recommend that you have one longer than the normal size as you’ll need that extra length later when you wire the power converter.
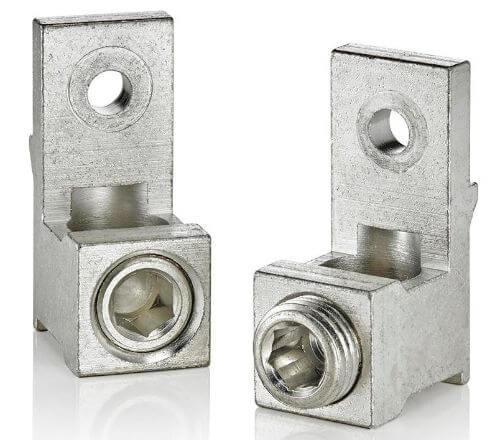
Once you have determined a location for the grounding lug, firmly attach it to the frame and installing this wire is a very simple step. You’ll need to strip the ends of a piece of green #10 wire and attach one end to the bus bar in your box and the other end to the ground lug by tightening down the allen screw.
With that task completed, now is the time to prepare your 110-volt distribution box. If you haven’t already, you’ll need to knock out at least two more openings (three total) which will be for the two load lines. Next, you’ll need to lay out your Romex wire down on a flat surface and using a utility knife, carefully cut that cover and then pull the protective covering back to expose those three #14 wires within the individual Romex wire. Once you’ve done this, you’ll need to remove the plastic coating from your power supply line and the return line as well as the single copper line that’s encased in paper and acts as your grounding line. Now you’ll need to strip the plastic coating from the black and white wires just like you did when you initially installed the wire for your power supply. Strip each of them back approximately a half-inch to 5/8 of an inch just as you did before.
Next, take your bare copper wire and secure it to the bus bar. Then we’ll connect the white line to a lug on the same bar as you did before. You can attach multiple lines into these lugs, but since we’re only installing two lines or loads to these breakers then you should just use the lugs provided. Then take your black line and attach it to the breaker. The breaker will have a nut where the wire should be inserted and just below that will be a small hole. Insert that wire there and then tighten down that nut. Now you have supplied power to that breaker and the load to the first of the two AC lines.
Wiring your AC loads to the electrical center and the interior of your camper
Now we’re ready to wire the first of the three outlets on your Romex 14/2 line. The first outlet will be located in your electrical supply box and this will be used to power your Inteli-power converter box which will convert your 110-volt electricity to 12-volt loads used to supply your interior lighting and whatever else you need to wire to that circuit. In this build, I intend to install two interior lights within the camper, one light in the hatch area to illuminate that area should you need to access it for cooking after a long day of hiking or fishing, another light outside of the door to the camper and finally the exhaust fan.
For this step, you’ll need a standard 110-volt outlet and a box to mount it into. I recommend using plastic outlet boxes as that will avoid having to add an additional grounding wire that is necessary when using steel outlet boxes.
Take the other end of this Romex 14/2 line and strip the black and white wires to connect it to the outlet receptacle. Just like you did for the AC distribution box, you’ll also need to install Romex clamps to keep the line snug and in place, just remember to run that line through the box before you connect it to the outlet.
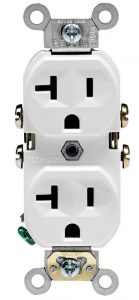
As you can see, there are a set of gold screws on one side of this power receptacle and a silver set of screws on the opposite side. There is also a green screw, which I will address later in this tutorial. For now, we’re just going to focus on the gold and silver screws.
In this type of wiring, your black wire is the hot wire. This means that the black wire will always connect to the colored terminal. In this case it means connecting to the gold side of the outlet. You can connect the hot (black) and neutral (white) lines one of two ways as the backside of the receptacle will have holes that you can slide the wires into just like you have done with the bus bar and other receptacles inside your distribution box. However, I prefer not to use those terminals because over time and the vibrations of traveling, if these were to become loose or disconnected, I would have to pull the receptacle out of the box to inspect it. Instead, I always prefer to use the screw terminals on the sides of the receptacle because it’s much easier to see a problem with a connection to those terminals than it is to see one if it were on the underside of the receptacle.
Once you have completed this step, you are ready to connect your bare copper wire. If this were the end of that power run, you would wrap a twist of that wire down on the green screw and tighten it accordingly. This would complete that circuit. However, we’re not going to do that. Instead, we’re going to add two more 110-volt outlets in the interior to this load by cascading or ganging this line.
In the final part of our electrical tutorial, I’ll walk you through how to cascade your AC power loads, how to connect your 12-volt power converter to the battery and how to wire your interior lights and other 12-volt needs through you DC distribution box.
Cascading Your AC Power Outlets & Wiring Your DC Power
Okay, we successfully wired the first of the three outlets that are designed to deliver a 110-volt electrical load to the first of three electrical outlets on the 14/2 Romex line. Now, we’re going to gang or cascade that load to the other two interior boxes within your teardrop. Then we’ll be repeating that same process for you 12/2 Romex line, and finally we’ll be installing your 12-volt power system.
If you remember, in the last section, we wired our black (hot) wire to the colored terminal and the white (neutral) wire to the silver terminal, which left us with one unused terminal on each side. These unused terminals are what we are going to use to cascade or gang other outlets to further down the line.
First, you’ll start by stripping the 14/2 Romex wire just as you did when you installed the first outlet. Then you’ll connect the hot wire (black) to the colored terminal and the neutral wire (white) to the silver terminal.
Now that you have connected the hot and neutral wires to the proper terminals, you’ll need to continue the ground wire (bare copper) to the next outlet. For this, you’ll need a barrel connector which can be easily found from Ace Hardware.
Slide both copper wires into the barrel making sure to leave an inch or so on each wire. Now tighten down the barrel with a crimping tool, a pair of pliers or even a wire stripping tool that has the appropriate setting located on the top of the tool. At this point, the circuit is complete and you’re ready to move on after you connect one of the copper wires ends onto the green screw. Repeat this process for each outlet.
The next step is wiring the two outlets within the interior that are in line with this load. If you haven’t already, you should lay out how you want to run your wiring through the walls and ceiling stud work as well as connecting to the electrical box. Always make certain to measure the distances between outlets to keep from wasting material and keep in mind that you may have to wire above, under or around an object such as a window, door or vent. I recommend drilling ¾” holes through your studwork to allow you to wire the 14/2 Romex and the 12/2 Romex wire to where they are designed to end.
Once you have cascaded or ganged all the outlets for this 14/2 Romex line, you’ll want to end the circuit, it’s at this point when you connect the bare copper wire to the green screw. This will ground the line and complete the circuit.
Now that you have done this, repeat the process with your 12/2 Romex wire. However, on this line I would highly recommend installing an outlet with an inline breaker.
Since this outlet will be in your kitchen hatch area, there is always a possibility of moisture from your sink area or the possibility that having a refrigerator or microwave and other appliances all drawing electric at the same that your circuit could overload.
Should too much moisture or an overload occur, this outlet has its own breaker which will automatically trip and stop the flow of electricity until the problem is resolved. These outlets are wired the same way as the others and they can be cascaded too.
Remember, this line will also include an outlet that will only be accessed from the outside so you will to have a suitable outdoor cover on that outlet such as this one that is available from Home Depot.
Now that you have completed your AC systems wiring, install both breakers and plug in your shore power. If you don’t have 30-amp outlet to plug into, you can purchase an adapter (which you should have anyway) that will allow you to access 110-volt. Now turn on the breakers and if they don’t trip or you smell smoke, you’re good to go. Check each outlet for power too.
Now, let’s start wiring your 12-volt system
In the next part of this tutorial we’ll install the wiring for your 12-volt system and this will include two interior lights, one exterior light by the door, one light in the hatch area and one light in your electrical control box should you need to access that area during the night. We’ll also run a line to your exhaust vent to keep the fresh air running through your teardrop camper.
But first, we’re going to supply power to your DC power distribution box from your battery through the Inteli-power converter box. By now, you should have already laid out where you planned to locate theses components and for the purposes of this lesson, I’m going to assume that you have.
The first thing you need to do in this part of the installation, is to establish a load line from the converter to the distribution box.
Since you’ve already done this with the AC line from your shore power, now you’ll need to convert that power into electric that will supply power to your lower voltage lights, and other power outlets on your 12-volt system. As you can see here, there are terminals for positive and negative located on the lower right bottom of the Inteli-power converter box.
At this point, we’re going to use those terminals to supply power to the 12-volt electrical distribution box.
At this point, as we transition from an alternating current (AC) system to a 12-volt direct current (DC) power supply, our white power line will shift from being a neutral line, to becoming a negative supply line and the black line that was positive when we wired the AC loads, will remain the same.
With that in mind, you’ll want to prepare a white wire and a black wire to transfer the power from your converter to your 12-volt distribution box.
Install the first line (white) from the negative terminal on the Inteli-power converter box to one of the terminals on the the silver bus bar shown here at the top of the distribution box. Now take your black wire and connect that from the terminal on the converter into one of the largeer sqaure lugs on the distribution box. This step has supplied power to the 12-volt system using shore power.
The next step is to supply power using your battery. This step is essentially the same as we did in the last step, except that we’ll be using barrel connectors for the battery terminals and we’ll run the positive wire through an inline breaker to prevent an overload. Once you have done this step, you’ll wire it exactly as you did before and your 12-volt system will be ready to wire for fixtures.
Now, you may notice at this point that one of your incoming power lugs is not in use. This is the lug you want to use for that extra wire that we discussed in the first tutorial of wiring your trailer for travel. In other words, this is the terminal that you’ll want to use with the extra wire from your wiring harness attached to your tow vehicle. Once attached, it will charge your 12-volt system while traveling through your tow vehicle.
Wiring your 12-volt lights and other accessories
Wiring this part of your system is far more easier than the AC system. You’ll have a positive line and and negative line. You won’t be cascading outlets and each light or outlet will be wired individually. Basically, wire the positive load from the distribution box to the positive terminal in the outlet and then return the load to the distribution box by way of the negative load.
Electrical wiring can be confusing, but once you understand the concepts, it’s easier than what you anticipate. With that said, if you are apprehensive or unsure of your abilities to wire your teardrop build, then you should consult a professional electrician to guide you through this process of the build. Should you choose that option, you can cut costs by purchasing many of the items listed in these tutorials and let the electrician you hire install them as needed.
As always my friends…thanks for following along and this will be the last of the tutorials about wiring your camper. May God bless you all and I truly appreciate your devotion and dedication to this site and myself.