Hey! This site is reader-supported and we earn commissions if you purchase products from retailers after clicking on a link from our site.
Making Your Own Teardrop Trailer Plans
An excellent way to travel with a small towable RV is to consider designing and building a camper known as a teardrop. Pre-made, these types of teardrop campers can cost anywhere from $10,000 to over $15,000 depending upon the accessories and its overall length, height and weight.
The teardrop camper is lightweight and will accommodate up-to two people very easily. Its aerodynamic design and low weight allow it to flow behind most vehicles with little resistance and there are even some people that have designed much smaller versions of teardrops that they tow with motorcycles. That said, building one from scratch is an option that can save you thousands of dollars.
While your own teardrop camper has its advantages, it has some disadvantages as well. Most are not designed to stand upright in them, they have limited storage space and much of your cooking will be done out of the rear hatch and that means weather can be a factor when preparing a meal.
As for living full-time out of a teardrop, this could be quite challenging, but I have seen it done before. However, most people that I have encountered using them did so for short road trips and weekend camping trips and they seem to be very popular with single travelers and especially hunters, fishermen and other sports enthusiasts.
In this series of articles, I will share some design tips and building instructions for creating your very own homemade teardrop camper suitable for a beginner or intermediate RVer or handyman. We’ll go over everything from design schematics to how to do all the woodworking, wiring, and everything in between. Since these types of RVs are small, I will stick to the basics and we’ll leave advanced items such as solar power for another article later.
Steps to Build a DIY Teardrop Trailer
- Choosing the right trailer
- Decking your trailer
- Designing and building your walls
- Framing your walls
- Building the frame for your hatch area
- Designing your hatch gussets
- Framing your hatch door
- Skinning your hatch door
- Skinning your roof
- Wiring your trailer navigational lighting
- Wiring your living space
- Sealing and finishing your woodwork
First up, let’s make sure you choose the right teardrop trailer.
Choose the Right Trailer
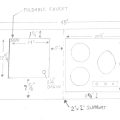
For the first part of this project, you’re going to need a basic trailer frame and a general idea of the length of your homemade teardrop camper. For example, you may decide that a 4’x8’ teardrop trailer will work best for you, or you may decide that a 4’x10’ trailer would be a better fit.
Having a trailer frame that is a bit longer will allow you to move the house structure toward the rear leaving you an area of two feet in the forward section of the house for a small storage compartment suitable for houses a small propane tank or a fresh water tank. However, for this tutorial I will concentrate on showing you some tips on designing and building a traditional 4’x8’.
You can shop around for a new teardrop trailer , but you should know that some companies such as Harbor Freight will require you to assemble them at home. As a rule, this also applies when ordering them online and shipping charges will be applied.
For example, this model from Harbor Freight trailer sells for approximately $450 and is available for in-store pickup only. However, several online companies sell models very similar to this model at the same price but with shipping charges well over $200.
Another thing to consider when purchasing a DIY teardrop trailer model is whether you have the tools required to assemble it per the manufacturer’s requirements. This model is equipped with all the hardware included, but it is all based upon the metric system, so you will need to have a metric socket and wrench set on hand if you plan on building it at home.
The ease of building this base DIY travel trailer is something you should also consider before you purchase a DIY trailer from a discount retailer. While most of these manufacturers describe their DIY teardrop trailers as “easily assembled”, that is not necessarily the case.
Related: RV Toolkit Essentials
Most reviewers of these 4’x8’ DIY teardrop trailer frames all say that they are difficult to build without additional help, and most folks say that they spend at least one full day of their teardrop build assembling their frame. Would I choose to buy a pre-built frame and assemble it myself? No, I would look for other options.
Other Options for Your DIY Teardrop Camper Trailer
Buying a brand-new teardrop trailer is always an option for those that don’t have the time or interest in building one from a kit such as those available at large box stores including Lowe’s or Home Depot. This is also a good option for buyers looking for specific building materials or accessories included.
For example, you may be able to order a custom teardrop trailer with a treated ¾” deck saving you the time of having to design one yourself. Or you may want to have tongue jack already installed, so buying new is a good way to save time during your build-out.
Also, you are more likely to have a warranty included if you purchase a new teardrop trailer and for most people this adds to their peace of mind. However, it’s important to keep in mind that when ordering or purchasing a new teardrop trailer, especially with specific modifications, the price of your home-built teardrop will significantly increase.
Another good option for those looking to save money is to consider buying a used teardrop trailer. You can usually save a good deal of money if you shop around. Several years ago, I purchased a used utility teardrop trailer for $150 from a fellow who would come into my business occasionally for a drink after work. I told him to keep his ears open if he heard of someone selling a trailer and to my surprise, he had one that he wanted to get rid of that day.
I got lucky of course because I knew who I was purchasing that little teardrop trailer from and I knew he had taken good care of it and that it had the proper paperwork, which is something that is very important to have when buying a used vehicle, RV or trailer.
If you don’t know a person selling a teardrop trailer, try looking on social media sites such as Craigslist, Facebook Marketplace, or eBay. Local newspapers or sellers guide is another option when you’re in the market for a used trailer too.
In the next part of this series, we’ll begin the build of your DIY teardrop camper by installing the proper flooring and protection from road hazards and natural weather elements.
We’ll also go over a list of tools you will need for this phase of the build as well as an estimate of the time it may take to complete the flooring before you begin to build the framework and shell of your teardrop. As always folks, thanks for reading and I hope to see you on the road someday.