Hey! This site is reader-supported and we earn commissions if you purchase products from retailers after clicking on a link from our site.
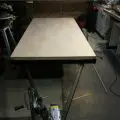
Now that we have framed in our walls for your sleeping and living area, we’re now going to concentrate on framing in the hatch area. We’re going to do this now to help with squaring your build as well as installing wiring before we seal up the inner walls which will leave us without access to work on the electrical system, which we will cover in another article.
You may remember that in the last part of this build, we had squared in our hatch wall so that is was recessed exactly 20 inches from the rear of your teardrop camper. In this lesson, we’re going to square in our outer hatch framing and prepare for the installation of our sink. We’ll also design an area for cold food storage and a stove top for cooking with a propane three burner system.
Table of Contents
- Timing & People Needs
- Materials You Need
- Tools You Need
- Cost of Building Your Hatch Area
- How To Build Your Hatch Area
Timing & People Needs
1-2 days. Building your hatch area involves several projects that not only incorporate the sink and countertop area, but also any other customizations your want to make to the interior frame. You also have to allow time for your glue to dry. Plan accordingly and block off a lot of time for this project.
2+ people needed. It’s helpful to have a partner to hold materials in place while you secure them and tackle the odds and ends of connecting everything.
Materials You Need
| Material | How Much You Need | Cost Range | Where to Get It |
|---|---|---|---|
| 1/2″ x 20″ x 48″ sanded plywood | 2 sheets | $$ | Home Depot |
| Construction adhesive | 1 case | $ | Home Depot |
| 2″ x 2″ boards | 8-10 | $ | Home Depot |
| Sink with fold down faucet and top | 1 | $$$ | Panther RV Products |
| 7-gallon water containers | 2 | $ | Amazon |
| 2″ drain for the sink | 1 | $ | Panther RV Products |
| Propane stove with fold down top | 1 | $$$ | Amazon |
| 12-volt water pump with switch | 1 | $ | Amazon |
| Screws | 1 box | $ | Home Depot |
| Caulk | 1 case | $ | Home Depot |
| ¾” water supply and drainage lines | 2 tubes | $ | Amazon |
| 1″ finishing nails | 1 small box | $ | Home Depot |
Tools You Need
| Tool | Cost Range | Where to Get It |
|---|---|---|
| Table saw | $$$ | Amazon |
| Jigsaw | $$ | Amazon |
| Power drill | $$ | Amazon |
| Sander | $$ | Amazon |
| Clamps | $ | Amazon |
| Hammer | $ | Amazon |
Cost of Building Your Hatch Area
The high cost of the pre-made sink and propane stove bring this project to almost $1,000. Make sure to budget accordingly.
How To Build Your Hatch Area
- Frame in your shelf
- Design your sink and stovetop
- Install your countertop
- Install your sink
- Install your stove
In this part of our build, we’re going to do what is commonly referred to as a “dry rough in”. In other words, we’re going to cut some components and not firmly attach them until we are satisfied that they will work for us. Once we have perfected or satisfied our cuts and framing, we’ll move on to securing those components permanently.
Framing in your shelf
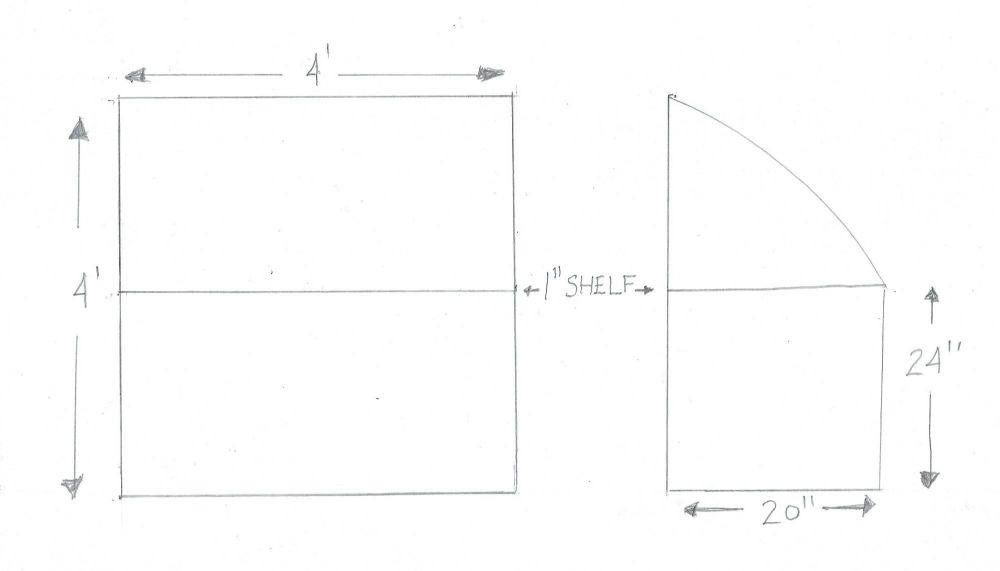
The first boards you should secure is the 2″ x 2″ board between your outer walls and your hatch wall. This board should be along the inner hatch wall and it should be secured first from the outer walls and later secured using 4-6 screws of appropriate lengths. This will serve as the base for your two sheets of 5/8″ that will be the platform for your sink and stove. You’ll also need to cut and install a 2″ x 2″ board on the outside platform that will support your sink and stove, as well as framing and squaring up your access to the water tanks and stove.
I recommend that you measure from the floor up 24″ and make a mark on the hatch wall as well as your side walls. Your 2″ x 2″ boards will be mounted below this mark. Be very careful when mounting this framework and make sure you have the right length screws to avoid them from going completely through your hatch wall or outer walls. You should be good using 1-¾” inch screws but be sure to sink them flush with your 2″ x 2″ board to avoid drilling through both boards.
It’s also a good idea to put in a few screws from the other side of your walls to secure the framework a little more tightly and to avoid to much torque on the inner screws. This can be done easily by measuring up 24-¾” and making a small mark for where your screw will go. By doing this you will be placing a screw directly on center of the board on the other side of the wall.
Now, you’ll want to measure, cut, and frame in some shorter pieces of 2″ x 2″ boards. I recommend placing these boards on your hatch wall at 12″ intervals on center. This means that your stud will be centered on that measurement. Since your exterior walls of your hatch only measure 20″, you should place your framework at 10″ on center for those two walls.
Now that you have almost completed the framework for your countertop, we’ll cut the sheets for this part of your stove and sink area. You’ll need to measure the distance between the inside of your walls as it will be just shy of 4′ wide. As with all cuts of wood, the boards you purchase pre-cut are never the measurement that they represent. For example, a 2″ x 2″ board measured correctly is 1-¾” x 1-¾”, so it’s very important that you make these measurements exact for your countertop to be secured correctly.
Once you have cut the first of your two boards for your countertop, lay it in place and make sure it fits correctly. If you’re satisfied with it’s fit, remove it and use it as a template for cutting the top board. Again, lay this board and the other board in place and make sure you are satisfied with their fit. Once you have that task squared away and you’re satisfied with the fit, the next step will be fitting in your stove and sink.
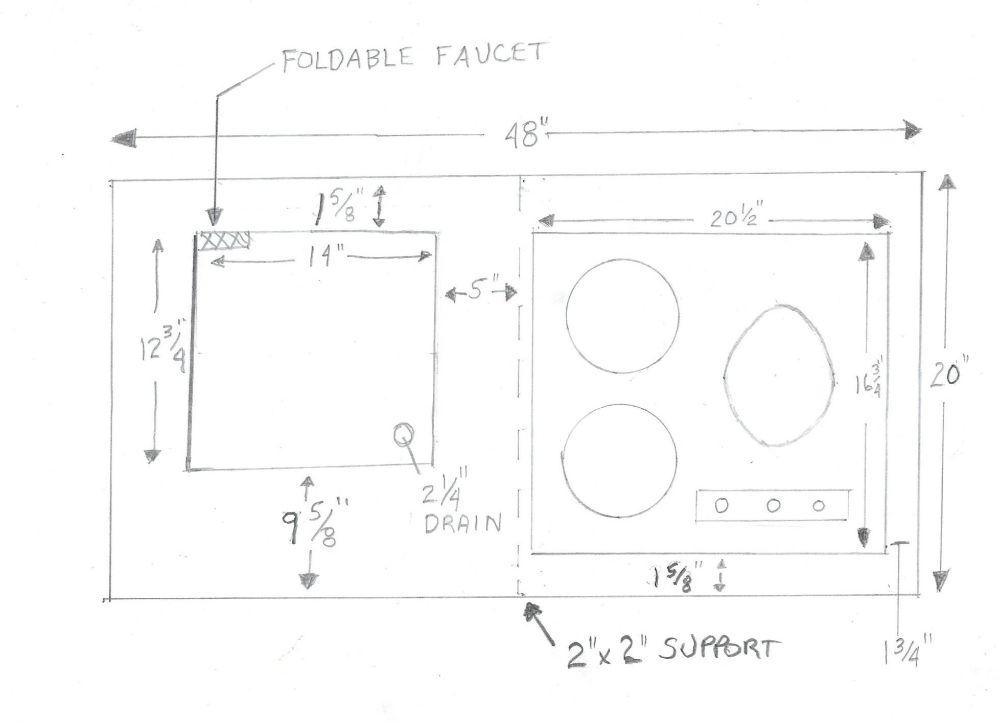
Designing your sink and stovetop
In this part of our build, we’re going to place our stovetop and sink. It’s always best to pre-order components such as windows, doors, vents, and other parts in advance and to lay them out before you cut the openings for them and the sink and stovetop are no exception to this rule.
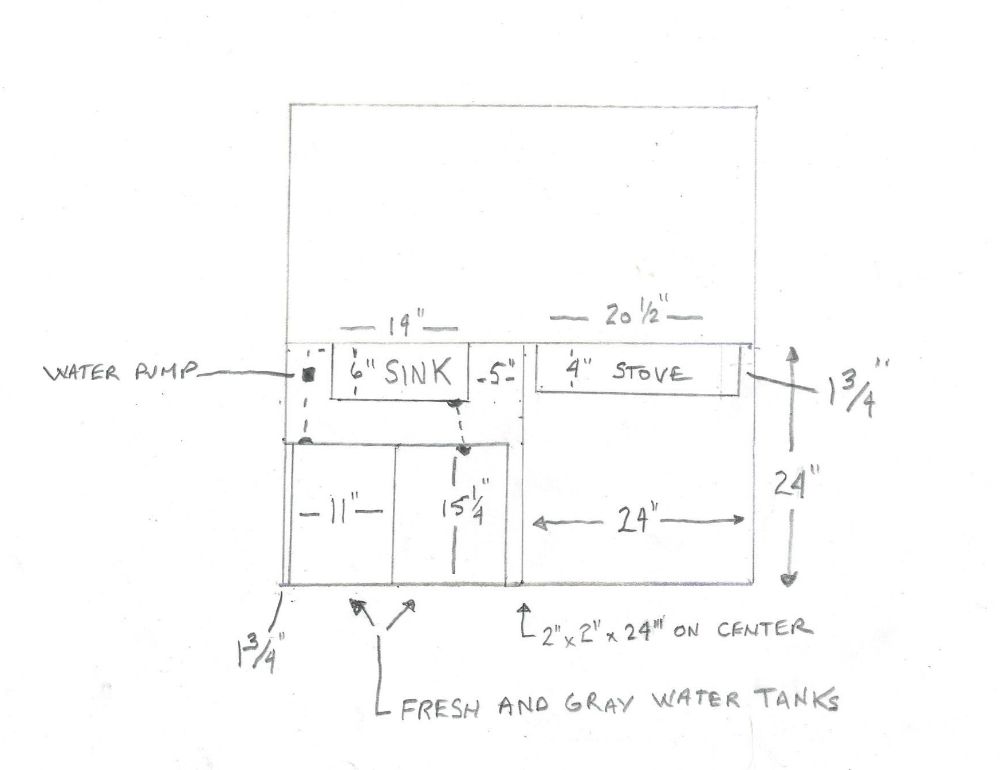
For this design, I have chosen to install a three-burner stovetop on the passenger side of the teardrop and a sink on the other side with two seven-gallon water tanks that will handle fresh and gray water demands below the sink. My design will also include a water pump and an easily accessed switch that will provide you with water on demand.
I decided to choose a three-burner stove and I also decided to design a layout that includes a seven-gallon fresh and gray water system. In the next section below, we’ll install those components and square in our framing, wiring, and plumbing so that we have our kitchen hatch fully functional. We’ll also take a look at my recommended products and why I believe they’ll work for you, as well as look at an alternative way to stow your propane tank while traveling.
Choosing a sink
For my sink I have chosen this model by CAN. Its dimensions are ideal for a teardrop build because of its 6″ depth making it perfect for installing a 7-gallon gray water and a freshwater tank of the same size directly underneath it.
It also comes with a fold down lid and faucet that gives you some additional counter space for food preparation when not in use and I found that very appealing when I was shopping for the right sink.
An additional feature is that it comes with a cold water only faucet so that makes installation much easier.
The only drawback to this sink is that it does not include a drain and you will need to buy that separately.
You can, however, order the compatible drain through the same supplier at the time you purchase your sink and that is what you should do. I also recommend that you order the appropriate water supply and drain lines at the same time too.
However, you can find drain and supply lines at most big box home improvement stores such as Home Depot or Lowe’s and it’s likely that you’ll save a few dollars by choosing this option.
Water containers
For this build, I have decided to purchase two of these 7-gallon water containers. One will serve as a source for freshwater and the other will handle my gray water.
To install these tanks, I plan on placing my freshwater tank with the supply side facing inward and my gray water tank will be reversed. This will conform to the design of the sink I have selected, and it will reduce the amount of water line I need to purchase. It will also open up a small area for the 12-volt water pump and switch as well.
While these tanks fit in this area very evenly, I would highly recommend that you use your table saw to cut down some ½” x ½” boards and secure them with finishing nails to prevent the tanks from shifting while you’re in transit.
Choosing a stovetop
For the stove in this design, I have chosen a propane powered Dometic stovetop with three burners. Of course, you may choose a smaller model than the one shown here, but this design is aimed for the camper who likes to cook and who may be cooking for several people at a time. Since this is more for the camper that wants to be a part-timer or “weekend warrior”, it is more likely that this type of camper would be camping with friends or relatives which could mean more cooking options.
I particularly like the idea of cooking more dishes at the same time as well as have the larger burner for cooking larger batches of things like soups or stews. Another feature of this stovetop is that it also has a fold down top when not in use which give you more meal preparation space before cooking your meals.
Installing your countertop
One thing I have stressed in previous articles in this series is to always have anything that needs to have a cutout for installation is to have the product on-hand before you make these cuts. This ensures that your measurements are correct and your not cutting out an opening that is too large or too small for your installation.
Once you have established the measurements for your openings, you’ll need to drill a small hole on the inside of your marks for the jig saw blade to begin the cut. Carefully begin your cut moving your blade to the line that you had previously marked and make your cutout. Once you have completed this step, take this board and place it on the framing and set your sink and stove into the openings to make sure they fit correctly.
If you are satisfied with this cut and fit, remove this base sheet of plywood and use it as a template to cut the top sheet of plywood that makes up your countertop. Remember to have the best side of your sanded plywood facing up to make the design as attractive as possible.
The next step in this part of your build, is to clamp the two sheets together and use your sander to square up cuts just as you did for the outer and inner walls that we covered in a previous article. Once you have done that step, lay a small bead of adhesive on the framing and lay the bottom sheet of plywood on the framing. Now apply adhesive to the top of your lower sheet and lay the top sheet of your countertop onto the lower sheet.
Using your clamps, immediately clamp down the inside of your cutouts and remove any excess adhesive that may have been squeezed out between the boards. Now screw the countertop into the framing along the outside walls and the hatch wall. Once you have secured this part of the build, I recommend that you wait 24 hours for the glue to set before you install your sink and stovetop.
Installing your sink
For this part of the build, I recommend that you lay your sink into the opening and that you next install the water tanks below the sink. Be sure to install them evenly and mark off where you want to place the ½” x ½” boards to keep them in place. Drill some small pilot holes in your ½” framework and using your hammer and finish nails secure those boards in place to keep your water tanks from shifting while your in motion.
Now that you have your tanks in place, remove them and place your water pump where it will work best for you. I recommend wiring it up at this point and bundling those wires with the others that will supply your hatch and door wiring on the passenger side of your teardrop build. Always cut your wiring long to avoid splices as this will help to eliminate the chance of a short which could result in a fire. This may seem wasteful as there will be an extra amount of lost wire, but it should give you some peace of mind knowing that your electrical wiring is installed without a breach in the line and without a chance of shorting out and causing a fire. At this point, you should also consider whether you want to install an external switch for your water pump or whether you are satisfied with an inline switch located on the pump. Personally, I recommend the latter.
The next step is to install your water lines. While your gray water line can be short, always remember to install your freshwater line about a ½” above the bottom of the tank. This allows it to draw as much water from the tank that it can while not being kinked up or sucking in some impurities that may gather in the base of your freshwater tank. I also recommend that each time you refill your freshwater tank, you give it a good rinse to avoid any mineral buildup in your tank or water pump.
Installing your stove
Installing your stove can be tricky. Since I have decided to install a stove with a propane supply tank located on the exterior side of my rear passenger side wall, I decided to consult a professional that’s well versed in these types of installations. Propane gas is explosive, and frankly, I don’t want to make a mistake when it comes to this part of our build. For that reason, I decided to consult someone with more experience than I have to correctly install this part of the build. If you are unfamiliar with propane or any power installations, I highly recommend that you do the same.
In our next lesson, we’ll look at some wiring issues as well as the final propane installation. We’ll also look at the best way to seal your countertop using varnish and a polypropylene finish.
As always folks, thanks for following, and I hope to see you out on the road someday.