Hey! This site is reader-supported and we earn commissions if you purchase products from retailers after clicking on a link from our site.
In the last part of this series we designed our gussets to support the hatch door. In this part, we’ll design our spars to support the outer skin and tie them into the gussets to square the hatch door for final installation.
Timing & People Needs
4-6 hours. While you don’t need too many supplies for this project, it does take precision and patience to complete it, which you should be able to do in half a day. Plan to leave your hatch door clamped overnight to allow the adhesive to dry.
2 people needed. Your clamps can do a lot of the work, but it does help to have another person holding boards and materials in place while the other person drills and sets everything.
Materials You Need
| Material | How Much You Need | Cost Range | Where to Get It |
|---|---|---|---|
| 2″ x 2″ x 4′ boards | 3 boards | $ | Home Depot |
| Construction adhesive | 1 case | $ | Home Depot |
| 2″ wood screws | 9 screws | $ | Home Depot |
| 1″ wood screws | 12 screws | $ | Home Depot |
| 5/8″ plywood | 4-6 small pieces | $ | Home Depot |
Tools You Need
| Tool | Cost Range | Where to Get It |
|---|---|---|
| Power drill | $$ | Amazon |
| Jigsaw | $$ | Amazon |
| Clamps | $ | Amazon |
| Sander | $$ | Amazon |
| Tape measure | $ | Amazon |
| Tape | $ | Amazon |
| Small T-square | $ | Amazon |
| Two pole clamps | $ | Amazon |
Cost of Framing Your Hatch Door
Assuming you already have the tools you need, the materials for framing your hatch door should only set you back about $20-30. This part of the project is relatively inexpensive.
How To Frame Your Hatch Door
- Sand your gussets evenly
- Measure and plan for your spars
- Cut the openings on your gussets
- Frame your hatch door
Sanding your gussets evenly
Now that you have glued your three gussets together and let the glue set, the next step is to clamp all three of them together and sand them down evenly again. The inside of your gussets can be a bit uneven, but it’s very important to have the outer cut even on all three gussets to ensure that the outer skin is free of bumps or waves once it is permanently secured.
Measuring and planning for your spars
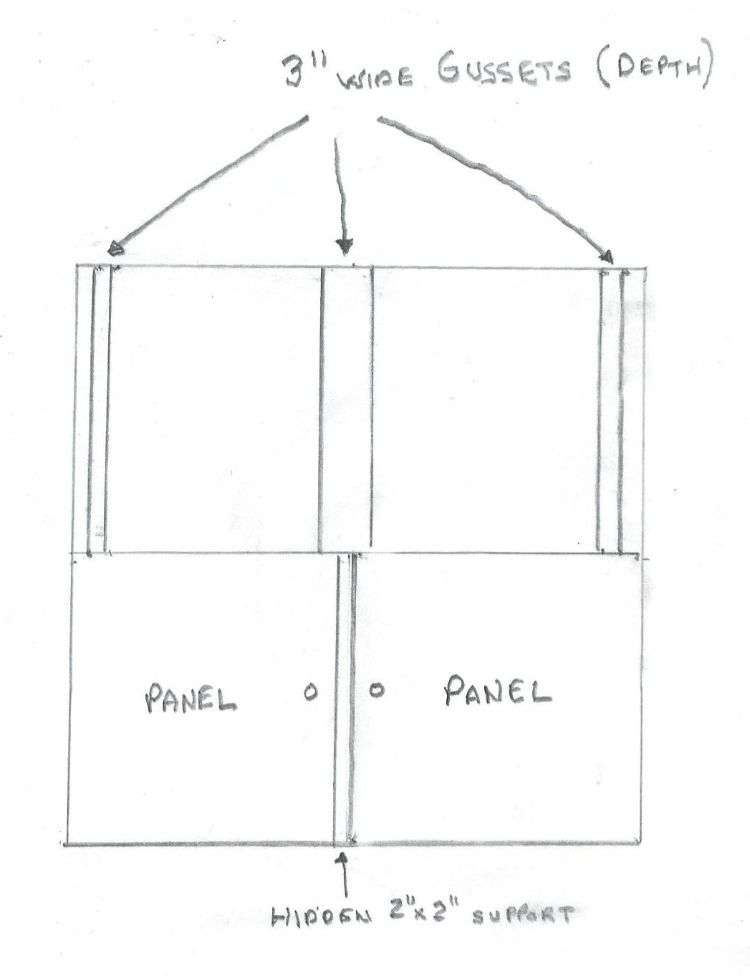
I have seen some designs where the builder/designer has included a face board and base board secured onto the ends of the gusset boards. In my opinion, that’s just not the right way to go. In this design, you’ll need to clamp your three gusset boards together and using your tape measure secured on the top side of your gusset with your tape.
Since the arc of any hatch can vary based upon the design, always measure your center spar to be in the middle of the door on center. In this build, we’re going to position our top and bottom spars inside of the base cuts by three inches with a middle spar squared away on center. This will help ensure that the hatch door is square.
Once you have established where to locate your hatch spars, you’ll need to use your square and draw a line where the center of your spar will be placed. Keeping your three gussets clamped together, mark a line exactly ¾” of an inch on either side of the first line you marked. These two additional lines are what you will use to cut out the opening for where you will inset your spars.
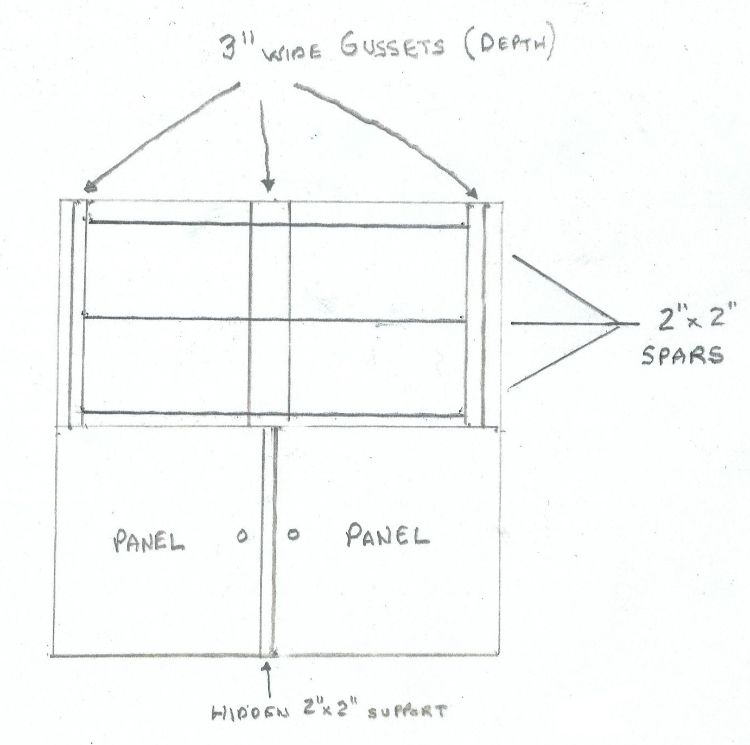
Cutting the openings on your gussets to place the spars
Now that you have established equal measurements on each one of your three gussets, the next step will be to unclamp your gussets and one-by-one lay them out on your work surface. Take a small piece of scrap 2″ x 2″ board and place it flush with the outer side of your gusset board and between those marks, carefully trace around that board. This will give you a good outline for when you cut the insets for your spars.
Once you have marked off the lines for your inset spar cuts, you’ll want to take each gusset and carefully using your jig saw, you’ll need to cut out these openings. It’s very important to cut the openings out equally and I recommend that you cut each inset a little short of the lines you marked to avoid an overcut. Remember, it’s a lot easier to remove excess wood when fitting spars than it is to add wood to fill in a missed cut.
Using your small piece of 2″ x 2″ board, check each insert cut to make sure that you have squared that cut, and that your spar boards will be flush with the gusset boards.
Framing your hatch door
The next step in this part of the build will be to begin the framing process. In the drawing above, you will see that I have drawn in the location of each gusset. For the outside gussets you will need to temporarily place ¼” inch spacers between the gussets and the walls of your trailer and clamp those two gussets to your walls. This will give you a ¼” inch gap between the walls and your hatch door making it easier to open and close once you have framed your door.
Note: These two drawings are not to scale so it appears that the gussets are different widths. Your gussets from this view are 1 ½” inches wide with a depth of 3″ inches each.
The next step is to measure the distance from the outside of the side gusset to the other gusset you have clamped on the other wall. This will determine the length of your three spars.
Now that you have this measurement, cut the spars to fit and set the center gusset in place. Once you have done this step, you are ready to place your spars into the openings on the gussets that you cut for them earlier.
I recommend placing the spars and gussets in place and check them for a good fit. Make sure they fit snugly, but not so tight that you must beat them in place with a hammer. Also make sure that the spars and gussets are flush one last time.
If you are satisfied with how your door fits, remove the top spar and apply adhesive on all three sides of your gusset openings for each gusset. Now place the spar back where it was and secure it in place with your 2″ inch wood screws to the gussets. Repeat this process for the bottom spar next and finish with your center spar.
I recommend that you leave the hatch door clamped in place for several hours or overnight to allow the adhesive to set. Next, unclamp your hatch door and take it to your work bench where we will begin the next part of the build.
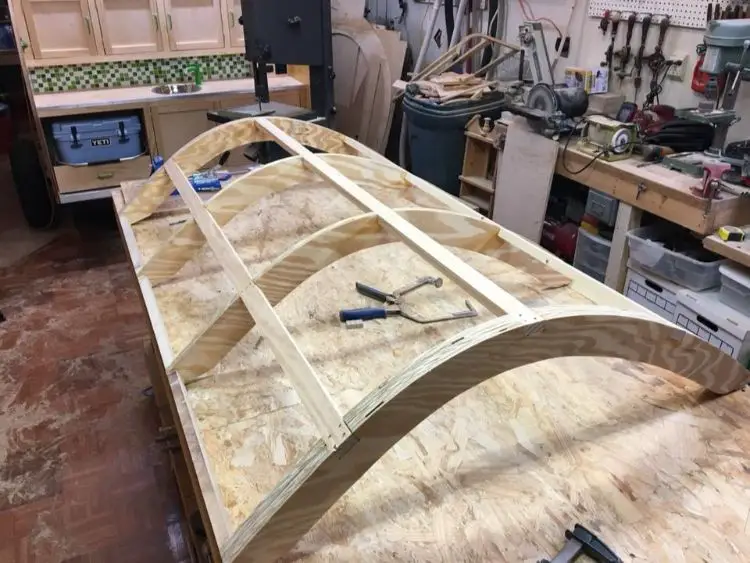
Your hatch door should look similar to this photo above. This builder is using four gussets and has attached spars on the ends of the gussets as well. Since my design is of less length and arc, and I am using 2″ x 2″ spars instead of 1″ x 2″ boards, my design should hold firm.
In the next part of the build, we’ll skin our hatch door and put it permanently in place. Thanks for following along folks and we’ll see you next time.