Hey! This site is reader-supported and we earn commissions if you purchase products from retailers after clicking on a link from our site.
Keeping your RV warm in the winter or cool in the summer can be a real challenge in terms of how you or the manufacturer designed its walls, ceiling, flooring, and ventilation system. Most times when you purchase an RV, be it new or used, you really have no choice in how your camper or motorhome has been insulated. Yes, there are manufacturers that have “cold-weather packages” that you can include in the options when ordering a new RV, but more often than not, anything you purchase directly off a new RV dealership lot will not have this option as it will need to be specially ordered.
In the past, I have owned used camper trailers that were ordered from the manufacturer by the original owner with a winter or cold weather package and frankly, I have always been unimpressed by the craftsmanship and quality of what they provide versus what they add-on in terms of the costs to the consumer. To be honest with you, I have never figured out what the added benefits of ordering a winter package for a new RV are given the fact that the walls are still as thick as a model without that package and in most cases the water lines and heat ducts are identical too.
In this guide to insulating your RV, I’ll share some of my tricks for avoiding heat loss as well as how best to keep your RV cool. We’ll also look at some of my design ideas for remodeling or doing a complete build of a camper, class B motorhome or even a step van if that is what you are looking to convert into your RV or tiny home.
Should I buy a new RV with a winter package?
Frankly, I would never recommend that anyone buy a new RV from a dealership because I believe the depreciation of your new RV far exceeds the value gained by purchasing the same model or one a couple of years older from an individual or a dealership that sells used RVs. That said, most manufacturers of RV have models that are all similar when design is concerned. The walls, floors, and ceilings are all the same thickness and they add no more insulation to those components than they would to a standard model that they sell for much less.
Usually when you buy a winter or cold weather package for a new RV, the differences are the amount of fiberglass batting surrounding the water pipes in the undercarriage of your rig and depending upon the air temperature and airflow over or beneath those lines determines whether that will freeze or not. Most of my experiences involving the purchase of winter or cold weather packages designed by a manufacturer have been inadequate for the buyer and are merely a means for the manufacturer and dealerships to add on more profits with little or no benefits to the consumer.
What is insulation and what works best for my RV?
Insulation can come in all sorts of forms and variations. Since I was born in the early 1960s and grew up in that decade as well as the 1970s, by parents that were avid followers of such publications as Mechanics Illustrated and The Mother Earth News, I learned a lot about alternative building styles as well as solar power and ways to best protect your home from natural elements such as cold and hot weather.
Would I recommend insulating your RV by filling its walls with brown beer bottles filled with sand and stuffing fiberglass batting around them? Of course not, times, technology, and thinking changes. However, I have seen a home with its exterior walls built like this and while odd, it proved to be very effective. I have also seen people insulate their homes by using old tires and stucco or plaster. Is this practical in a camper or motorhome? No, but it should give you a range of ideas when you are trying to decide how to plug a hole around a water pipe, stop an air leak around a window or prevent air from flowing under your RV.
Skirting

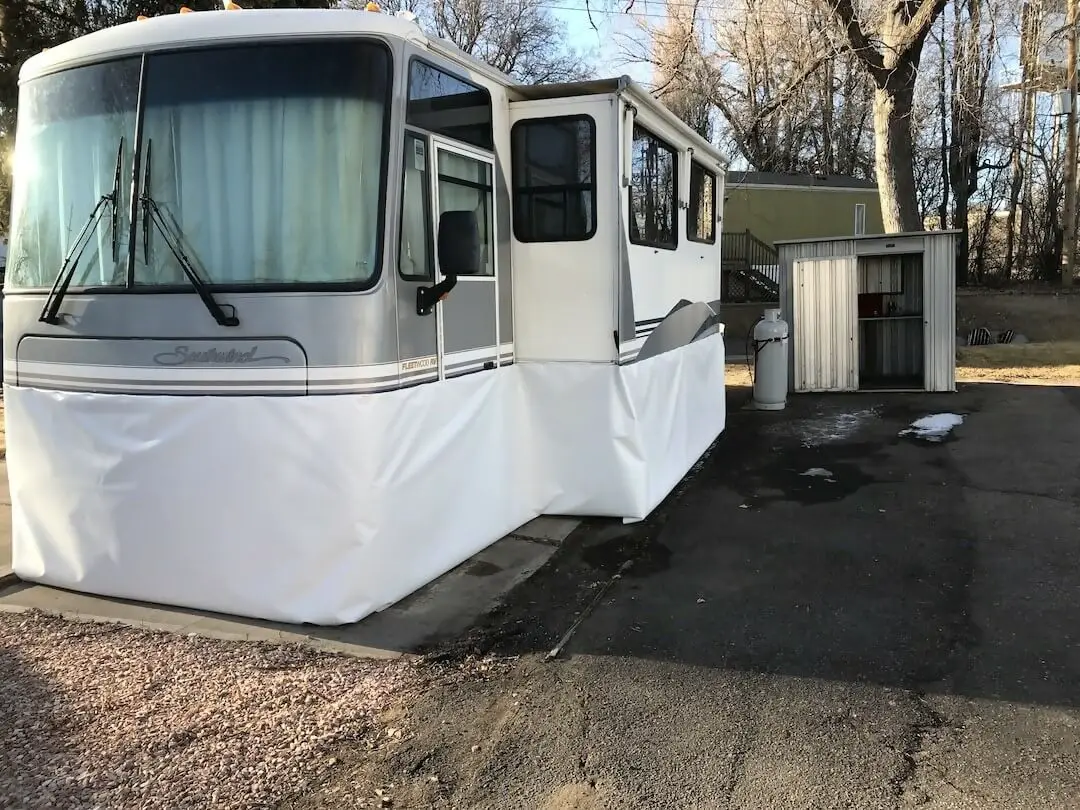
One good way to limit air flow beneath your camper of motorhome is to use skirting. Over the years, I have seen and used various methods of skirting RVs. I have built skirting using plywood and 2”x2” studs and I have used foam board with low cost aluminum struts and bases to support that type of skirting as well.
However, one company I discovered recently is EZ Snap Direct whose specialty is insulating RVs and boats. This company has a very informative website with an interactive sales staff that is equally informative, and they will work with you as far as measuring your rig and how much fabric and snaps you will need to install your skirting. Installation is relatively easy with a limited amount of tools needed.

The fabric for the skirting is manufactured with a patented design that incorporates a specific weave that prevents it from fraying when you cut it to fit your RVs dimensions. While it is likely that you can find other methods of skirting your RV, many of them will have for less quality in terms of fabric and are likely to fray and tear in less than one season of use. Another advantage of using this fabric skirting is that it is easily folded making storage more convenient to stow away when traveling.
Keep in mind that skirting is not necessary or practical for those taking short journeys or short stays. For example, you live in Denver, Colorado but love to take weekend trips up to the high country to ski and hike during the winter. Are you really going to look forward to spending 2-3 hours skirting your RV when you first arrive at a campsite where you are only staying for a weekend? No, so as a rule, skirting works best for those that are staying seasonally in a campground or at the very least a week or two.
Preventing drafts in your windows and slide-outs
Another type of insulation that works well for windows, corner seams in your RV and slide-outs seams is manufactured by Reflectix, Inc.. This insulation works well for hot and cold weather use and is commonly used to block out the sun in window openings as well as draft control.
- This product adds a great value
- Product is highly durable and easy to use
- This product is manufactured in China
Last update on 2025-08-08 / Affiliate links / Images from Amazon Product Advertising API
According to the manufacturer, Reflectix can best be described as, “two 96% reflective layers of film bonded to two internal layers of heavy gauge polyethylene bubbles with a total thickness of 5/16”.
I have used this type of insulation on many occasions and still use it often on my current RV. This product comes in various lengths and widths and can be easily cut to size using a good pair of scissors. I like to use Velcro strips to hold the Reflectix in place when I use this form of insulation.
Because of its viability, another good application for Reflectix is keeping drafts out of any wall or slide-out seams in the interior of your RV as well as its exterior. During extended stays in some of the colder areas of my travels, I have used this on more than one occasion, and it works especially well for controlling drafts. I also use Velcro to secure it outdoors, but I usually more strips to avoid it from being ripped off during periods of high wind.
Sealing your doors
Rubber seals around your doors and compartments should be regularly inspected too. When these seals crack or deteriorate, they allow air and moisture into your RV which can potentially cause serious damage to your rig over time. For example, a small portion of your entrance door’s seal is split at the base of the door and it’s allowing some snow and air to flow freely onto the floor or step of your RV’s interior. Over time, this small amount of moisture can cause your carpet or flooring to deteriorate as it melts and refreezes, and this will lead to larger issues such as replacing flooring.
If you should find that the seals are defective, then I recommend that you consult the owner’s manual for the correct replacement of that part. Should you not have that resource available then you should consider doing some online research for a seal similar or one that might work for you.
Insulating your vents
Ceiling vents should also be considered when properly insulating your RV. When not in use, these vents usually leak an incredible amount of warm air, so I recommend using a piece of rigid foam to fill that void. However, it’s important that this air flow is never closed off permanently as humidity is likely to build up and that air needs to be exhausted from your RV properly. For ceiling vents, I use this type of insulation and I secure it with two small bungee straps in an “X” formation that holds it in place when camping or traveling. By using small straps to hold it in place, it is also very easy to remove should I need to exhaust air and humidity from my rig. Second Skin Audio has a great guide on installing this type of foam for insulation around your RV.
Thinking about a new rooftop vent? Read our guide on the best ones.
Fiberglass insulation
Some fiberglass trailers use batting as another form of insulation used in RVs as well as homes and businesses. A very reliable form of insulation when not exposed to moisture, this insulation is the one I would normally recommend. However, when it’s exposed to moisture, it’s likely to hold that element and decay. As such, mold can develop so it’s very important that you keep any type of fiberglass insulation dry.
Final tips
Another tip for keeping your RV comfortable in cold or warm weather is to use your interior cabinets wisely. Storage cabinets located on the outside interior walls of your RV are a dead air space that is usually cold or hot depending on the climate you are camping in. One good way to fill this void of air is too fill it with clothes that you are not using. For example, consider storing clothing such as sweaters and coats in cabinets, compartments or closets that may help to block any air flow. In short, cabinets, drawers and cupboards should always be kept closed as these areas are never heated or cooled and if you are able to fill some of that void with materials that insulate the area then that is what should be done.
Properly insulating an RV has many options that vary upon whether the rig is manufactured or a unique design. In a future column I hope to share some of my tips for keeping water lines from freezing when restoring an older camper or designing a new rig.
Until then folks, thanks for reading, and I hope to see you out there on the road.


