Hey! This site is reader-supported and we earn commissions if you purchase products from retailers after clicking on a link from our site.
Did you purchase a used RV with worn carpet or flooring that you dislike because the price was right? Have you had the same RV for several years and the flooring is worn down and not to your liking anymore? Are you looking to upgrade your RV’s flooring and looking for a change?
If you answered yes to any of these questions, then you’ll want to follow along in this tutorial as we cover the essentials for installing new flooring in your RV. We’ll also cover some of the shortcuts that RV manufacturers routinely use when building your rig, and what’s best when correcting their design flaws.
Understanding the manufacturing process of your RV
The first thing I stress when doing a tutorial that addresses how to repair or replace a part of your RV’s original plan, is that you thoroughly understand its design and how your RV was manufactured. As a rule, RVs are manufactured from the outside to inside. This means that once the sub-flooring has been installed, the finish flooring is immediately laid over it and interior walls or cabinetry framework are overlaid on the finishing flooring.
While this saves time and labor costs for the manufacturer, it is problematic when you are looking to replace the original flooring. For example, kitchen, bathroom, bedroom and living area cabinetry are routinely installed after the flooring is secured. This means that the flooring in the common space of the removal area needs to be finely cut and removed, or you’ll have to evacuate the flooring beneath the cabinetry or wall framing. Frankly, to do this job correctly, I would recommend the latter of these two options.
Why should the flooring material beneath the cabinetry or interior walls be removed?
The obvious answer here is that if it’s a fiber product such as carpet, it’s not going to hold up over time, especially if it’s cut down to a much smaller size than what it was originally designed to support. However, for flooring such as vinyl or linoleum that are not as likely to deteriorate over time, it’s perfectly acceptable to leave these under cabinetry and wall framework and would be the preferable option as opposed to damaging interior wall framework and cabinetry framework when trying to remove them. It’s unusual to see manufacturers install framework over carpet, but I have seen it done, especially in older model campers.
Carpet vs. other flooring types, what’s the best choice?
This is a hard question to address as all RVers have different tastes and preferences. For me, I’m not a big fan of a fully carpeted RV. Sure they look nice when they’re new at the RV shows and dealerships, but if you’ve ever shopped for a new RV, you probably noticed that they have temporary protective plastic sheeting laid over the carpet to protect it during the selling process.
In my opinion, carpet doesn’t hold up over time and it gets too dirty, to quickly depending upon where your camping. Unless you’re willing to take preventative measures such as a “no shoes indoors” policy or lay out temporary door mats, it’s likely that you’ll spend a lot of time trying to keep your carpet clean. When my mother and her husband were alive and traveling the country in their fully carpeted class A motorhome, they had plastic mats that were about an 1/8th of an inch thick and had small pointed plastic cleats on the underside to keep them in place on the carpet. I understood why they were using them, but they were cold, hard, and uncomfortable to walk on.
Those plastic mats also needed to be cleaned regularly. Wouldn’t it have made more sense to have hard flooring that took far less time to clean and maintain, than to have a plastic protective covering that needed to also be cleaned regularly by taking them outdoors, hosing them down and scrubbing them clean occasionally? Also, they traveled with two cats so whenever they did pull the plastic walkway mats out of their unit, they still needed to vacuum the carpet to remove the pet hair caught in the carpet along the borders of their walls and cabinetry.
With that said, and since I have always traveled with a dog, my choice for flooring does not include a fully carpeted RV. Instead, I prefer interacting carpet, hard flooring such as wood, vinyl, linoleum and in some cases even ceramic tile to create a cohesive flow and design for my rig when I’m remodeling.
What do I mean by an interactive design?
When I purchased my 5th wheel, I bought it from a widow that had lived in it for 16 years. Her and her husband bought it new from a dealership that was located less than a mile away from the campground where they retired. In a nutshell, they had taken great care of the unit, protecting its tires and undercarriage by enclosing those areas and its components from weather related elements. However, over time, the carpet within the unit had deteriorated.
Being conscientious and permanently placed full-time RVers, they replaced they’re indoor carpeting during their ownership of the rig. Unfortunately, when they did that, they hired a carpet installer that laid the carpet on the floor and then went up and over the slide-outs. While this worked well for them when they were living there full-time during the colder months of Northern Michigan, it created a huge problem for me when I decided to move the RV to another location after I purchased the rig.
Naturally, the first thing I did when I attempted to move my newly acquired 5th wheel was to retract the slide-out. This lasted about 12 seconds and then I heard my slide-out motor begin to grind and skip. I immediately stopped the retraction of the slide-out because I didn’t want the motor to lose its smoke. In the words of my high school shop teacher, if you let a motor expel its smoke…it’s usually fried.
As it turned out, the people I purchased my 5th wheel from, had purchased it a dealership that was less than a mile away from the campground where they lived in it full-time for the next 18 years. At some point, they had replaced the carpet and while it was in good condition there was a major flaw in its installation.
I lived in it a year before I decided to hit the road and the night before I was ready to leave, I decided I would test the slide-out to see if it worked correctly. It didn’t. Instead, it retracted about three inches and it stopped. The electric motor began to hum loudly so I immediately stopped the retraction to investigate what the problem was.
Naturally, I checked underneath the slide-out looking for something that might be obstructing it from retracting. Next, inspected the slides and found no issue there either. The motor was working, because I was able to expand it fully out, but it would only retract a few inches and it would stop.
Stymied, I went inside to think about what the problem could be, and that’s when I discovered what was causing the slide-out from retracting. Simply put, whoever they hired to install the new carpet never cut it to fit the slide-out separately.
My slide-out has a four-inch riser, and the carpet installers simply went up and over the riser without cutting the carpet to fit separately on the riser. This of course, caused the slide-out to stop retracting, and I was able to solve the problem very quickly with a utility knife. However, the knap of the carpet was thicker than the original factory installation and it still didn’t completely retract. Instead, it was leaving it about an inch from being fully pulled into my RVs interior. That didn’t stop me from hitting the road that day as I was on my way to a work camping location and had to be there per our contractual agreement. It did, however, start me thinking about how I could correct the problem which I did later that summer.
My solution to my flooring issues and beginning in the bathroom area
I gave considerable thought to some of the angles I would have to work around when installing new flooring in my RV.
Because I started out by reflooring my bathroom with vinyl tiles first, I bought this set of handy contours measuring tools. These work well when you need to make special cuts in the tiles to accommodate corners around vanities, cabinetry and especially around the toilet which always has a rounded shape making it more difficult to accurately cut those tiles surrounding it.

Last update on 2024-09-27 / Affiliate links / Images from Amazon Product Advertising API
As a rule, you would normally remove the toilet for this task, but that can sometimes be a messy job and since I had previously replaced the toilet, I didn’t want to repeat that process.
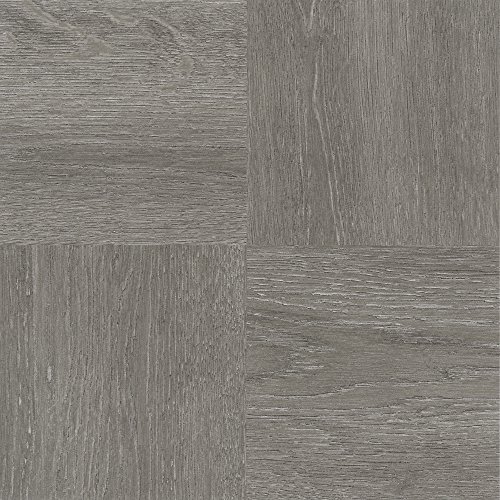
For my bathroom flooring, I chose to install a gray-toned, 12″ x 12″ self-adhesive vinyl tile manufactured by Achim Home Furnishings and readily available online or in many larger big box retailers. The medium tone and wood grain design of this tile accented my chose of a semi-white and gray paint for the walls, a darker gray paint for trim, and a neutral lighter gray toned choice for my linens.
- Nexus Vinyl Tiles: Refresh your home for a low cost and no hassle with the Nexus Vinyl Floor Tiles....
- Peel ‘N’ Stick: The Nexus Vinyl Floor Tiles feature easy do-it-yourself installation. Simply...
- Dimensions: Each tile measures 12 inches x 12 inches and 1.2mm thick. There are 20 tiles per box,...
Last update on 2024-09-27 / Affiliate links / Images from Amazon Product Advertising API
Overall, I was very satisfied with this tile and I was also glad that I decided to start in the bathroom because it gave me some time learn how to properly use the tile, knife and contour measuring tool before I moved on to the larger living spaces in my RV.
For cutting my vinyl tiles, I used a BIBURY utility knife. This knife comes with ten extra blades, is foldable and has a belt clip that helps to keep it from being misplaced during your projects. It’s also very functional for other projects, has a good guarantee and is ergonomically designed for easier use.

- Upgrade Design: The button for replacing the blade is changed from plastic to metal, smoother blade...
- Safety Use: BIBURY utility knife has a small plastic protector on the blade tip, and a safety lock...
- Anti Slip: On the art cutter’s body, we create the anti-slip handle and an anti-slip button....
Last update on 2024-09-27 / Affiliate links / Images from Amazon Product Advertising API
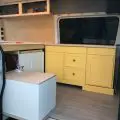
For my living flooring I chose this vinyl flooring manufactured by Amerlife. I really liked how it was longer in length and was less wide than the tiles I had used in my bathroom. The grain pattern was very cohesive with each tile, and I was able to blend the tiles very cohesively throughout the arears I was laying this tile.
Because I am an artist and designer, I didn’t want this type of flooring to completely consume my living area. Instead, I chose to remove the carpet in my living area by fully extending my slide-out and pulling the carpet up and throwing it out the door. As I said earlier, my slide-out has a four-inch riser that is carpeted and in great shape, so I decided to keep that covering.
The after-market carpet in the area where the slide-out would be normally retracted was ultimately inhibiting that process. Once I had replaced it with the vinyl tile alternative, the slide-out worked correctly and still does to this day.
As an artist and designer, one thing I did do that was contrary to completely installing vinyl tiles throughout the kitchen and living areas, was to keep the carpet in the slide-out and install ceramic tile on the floor in my kitchen area. In fact, it was one of my favorite parts of this design because it allowed me to create a tile design using broken ceramic pieces from a Mexican tile dealer that specializes in creating backsplash and flooring tile. When those tiles are broken during the manufacturing process, they are more than happy to sell them for next to nothing. If you’re a good artist or designer, you’ll make them work for you.
Final thoughts
Designing a good flooring plan can be complicated. It shouldn’t be. Once you understand your choice of color or tones, the pattern and how best to install the components, you’ll be well on your way to making your RV a showplace.
Thanks again my friends. As always, I hope to see out on the road.