Hey! This site is reader-supported and we earn commissions if you purchase products from retailers after clicking on a link from our site.
If you’re new to RVing, then you may be confused about how your water system works and the basic components that make up that system. Most manufactured motorhomes and campers have a three-tank system that handle your water and waste needs. These three tanks consist of a freshwater tank that stores any water you would bath, drink, or cook with. There is also a black water system that I discussed in a previous column and this system is solely designed to store solid waste such as sewage. However, in this article I’ll explain your gray water system, what it’s designed to do and how best to maintain it during your travels.
What is the purpose of a grey water tank?
Gray water tanks are designed to hold wastewater that would not normally be held in a black water tank. In a traditional home, a gray water holding system would not be necessary as your home would normally be hooked up to city sewage system or septic tank. However, combining gray water with black water in an RV is usually not practical because of the size of the tank you would need to hold these combined waste materials.
Instead, RV designers have chosen to separate solid waste such as sewage and wastewater that is produced when you shower, use your bathroom sink, or water used when you do the dishes or access your kitchen sink. Essentially, gray water is any water that needs to be properly disposed of that is not human waste or sewage.
What is the typical size of a grey water tank?
There really is no specific size as to the dimensions of freshwater, black water, or gray water tanks because the sizes will vary by manufacturer of your rig as well as the size of your RV. As a rule, and one I have always followed when restoring or remolding an RV, is that it’s best to have a gray water tank that is the same size or a littler larger than your freshwater tank. This ensures that your gray water tank will not need to be drained before you have exhausted your freshwater supply.
For example, when I redesigned my 5th wheel’s water system, I installed a 40-gallon freshwater tank and a 50-gallon gray water tank. I allowed for the extra five gallons of freshwater my water heater holds and another two or three gallons that may be in the lines. This means that should I start out a boondocking journey for a week or two, I know that I will not need to empty my gray water tank before I need to replenish my freshwater. Also, because I am using some of my freshwater to flush my toilet it is unlikely that I my gray water tank will need to be emptied before my freshwater tank will need to be filled.
How do I maintain by greywater tank?
Of the three water holding systems on your RV, your gray water system is probably the easiest to maintain. Since this tank is not holding raw sewage that requires being emptied and flushed out to eliminate odors and decay and it is not holding potable water for drinking and bathing, it requires minimal maintenance. One thing I do recommend however, is that you purchase drain screens for your sinks and shower such as the type you would use in a conventional home. This will help to prevent any small food particles or hair from draining into your gray water tank that may result in clogged pipes or the main drain for this tank.
As I said earlier, I prefer to empty the gray tank and the black tank before I leave a campground that has those facilities. This helps to eliminate added weight as well as unwanted smells. Once I have drained these two tanks, I will dilute approximately ½ cup of baking soda into a gallon of water and I will pour it down my shower drain and into the gray water tank. Then I will run another gallon of freshwater down the same drain to clear any of the dilution out of the shower drain lines and into the gray water tank. The motion while driving down the road will allow the baking soda solution to “slosh” around in the tank which will also help to prevent unwanted odors.
I also recommend doing this with your black water tank by dumping freshwater directly down your toilet and increasing the amount of baking soda to a cup of soda and three gallons of water. Now that you have done these steps, replace any freshwater you may have used, which in this case would be approximately five gallons.
How do I drain my grey water tank?
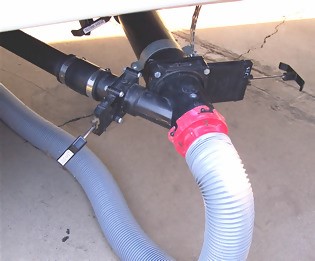
Most RVs will have a drain system for black and gray tanks such as the one shown here. Simply connect your RV sewer hose to the RV drain and the sewer tank, then open the slide valves by pulling the levers out.
Now close the valves and rinse out your septic hose.
How often should I clean my grey water tank?
As I said earlier, cleaning your gray water tank as often as your black and freshwater tanks is not necessary. This tank is more contained, holds non-potable water and is free of raw sewage. For full-time RVers, I would recommend once a year and if you are a part-time RVer, then I would do it after each use if you don’t use your rig frequently and I would certainly clean and flush your tanks before you put it into any long term storage during the off-season.
How do I clean and flush my grey water tank?
To clean and flush this part of your water system, I would recommend that you hook up to a water supply and simply turn on your cold-water faucets until you have filled your gray water tank. Then drain your tank as explained above and you have successfully purged your tank with cleaner water. Once or twice of this process and your system should be good to go for at least a year or more.
However, if you are going to flush your system prior to storing it away for the season, then I would suggest reviewing my guide to winterizing your RV that I covered in a previous column. This will prevent any residual water in your lines and drains from freezing up and damaging your water system.
What are some signs that my grey water tank need replaced?
One of the most obvious signs that your gray tank needs to be repaired or replaced is if you see any signs of leakage when your RV is parked. Occasionally a stone or small rock will be thrown up by a tire and depending upon the plastic that is used to manufacture your tank that stone can easily puncture your tank.

- 40 Gallon RV Waste Water Holding Tank MADE IN THE USA by Class A Customs using Medium Density...
- INSTALLED OUTLET 3” ABS Female Pipe - outlet can not be moved DO NOT over-tighten fittings damage...
- INLET & VENT INSTALLATION Class A Customs Black Water Tanks only come with the outlet the end user...
Last update on 2025-06-24 / Affiliate links / Images from Amazon Product Advertising API
Other issues to look for are the seams of the tank.
- Are there any cracks in the seams or along any straps that are helping to support the tank?
- How do the intake and outflow fixtures look?
- Are they worn with cracked seals?
These are all good reasons to inspect your gray water tank components and make repairs or even replace the system if need be. In a future article, I will explain in more depth the difference in the plastic used to make your holding tanks, how to repair the tank based upon the plastic, and whether you should just replace the tank with a custom build or an available used model of the same size or similar to your current design.
Until next time folks, safe travels and remember, home is where you make it. Hope to see you there some day.
Working on your plumbing setup? Read these guides too.