Hey! This site is reader-supported and we earn commissions if you purchase products from retailers after clicking on a link from our site.
In this part of our teardrop camper build, we’ll begin by constructing the walls. First, we’ll concentrate on the two 4’x8’ walls on the sides of your camper and then we’ll square those walls up by installing part of your kitchen hatch design and your forward wall which will have a window installation. This will square up your camper build and it will benefit you later when you install the skin for your roof and hatch door design.
Timing & People Needs
4-6 hours. This is a step where you want to make sure you are super precise and all your panels line up well. Plan on carving out a day for this project.
1-2 people needed. It’s nice to have another person hold panels and other materials in place while the other takes measurements and makes the cuts.
Materials You Need
| Material | How Much You Need | Cost Range | Where to Get It |
|---|---|---|---|
| 5.2mm Sande Plywood | 2 sheets | $$ | Home Depot |
| 12mm Sande Plywood | 5 sheets | $$ | Home Depot |
| #6 x 3/4 in. Phillips flat head wood screws | 2 boxes | $ | Home Depot |
| 1 in. x 10 in. x 8 ft. square edge whitewood | 3 boards | $ | Home Depot |
| Passenger side door | 1 door | $$$ | Vintage Technologies |
| Sliding window | 1 window | $$$ | Vintage Technologies |
| Construction adhesive | 1 case | $ | Home Depot |
Tools You Need
| Tool | Cost Range | Where to Get It |
|---|---|---|
| Tape measure | $ | Amazon |
| 36″ corner square | $ | Amazon |
| Sawhorses | $$ | Amazon |
| Table saw | $$$ | Amazon |
| Chop saw (optional) | $$$ | Amazon |
| Jigsaw | $$ | Amazon |
| Caulking gun | $ | Amazon |
| Several C clamps | $ | Amazon |
| Belt sander | $$ | Amazon |
Cost of Designing and Building Your Walls
If you already have the necessary tools, the raw materials for building your walls should run you around $800. The pre-built passenger door and window are the bulk of that cost.
How To Design and Build Your Teardrop Trailer Walls
Prep for Wall Construction
When laying out your outer walls, your first board should have the finely sanded side of your plywood facing upward toward you. This will be the passenger side wall. Take your corner square and line it up flush with each side of the upper right corner and then make a small mark with your pencil exactly 19” inches from the corner on each side.
Now you’ll want to measure in from each mark 18 inches, and where those two lines intersect, you’ll place a small finishing nail to use as your pivot line for the next step. I recommend securing that line by using some monofilament fishing line around your nail (pivot point) and doing the same around your pencil at exactly 18 inches. This will give you the nice arc on the forward side of your teardrop wall and this type of line guide is less likely to stretch while you draw the line on the plywood.
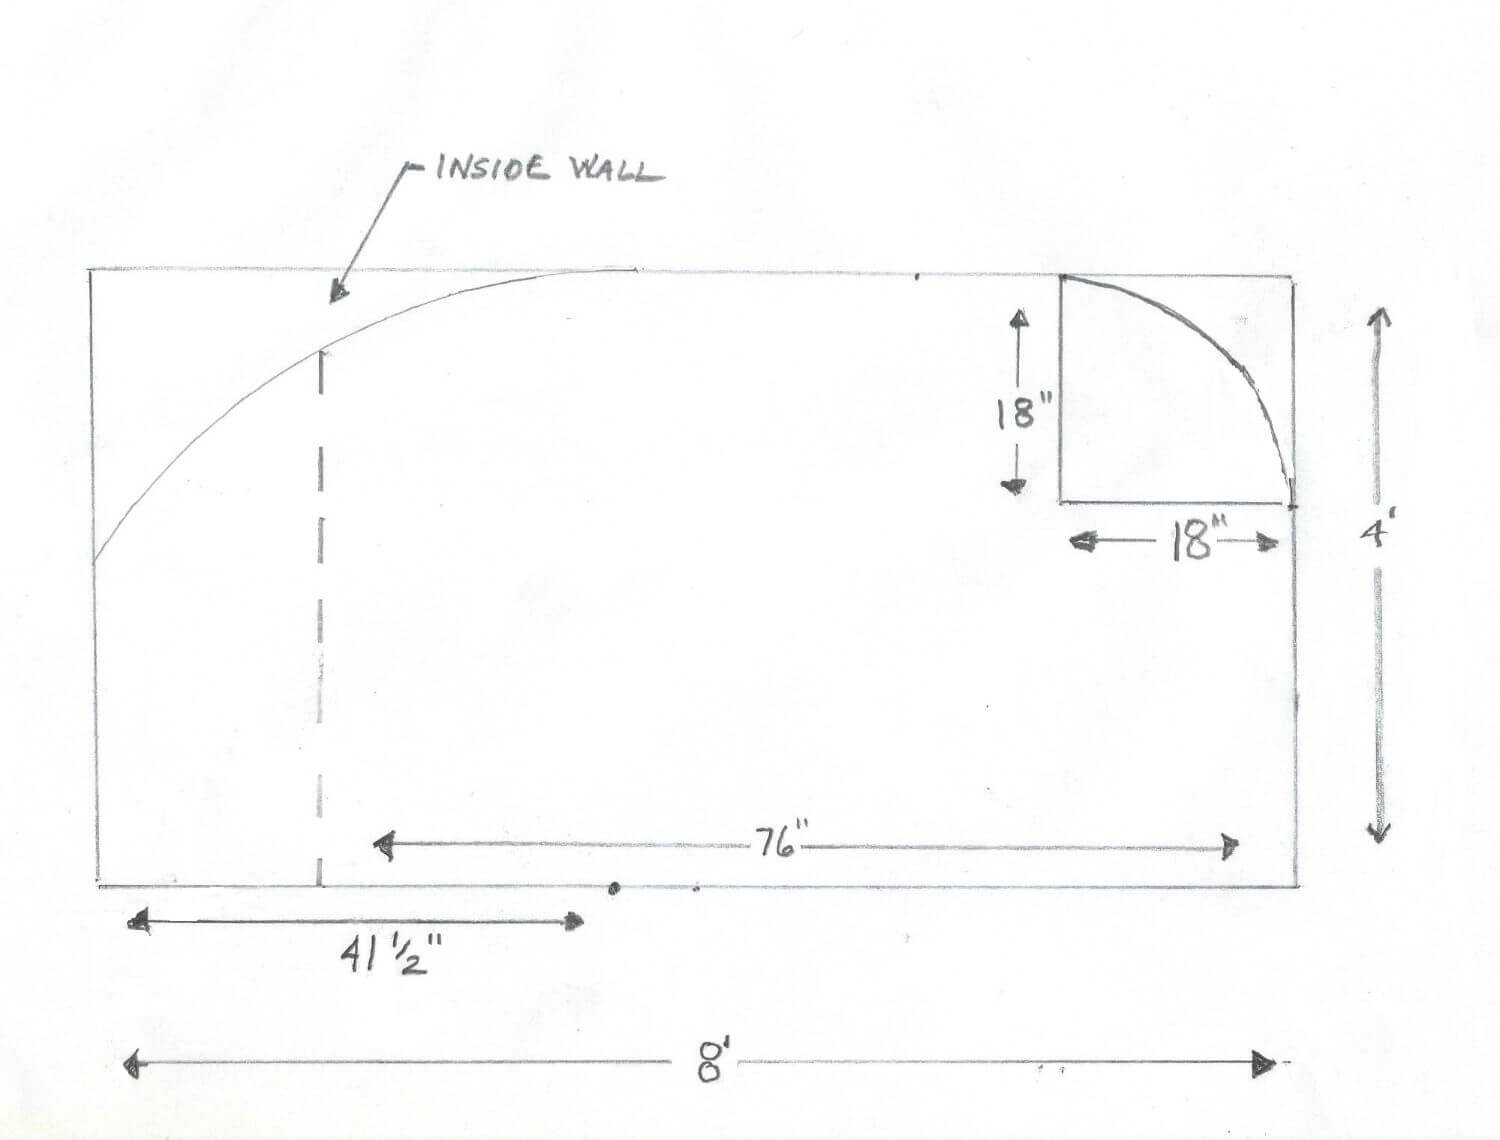
Your next step will be to get the arc of the rear of the trailer drawn out. Here, you’ll need to measure in from the rear lower corner of the panel 41 ½ inches for your pivot point where you’ll place your nail. Be sure to firmly place the nail as close to the edge as possible.
Just as you did when you laid out the first arc of your wall, you’ll want to use the same method for drawing the rear arc of your teardrop. However, you’re going to need to extend your line length to 48 inches. Once you have done this, use your pencil to draw a line toward the rear of the camper and make the cuts using your jigsaw. Be sure to use your saw evenly and at a reasonable speed to ensure the accuracy of your cuts.
At this point, I recommend that you place your first cut wall on the other three panels (interior and exterior) and trace them out one at a time. Now you’ll need to cut them out individually and set them aside. Once you’ve completed this task, square up your panels and clamp them together securely with the two inner panels secured between the two outer wall panels.
When you have secured your wall panels together using your “C” clamps or squeeze clamps, you’ll want to use your belt sander to ensure that your walls are all the same dimensions. Don’t be too aggressive with the sander, just try to give each panel an even finish so they all match dimensionally with the panel adjacent to them.
Designing Your Walls
At this point, I recommend that you have all your windows, door, access panels, utility outlets or air vent designed into your plans, and I highly recommend laying out a plan before you start ordering parts.
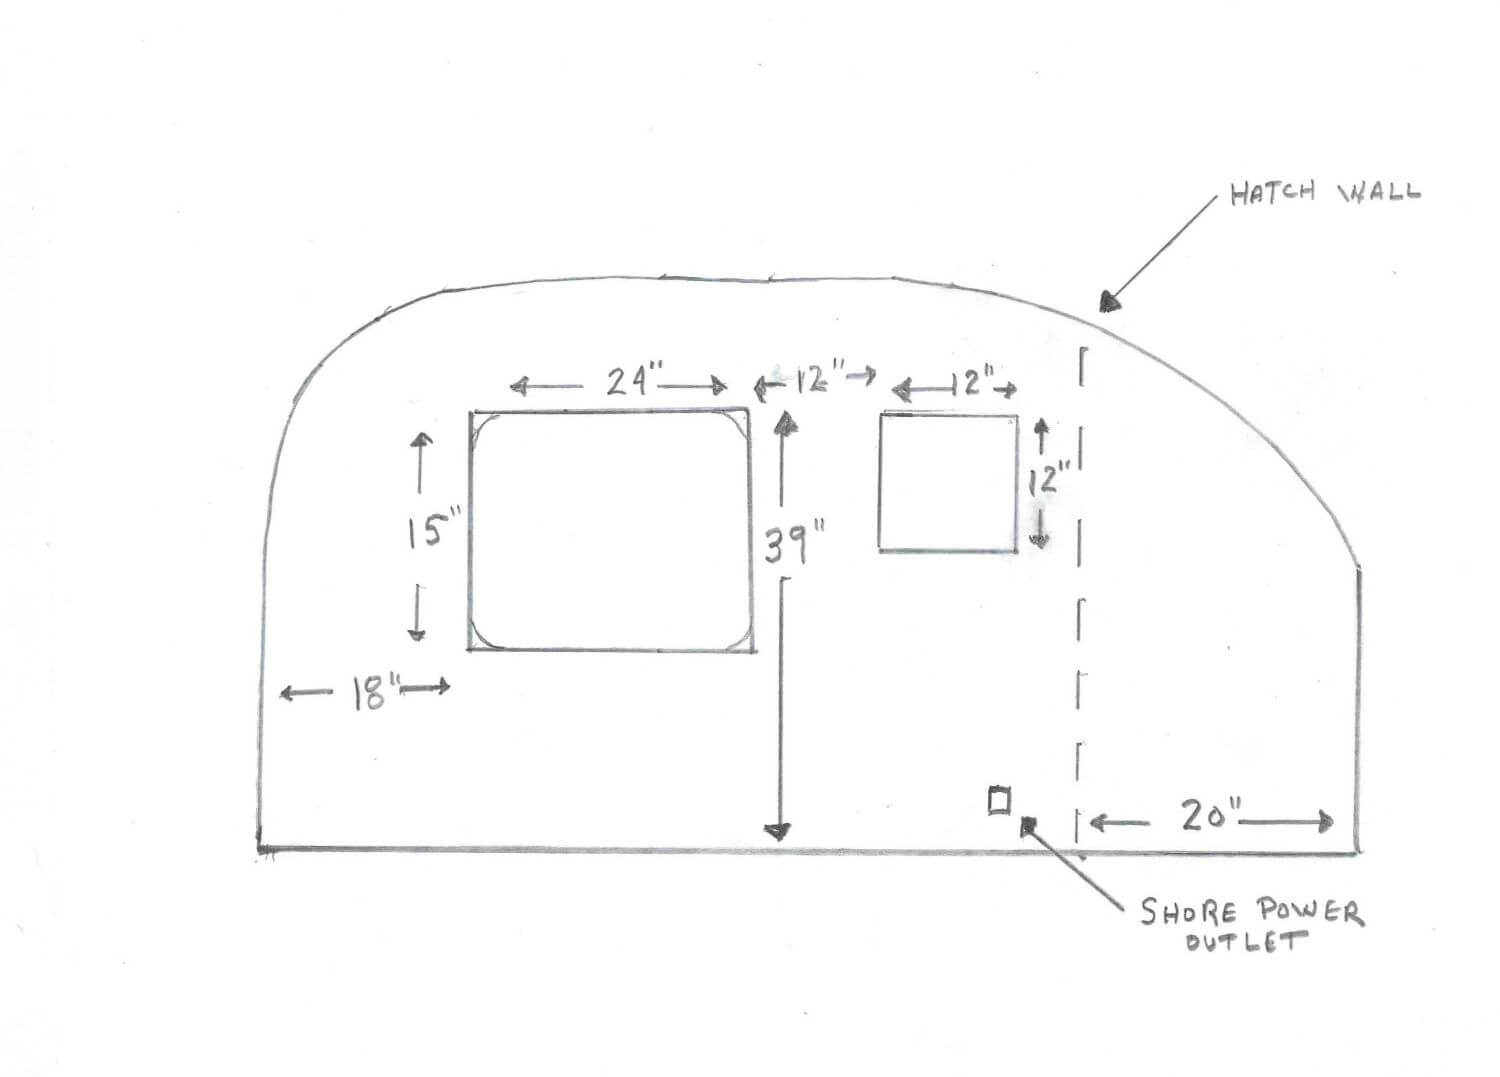
In this design for the driver’s side of the teardrop, I have incorporated a window and adjustable 12-volt fan to supply a nice air flow through the teardrop. I have also included a shore power outlet should this rig be at a campground, friends’ home or any other spot where conventional electrical power can be accessed.
Making Room for Airflow
I also decided that a nice opening window on this side would be a good idea for natural airflow and personal security. Since I want to eventually install two solar panels on the roof using a “steel grab bar” design, I thought it best to reposition the exhaust fan configuration normally incorporated on the roof, to the rear or “aft” part of this wall panel so as to avoid any air flow obstruction when the solar panels are installed.
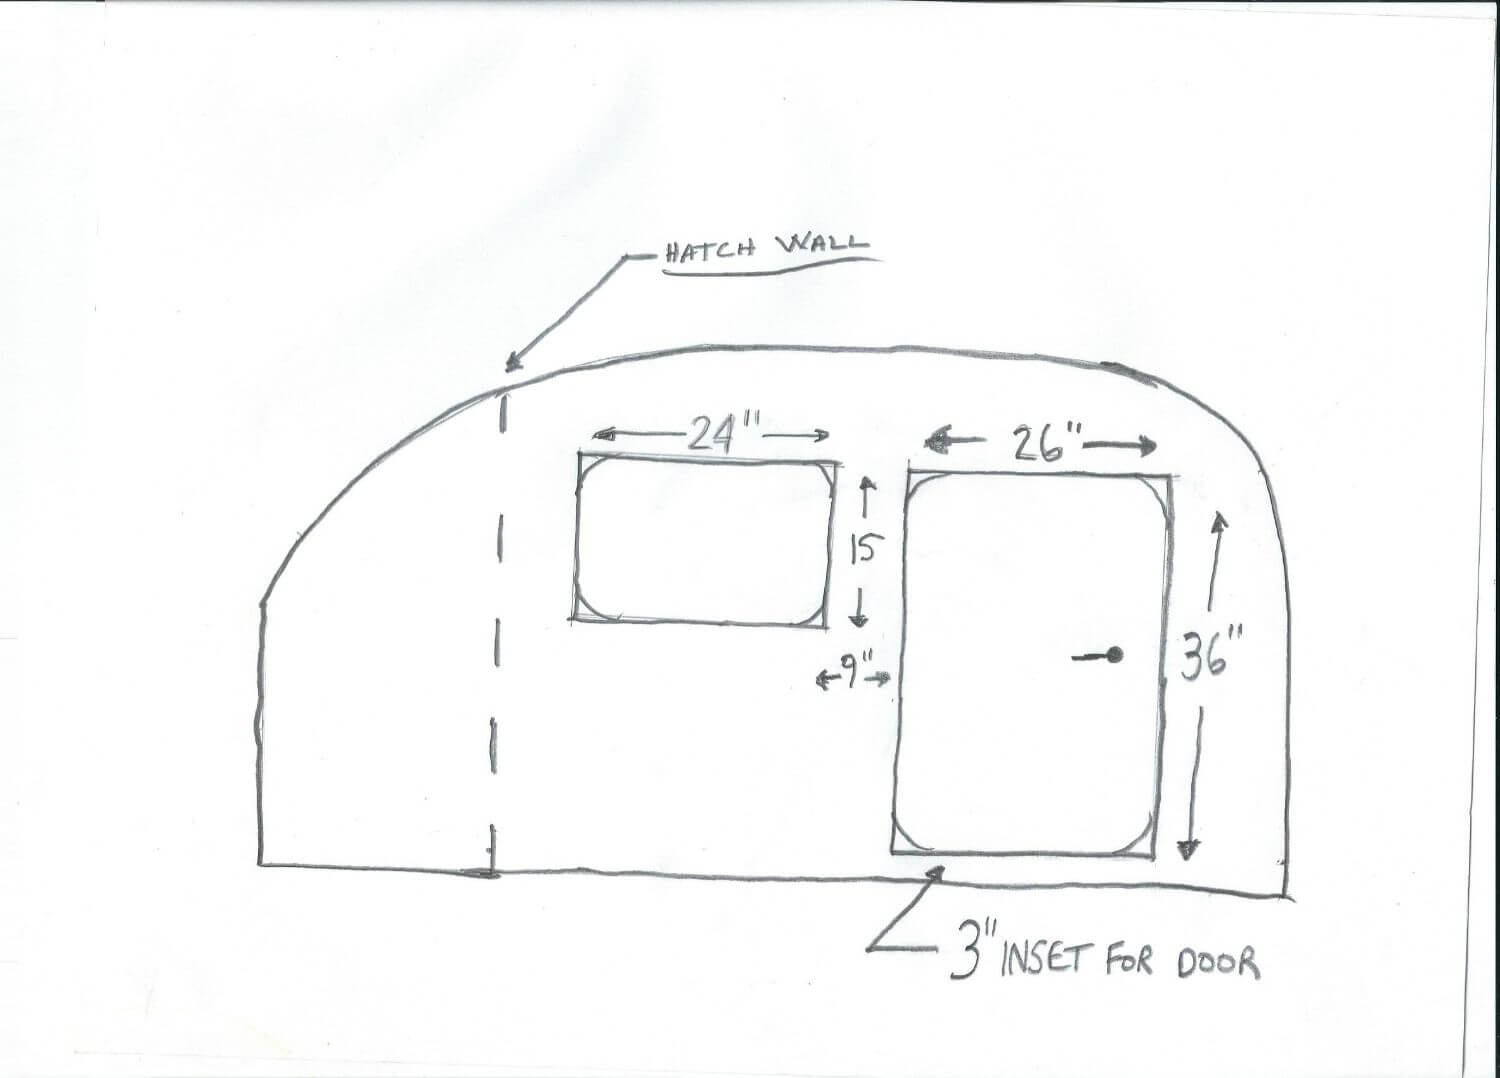
On the passenger side of this design, I have incorporated the door and window that matches the window from the driver’s side. While the windows are not lined up equally, they will balance your design and provide your teardrop with plenty of light and air flow.
I highly recommend that you have all the windows, doors, and other access points purchased prior to installation. This will allow you to trace out the inner frame dimensions without there being an issue and you’ll be able to cut them out cleanly with your jig saw.
Now that your walls have been designed and prefabricated, it’s time to get them in place as well as adding insulation and framing. In the next part of this series, we’ll start that process and we’ll begin to lay out some electrical wiring inside studwork as well as some other design features to square up your teardrop design.
As always, thanks for reading and following. Please remember, I hope to see you out there some day.