Hey! This site is reader-supported and we earn commissions if you purchase products from retailers after clicking on a link from our site.
In my last installment in this series, we looked at how to design your walls and cut them to the appropriate dimensions for your design and then I walked you through the process of cutting the openings for any doors, windows, access panels and utility outlets. In this installment, we’ll begin framing your walls, squaring them up, and preparing them for electrical wiring and insulation. We’ll also look at building your teardrop camper with as little waste as possible and how saving some of those pieces of scrap lumber from other stages of the build can benefit you later.
Timing & People Needs
4-6 hours. Once again, framing your walls is a project that takes patience and precision. Plan on this project taking most of the day.
2 people needed. You need someone helping you hold your walls in place as you attach them.
Materials You Need
| Material | How Much You Need | Cost Range | Where to Get It |
|---|---|---|---|
| Pre-cut outer and inner walls | 4 walls | N/A | See previous step in our build |
| 1 ¾” wood screws | 1 box | $ | Home Depot |
| 2″ x 2″ x 8′ boards | 8-10 boards | $$ | Home Depot |
Tools You Need
| Tool | Cost Range | Where to Get It |
|---|---|---|
| Tape measure | $ | Amazon |
| Chalk line | $ | Amazon |
| Power drill | $$ | Amazon |
| Pencil | $ | Your desk drawer 🙂 |
| 36″ corner square | $ | Amazon |
| Sawhorses | $$ | Amazon |
| Table saw | $$$ | Amazon |
| Chop saw (optional) | $$$ | Amazon |
| Jigsaw | $$ | Amazon |
| Caulking gun | $ | Amazon |
| Several C clamps | $ | Amazon |
| Belt sander | $$ | Amazon |
Cost of Framing Your Walls
Assuming you already have the tools on hand, the additional materials outside of the walls we made in our last step of this project should only cost you about $80-90.
How To Frame the Walls of Your Teardrop Trailer
- Make your first inner wall cuts
- Cut your passenger and driver’s side walls
- Make measurements on your trailer floor
- Set your outer walls
Making Your First Inner Wall Cuts
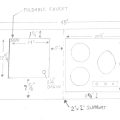
We’re going to start here by laying out your inner walls and measuring from the rear in 20″. Once you have this measurement, you’ll need to cut that part off and set those parts of the panels aside for use later.
Your next step will begin with laying out your inside walls again and measuring an inset line of 1¾” from the forward base of the outer wall of your teardrop build to where you made the cut for the hatch wall installation. This will square up the walls and allow you to install the spars that will form the framework of the outer skin of your ceiling. It will also ensure that your ceiling will be even and square when the time comes to install the outer skin of the ceiling.
Cutting Your Passenger and Driver’s Side Walls
Once you have established this line, you’ll cut the inner passenger and driver’s side walls with your jig saw down to that measurement. One of the best ways to draw that line is to scribe it using your pencil and an adjustable corner square set to 1 ¾” wide. You’ll need a steady hand for this task, and I recommend that you practice a few times on cardboard or a flat surface before you decide to commit to making the mark that will ultimately determine the continuity of your ceiling and the roof of this teardrop.
Now that you have completed this task for each wall, be sure to clamp them together and sand them down with your belt or palm sander evenly as you did before when you were preparing your outer walls. Your next step will be to lay them out on the outer walls and trace out the openings to cut for the door, windows and any other openings you may decide you need. Then, using your handheld jigsaw, carefully cut those openings and sand them down to match. Once you have completed this part of the build, we can set the inside walls aside and concentrate on building our outer walls and framing our walls.
Making Measurements on Your Trailer Floor
In the next part of this build, we’ll begin by making some measurements on your trailer floor and marking them so we can anchor the outer walls. To start, measure in 2 ¼” from the passenger side and driver’s side corners and draw a line at that measurement. Next, you’ll lay down one of your 2″ x 2″ x 8′ boards on the outside of these marks. Using your adhesive and some of the screws from building your trailer decking, secure the board onto the deck. Repeat this process for the other wall. This will leave you with a small shelf for your walls to rest on which will ultimately lead to making it easier for you to secure your outer walls with little or no help.
Placing Your Outer Walls
Once you have secured your 2″ x 2″ x 8′ board onto the decking of the trailer, place your outer walls using the adhesive onto the shelf and secure the base of that wall into the inner stud work making sure that your wall and stud work are flush and ready for permanent installation. Secure the base of the wall using 1 ¾” wood screws. Repeat this process for the other wall and then in our next lesson, we’ll begin by framing up your inner walls using more 2″ x 2″ boards. We’ll also frame around your windows, door and any of your wall openings that will require outlets for electrical or communication outlets such as internet or cable television.
As always folks, thanks for reading and in my next installment of this series, we’ll concentrate on framing our outer walls and we’ll also look at wiring and closing our interior walls. We’ll also look at laying out the spars for our ceiling and squaring up our ceiling with the outside walls as well as laying out some wiring options to power your teardrop using conventional power sources as well as solar panels. Be safe, and I hope to see on the road someday.
Start reading step five: Building the frame for your hatch area.