Hey! This site is reader-supported and we earn commissions if you purchase products from retailers after clicking on a link from our site.
In the last part of this series we framed the hatch door and prepared it for skinning. In this part, we’ll install the outer skin for the hatch door, and we’ll seal it just as we did when we sealed our outer walls in a previous part of this build.
Timing & People Needs
6-8 hours. This part of the build takes a lot of precision and patience. Prepare a whole day for this project.
2 people needed. Have another person help you with this part of the project. They can hold your materials in place while you apply adhesive, screws, and everything else in the right places.
Materials You Need
| Material | How Much You Need | Cost Range | Where to Get It |
|---|---|---|---|
| #8 x 1/2 in. Philips Truss-Head Standard Thread Wood Screws | 100 pack | $ | Home Depot |
| 1/8″ Plywood Panel | 4 boards | $ | Home Depot |
| Wooden skewers | 1 pack | $ | Amazon |
| Wood glue | 1 bottle | $ | Home Depot |
| Polyurethane and varnish | 1 bucket | $ | Home Depot |
| Construction adhesive | 1 case | $ | Home Depot |
Tools You Need
| Tool | Cost Range | Where to Get It |
|---|---|---|
| Table saw | $$$ | Amazon |
| Power drill | $$ | Amazon |
| 2″ paint brush | $ | Amazon |
| Utility knife | $ | Amazon |
| Palm sander | $$ | Amazon |
| Tape measure | $ | Amazon |
| Clamps | $ | Amazon |
Cost of Skinning Your Hatch Door
Materials for this project should cost you about $60-70. That doesn’t include the tools, which you should have most of from previous steps in this teardrop trailer build.
How To Skin Your Hatch Door
- Measure the area for your hatch door
- Cut your hatch door layers
- Secure the first layer to your framework
- Add your layers
- Seal the hatch door
Measuring the Area for Your Hatch Door
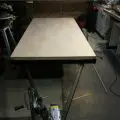
The first thing you need to do in this part of your build, is to lay out your framed hatch door on a workbench or work area that you can dedicate a day or two of time to complete the construction of your door.
While your hatch door is not four-foot-wide, your skin for the door should still be that wide. This helps to ensure that your hatch door will seal properly when closed and it also ensures that the hatch door will protect and seal your outer walls from excess moisture while your teardrop is in transit or stationary in an environment that may add moisture such as rain or snow.
Take your tape measure and measure the length of your gussets. I suggest that you add 1-½ inches to that measurement, and this will create a nice little lip at the base of your hatch door that will act as a small overhang which will prevent rain from draining down your rear hatch wall.
Cutting Your Hatch Door
Once you have established your measurement for your hatch door skin, use your table saw to cut your 1/8″ inch plywood to that length. We will be cutting four pieces of this plywood to fit; however, I would not recommend cutting all four boards at the same time because as you arc each piece of plywood and apply them on top of each other the next board will need to bit cut a bit longer to accommodate for the additional width being added which each layer of plywood.
Securing the Door to Your Framework
Take this first sheet and after you have applied construction adhesive to your gussets, place it onto the framework for your door. Remember to keep it flush with the top of your door and that it will need to be centered because the sides will be longer than the framework. Now take your clamps and place them on the outside gussets to secure the plywood tightly to the framework.
To secure the skin to your center gusset, I recommend using wood screws with a flat wide head that will prevent them from sinking into the panel. Place these screws 4-6 inches apart along that gusset and I would also suggest placing a few screws in between some of your clamps on the outer gussets.
This will tightly secure your first layer of skin and better prepare you to install the next layer of skin for your hatch door. Set aside and allow adhesive to cure.
Now that you have allowed the adhesives to dry and properly cure, remove your clamps and measure the skin length again. Cut your next piece of 1/8 inch skin and set that board aside.
Adding Your Layers
The next step will be to remove your screws. Your first layer of skin should be tightly secured at this point and using your skewers lightly dipped in wood glue, tap them into those holes with your hammer and cut them off with the utility knife. At this point, you should use your sander to make sure that these fills are flush with the skin.
Now take your wood glue and spread it liberally using your paint brush on the entire first layer of your skin. Apply the next layer of skin, clamp it down on the outer edges and screw the next layer of skin down as you did before. Be sure to allow enough time for the glue to set between layers and repeat this process for the next two steps.
Sealing the Hatch Door
Once you have all four layers secured, you’ll need to remove the temporary screws and seal the hatch door with some permanent screws that can be counter sunk and flush with the last skin. The next step is to varnish and polyurethane the outer skin just like as we did earlier in this series when we were sealing the walls and hatch area.
Once this is completed, we’re going to give it time to dry and in the next part of our build, we’ll be putting it in place with a hinge as well as skinning the rest of our teardrop build.
Thanks for following folks and we’ll see you in the next tutorial.