Hey! This site is reader-supported and we earn commissions if you purchase products from retailers after clicking on a link from our site.
There’s a lot of different reasons that would explain why your RV’s house or vehicle battery won’t charge, or hold a charge, and they can range from poor maintenance, age of the battery, and a few other issues that can occur during the course of your travels. In this guide, we’ll explore how your battery is designed to work, the best ways to keep it working longer and the best ways to troubleshoot any battery problems that may happen while you own the RV.
Checking the age of your battery and understanding its ratings
| Month = A-M | Years = Numbers | ||||
| A = January | E =May | J = September | 8 = 2008 | 2 = 2012 | 6 = 2016 |
| B = February | F = June | K = October | 9 = 2009 | 3 = 2013 | 7 = 2017 |
| C = March | G = July | L = November | 0 = 2010 | 4 = 2014 | 8 = 2018 |
| D = April | H = August | M = December | 1 = 2011 | 5 = 2015 | 9 = 2019 |
To get the correct manufacture date of your RV’s battery, you’ll need to find its heat stamped identification code. This code is usually located along the top lip of your battery’s upper housing casing.
Typically, this stamp can be hard to read, but once you have located it, a good tip to deciphering it is to take a piece of paper and lay it over the stamp and gently rub a pencil over the paper. This technique should make the code amazingly easy to interpret and it’s extremely likely that it will be coded using either a two-character coding or a four-digit code.
For example, if your manufacture code is based on two digits, a battery made in October of 2018 would have a code that begins with “8K”. However, if your code is a four-digit type code it may read something like “8274”, which would mean it was made in 2018 on the 274th day of that year, or simply put, October 1st, 2018.
Another good way to determine an approximate date of manufacture for your battery, is to refer to the sticker applied to your battery on its left side. As a rule, most automotive batteries and long-term RV or marine batteries will have this identification.
While this doesn’t give you an exact date of when your battery was manufactured, it does indicate when your battery was sold, and in most cases when the battery was first warrantied. While the sticker shown here is not punched, typically the retailer will mark or punchout the month and year symbol when you purchase a new battery and since the average time from the battery’s manufacture date to the date of its purchase is three months this sticker will give a good estimate of your battery’s age.
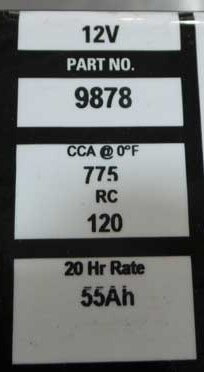
Another sticker on your RV’s battery you should be aware of is its amperage capacity sticker. This information is important to understand because it gives you a good guide as to limitations of your battery during certain weather conditions as well as its rate of discharge based upon how much amperage you draw from it during a given period of time.
For example, this sticker indicates that the battery has a Cold Cranking Amps (CCA) rating of 7.75. This is the amperage rating your battery can provide when starting your engine in a tow vehicle or motorhome at 0º F for 30 seconds without dropping below 7.2 volts. This is probably the most important measure of a battery, and it’s the typical rating used when selecting the appropriate battery for your tow vehicle or motorhome.
Below the CCA, you’ll see the RC (Reserve Capacity) of your battery. This figure is measured in minutes and indicates how long the battery will provide 25 amps until its voltage drops to 10.5 volts. This is used on both starting and deep cycle batteries.
And finally, the last rating on this particle battery is its Amp Hour (AH) designation. Generally used for deep cycle batteries commonly used in most RVs or motorhomes, this rating details the amperage capacity of your battery. For example. a battery with a 150-amp hour rating would provide 15 amps for 10 hours, 10 amps for 15 hours or 150 amps for 1 hour.
Check your battery terminals for corrosion, its wiring, and its water levels
Have you ever seen a battery terminal corroded as badly as this one shown here? Believe it or not, I have seen some that were much worse.
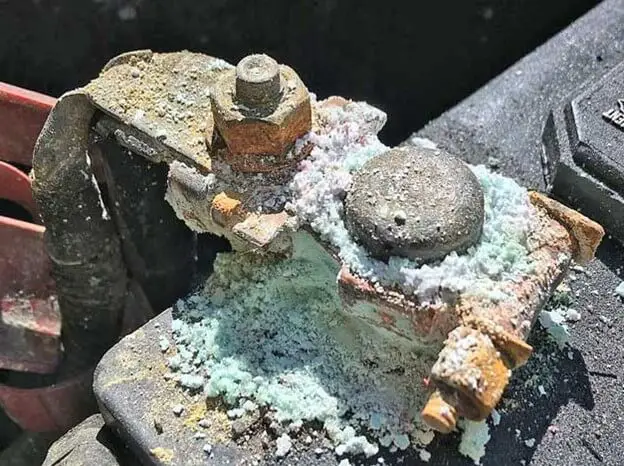
It’s not uncommon to see corrosion on your battery terminals over time as this a natural response when hydrogen gas being released from the sulfuric acid inside the battery interacts with the outside atmosphere. As a rule, battery terminal corrosion occurs on the negative battery terminal, which is a symptom of undercharging the vehicles battery and you should have your RV’s alternator tested. However, if the corrosion is on the positive terminal, this is most often the result of overcharging and it’s still advisable to have your alternator tested in the scenario as well.
Using a wire brush to remove this corrosion is your best bet and you should include this tool in your RV’s essential tool kit as it has varied uses when maintaining your rig.

- Strong and durable with solidly imbedded stainless steel bristles
- Long curved wood handle with pre-drilled hole for hanging
- Ideal for cook-out grills, restaurants, dairy operations and surfaces exposed to high humidity
Last update on 2024-07-14 / Affiliate links / Images from Amazon Product Advertising API
To begin, remove the wiring from their terminals. In many cases, it’s easier to remove the battery from the RV and work on it while it’s on a table or in an environment where it can be easily accessed from all four sides without having to work around other engine components or parts of the RV’s body. Now that you have done this, use a wire brush to vigorously to remove most of the solid corrosive buildup around your terminals.
Once you have removed most of the solid particulates of the corrosives on the battery terminals, and their wires, use a mixture of water and baking soda to clean the terminals and the battery’s surface and the wires. I recommend using a mixture of one cup of water with two tablespoons of baking soda. When thoroughly cleaned with this formula using the appropriate cloth, you should be free of any corrosives. Always remember however, to wash your gloves and cleaning cloths/rags as soon as you can to prevent future damage to your rig or physical injuries to yourself.
Preventing corrosive buildup
Believe it or not, common petroleum jelly such as Vaseline® is an excellent deterrent for preventing corrosive buildup on your battery terminals.

- VASELINE PETROLEUM JELLY: Stock up on our convenient 3.75-ounce Vaseline jars to lock in moisture on...
- DERMATOLOGIST RECOMMENDED: Hypoallergenic, fragrance-free, and non-comedogenic, 100% pure white...
- ECZEMA TREATMENT: Triple-purified Vaseline was awarded the US National Eczema Association Seal of...
Last update on 2024-07-14 / Affiliate links / Images from Amazon Product Advertising API
Once you have cleaned up the battery, and its wire connections, apply a thin layer of petroleum jelly to those components and then reattach them. While this won’t eliminate this issue completely, it’s an excellent preventative maintenance tool to help extend your battery’s life.
Carefully examining your alternator and the wires from the alternator to your battery is a must as well. Are there any breaks in the protective covering of your wiring? If so, this could be the source of your problem. One small crack in a wire from an alternator to your battery can cause massive issues with keeping a charge in your RV and your tow vehicle, especially if water or corrosives such as road salt, sand or chemical corrosives come in contact with your RV’s wiring.
I cover more on corrosion in my article on extending the life of your RV battery.
Final thoughts
With that said my friends, there are other factors that can affect the charge on your RV batteries too. Some of these issues could include wiring factors, performance problems with your RV’s electrical convertor or invertor, and issues concerning its connectivity when plugged into shore power outlets.
In a future article, I hope to share some of my thoughts on troubleshooting your RV’s converter and invertor system, its hook-up to shore power facilities and how those connections may affect the overall efficiency of your RVs electrical systems.
If you’re working on your electrical system, be sure to read these other guides too.
- RV electrical system: how it all works
- Best RV deep cycle batteries
- Best RV battery chargers
- RV electrical system troubleshooting
As always, my fellow RVers, stay safe, stay healthy, and I can’t wait to meet up with you on the road some day in the future.