Hey! This site is reader-supported and we earn commissions if you purchase products from retailers after clicking on a link from our site.
Electrical…this was by far the aspect of my van build that I was dreading the most. I have absolutely zero background in any kind of electrical work besides changing the occasional light bulb and when I started doing my research I was instantly overwhelmed. What is wire gauge? What is direct current versus alternating current? What are amp hours? I’ll admit, even now after finishing my electrical setup I’m not 100% sure about a good portion of it. But if you take it slow and check every step along the way, you too can have electrical power!
Timing & Level of Difficulty
One-two full days. Trust me, you do not want to mess this up and if you have no electrical background, this will take a while to break down.
Two people needed. This is all technically possible with one person but it is much easier to have two people to bounce ideas off of.
Level of difficulty. Moderate to high. The final product is literally the exact project my friend had to accomplish for his final in his electrical engineering class in college. Granted, he probably finished it and understood exactly what he was doing at the end of it, but the pieces are all the same.
Materials You Need
There are a lot of variables for your electrical and your solar setup and I found it was easier to just buy it all in a bundle on Amazon. Also God bless the employees at Home Depot because they were an absolute savior for all my electrical questions.
| Material | How Much You Need | Cost Range | Where to Get It |
|---|---|---|---|
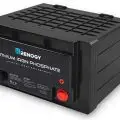
| 100Ah Deep Cell Batteries | 2 | $$$ | Amazon |
| 1000W Pure Sine Inverter | 1 | $$$ | Amazon |
| MPPT Charge Controller | 1 (part of Renogy solar panel kit) | $$ | Amazon |
| Power Inverter Remote | 1 | $$ | Amazon |
| Battery Disconnect Switch | 1 | $$ | Amazon |
| Fuse Block | 1 | $$ | Amazon |
| Blade Fuses | 1 box | $ | Amazon |
| Fuse Holders | 1 box | $ | Amazon |
| Smart Battery Isolator | 1 | $$ | Amazon |
| 40amp Circuit Breaker | 2 | $ | Amazon |
| 100amp Circuit Breaker | 1 | $ | Amazon |
| 4 Gauge Wire | 25 feet (red and black) | $ | Home Depot |
| 8 Gauge Wire | 25 feet (red and black) | $ | Home Depot |
| 12 Gauge Wire | 25 feet (red and black) | $ | Home Depot |
| 4 Gauge Ring Terminals | 8 | $ | Home Depot |
| 8 Gauge Ring Terminals | 8 | $ | Home Depot |
| 12 Gauge Ring Terminals | 8 | $ | Home Depot |
| Wire Connectors | 1 box | $ | Home Depot |
| Electrical Tape | 2 (one black, one red) | $ | Home Depot |
| Plywood | 1 sheet (4×8′) | $ | Home Depot |
| #8 ¾” General Purpose Screws | 1 box | $ | Home Depot |
Tools You Need
| Tool | Cost Range | Where to Get It |
|---|---|---|
| Power Drill | $$ | Amazon |
| Jigsaw | $$$ | Amazon |
| Cutting Pliers | $ | Amazon |
| Wire Crimper/Stripper | $ | Amazon |
| Socket Wrench and Drive Set | $$ | Amazon |
| Wrench | $ | Amazon |
| Wood Glue | $ | Amazon |
| Label Maker | $ | Amazon |
Cost of the Electrical Setup
Electrical was absolutely the most expensive part of my van build. With the solar panels factored in, it cost about $2,000. However, when put into perspective, I paid about $2,000 for hypothetically unlimited electricity! I won’t have any electricity bills as long as my system is working and there’s enough sun to charge my batteries.
How To Set up Your Electrical System in Your Converted Van
- Figure out how much power you need
- Piggyback your batteries
- Connect all your elements and test your system
- Build your storage box
- Hook it up in the van
Okay, like I mentioned, this is a lengthy process. There is a lot of math and a lot of factors to figure out, but I’ll help break it down one step at a time and together we can all get lit.
Step 1: Figure Out How Much Power You Need
Solar power and electrical – what the f$#% exactly am I setting up and how does this all work??
Basically, the solar panels absorb sunlight and convert that energy into electricity! The electricity gets sent to the charge controller which regulates the flow of the electricity from the panels and works to charge the batteries. Just like the battery in your phone or camera or electric toothbrush, the batteries store the energy that has been converted from the solar panels and distributes it out to the van through your fuse box. In my system, the charge controller also distributes the electricity.
However, not all electricity and electrical currents are created equally, so it’s essential to have an inverter to power more powerful electronics such as computers, hair dryers, and fridges. The deep cell batteries support DC (direct currents) – i.e. simple electricity flowing in one direction such as in phone chargers, lights, and two-prong outlets. The inverter converts devices that use AC (alternating current) to DC. AC is with more powerful devices that have electricity flowing in two directions, which is pretty much anything with a three-prong plug. Without the inverter, electricity would be flowing the wrong direction and overload the system, resulting in a blowout.
But how much power do I need?
This was a bit confusing for me to figure out because there are SO many factors that you have to take into consideration. For example, how many people will be traveling in the van most of the time? How many devices will you have that will need power on a regular basis? Will you need any sort of serious power like with power tools or kitchen appliances? Will you have access to sunlight every day to fully charge your batteries?
My criteria:
- One full-time traveler with occasional visitors
- A few minimal-energy features (lights and fan)
- Several minimal-energy electrical devices (phone, iPad, camera battery, Bluetooth speakers)
- Two high-power devices (laptop and fridge)
As you can see, I didn’t have a ton of serious power needs. However, I also didn’t want to settle for the bare minimum for power because I felt more at ease having extra power than having to consistently watch my energy usage (even though we should all be doing that anyway). I knew I had to determine the amount of energy I would use every day. To do this, I had to calculate a few things, which means I had to start working with watts, volts, and amps. While it is a bit more complex, the easiest way to conceptualize these three factors is to use a water analogy. Amps is how much “water” is flowing through the pipe (width of wire), volts is the water pressure (speed of electricity), and watts is how much power the water could provide. Watts is calculated by multiplying amps x volts.
But to determine my power needs, I specifically need to know my watt-hours (Wh), or how much electricity I use in a day. This is determined by multiplying a device’s wattage by the number of hours a day they are being used. So if my phone charger uses 6 watts and I use it for 3 hours a day, my consumption would be 18 Wh per day. I calculated my total Wh taking into consideration each of my devices. While this website is mostly geared towards houses, it has a list of the average wattage of household appliances to help you in your calculations.
- Phone = 18Wh (6W at 3 hours)
- iPad = 24Wh (8W at 3 hours)
- Fan = 21Wh (7W at 3 hours)
- Speakers = 14Wh (7W at 2 hours)
- Computer = 320Wh (80W at 4 hours)
- Lights = 12Wh per light, 48Wh total (3W at 4 hours)
- Fridge = 480Wh (60W at 8 hours)
My Total = 925 Wh per day
This amount will vary day by day based on how much I’m using my devices and if I have other people in the van with me, but this is a generally good average.
Next, I had to make sure my batteries would have enough power saved up to provide me with the electricity I needed. Unfortunately, battery capacity is measured in amp-hours (Ah) so I had to convert my Wh to Ah. How can I do this? To convert, you need to divide the Wh by the voltage. This website is a great tool for calculating back and forth between Ah and Wh. I simply divided my daily Wh by 12 because my system is run on a 12v battery.
925Wh/12v = 77Ah
A general rule of thumb is that 35-50Ah is modest energy consumption, 70-90Ah is moderate, and 110+Ah is like living on the grid.
This means to power my system on a daily basis, I would need a battery that can hold at least 77Ah – so that means get a 77Ah battery, right? NOPE. Unlike my phone battery which I constantly let get down to 20% and below (shoutout to Low Power Mode), you never want your deep cell batteries to go below 50%. If they do, they could become seriously damaged! Instead, I want to get a battery that can hold at least DOUBLE my daily amount, so a minimum of 154Ah.
Cool! So an 154Ah battery. But…how many solar panels will it take to adequately charge those batteries? Again, you want to make sure your batteries never get below 50%, so if you have a battery that can store a lot of energy but not enough solar panels to fully charge them, you’re setting yourself up for failure. Because nothing could possibly be easy, solar panels are measured in watts and not amps. If I divide my total Wh by the amount of sunlight I expect to get each day, I can find the best solar panel size.
925Wh/5 hours of sunlight per day = 185 watts
Remember – this is an IDEAL situation. It’s impossible to predict getting a full 5 hours of sunlight every day to fully charge your batteries and there may be days when you consume more energy so it’s better to go bigger.
Tl;dr for a one-person setup with medium electricity needs, a 200-watt solar system with two 100Ah deep cell batteries should be fine.
Step 2: Piggyback Your Batteries
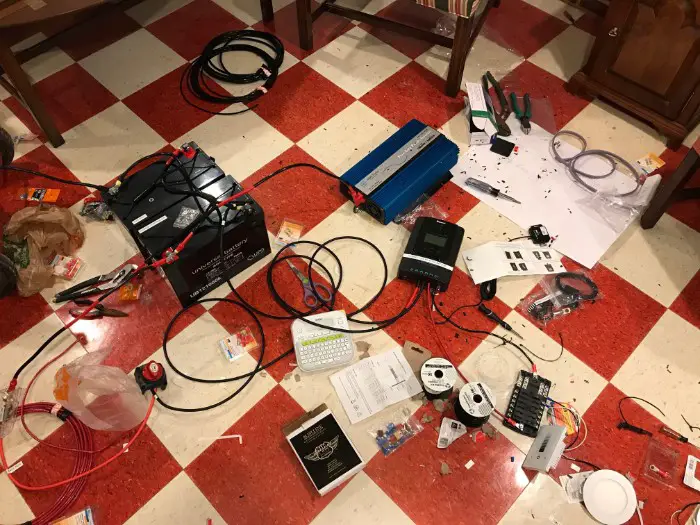
WOW, okay now that you know how much power you’ll need and you have your materials, let’s get this bad boy set up! First things first, you need to parallel your batteries. This basically just means that you connect your batteries so that they act as one giant battery.
Pro tip: Choose one wire color to be positive, and one to be negative.
We chose red to be our positive and black to be negative. In cases where we weren’t able to find red wire, we used the red electrical tape to label our wires.
Using the wire crimpers, attach the 4-gauge ring terminals to each end of a short piece of red 4-gauge wire and black 4-gauge wire. The wire only needs to be long enough to reach between the two batteries. Our wire crimpers weren’t very strong, so we had to get creative with getting our terminals to attach firmly to the wire. Using the socket wrench and adjustable wrench, connect the positive wire to the bolts on each battery that’s marked positive (+) and likewise for the negative (-) wire.
Step 3: Connect Everything and Test Your System
Once the batteries were connected to each other, we wanted to set up the rest of the system. Along with connecting the batteries to each other, we needed to connect the inverter and the MPPT charge controller to them. As you can see from the diagram, six total wires will be connected to the MPPT charge controller:
- Battery (positive wire)
- Battery (negative wire)
- Solar panel (positive wire)
- Solar panel (negative wire)
- Fuse box (positive)
- Negative bus bar
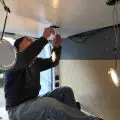
My dad and I worked for a whole day just putting everything together to see if we could get it to work (spoiler: we got it to work). We connected and tested each element along the way to make sure it was all functioning properly.
- Connect the battery control switch to the positive wire that will connect to the charge controller.
- Connect the charge controller to the battery using the positive and negative wires and make sure it turns on. The charge controller will light up immediately.
- Connect the fuse box/fuse bar to the charge controller. To make sure this was working we connected one of our lights directly to the fuse box using two 12 gauge ring terminals and a 5 amp blade fuse. The light turned on! (If your light doesn’t turn on immediately, check to make sure the lightbulb icon on the charge controller is lit up. If it isn’t, click a couple of the buttons until it does come on and that should connect the fuse box).
- Connect the inverter to the batteries. I plugged an old lamp into the inverter and when the light turned on, I knew it was working properly.
Once we figured it out, we unhooked it all so that we could re-connect it inside the van. This may seem like an extra step, but it was much easier to figure it all out when we had plenty of space as opposed to trying to figure it out cramped inside a van or a box. We also weren’t 100% sure exactly how we were going to mount the system so we didn’t know the exact length we should cut the wires.
Pro tip: Use the label maker to label EVERY SINGLE WIRE. They will all start to look the same after a while and this will help you to remain organized.
It was a hot mess, but we got the system connected and working!
Step 4: Build Your Storage Box
Where and how you decide to have your electrical setup is completely dependent on the layout of your van. We eventually decided to build a box that would house all of our electrical elements in a neat and easy-to-access way.
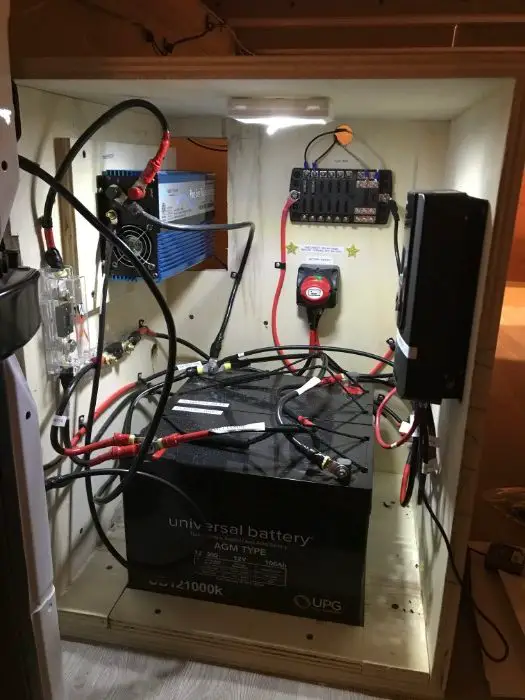
This is what our box looked like when it was all put together and the electrical battery system was set up inside.
Box dimensions: 19.5″ x 26″ x 18″
Each panel of the box was modified to specifically meet the needs of the element of the system it was holding. We outfitted the bottom panel with a frame to keep the batteries in place. The left side panel also has a frame to securely hold the inverter while the back panel has a square opening for the back end of the inverter and a hole for wires to come in to connect to the fuse box. Depending on the size of your system and how many batteries you will have, the exact dimensions of the box and its elements will change.
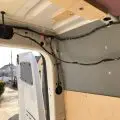
Step 5: Hook Everything Up to the Van
Now that the box was built and the elements had been installed inside, it was time to move the box to the van and ground it to the metal of the van. We actually disconnected the batteries to move them separately from the box because they were so heavy (60 pounds each) and then just reconnected them back inside the van. Once inside the van, we were able to decide exactly where we wanted the box to be and drilled it into the floor. Because of the shape of the door hinge, we ended up having to cut two small notches in the left side of the box to make sure it could fit all the way up against the wall. It looked good inside!
At this point, we hadn’t installed the solar panels yet, so anything we plugged into the inverter or connected to the fuse box was running off of whatever juice the batteries had inside them when we got them. I wasn’t living in the van at this point so it wasn’t necessary to have the entire system set up yet. In my solar panels guide, I tell you how to install your solar panels and once they’re attached to the roof, all you need to do is connect them to your charge controller and as long as everything has been connected correctly, they should start charging your batteries right away.
If you’ve made it to the end and everything is working and nothing has exploded, CONGRATULATIONS! You’ve officially completed a project many electrical engineers take on during college and you didn’t even have to deal with the Freshman Fifteen and the nightmare of registering for classes!
Tips and Tricks
YouTube is Your Best Friend
Watch as many YouTube tutorials as possible concerning electrical systems, solar panels, and what it means to live off-grid. I can offer what knowledge I have, but I am by no means an electrical expert. The more videos I watched, the more comfortable I became with the lingo and it was less daunting to approach the whole task.
Go Slowly
Go slowly and don’t become overwhelmed! Check and double check each step as you go so that if there’s a problem with the system, you’ll be able to find it right away. If even one wire is loose, the whole system won’t work.
Don’t Forget the Fuse Blade
This may seem silly, but make sure you have a fuse blade in the fuse box each time you connect something to your system. I went crazy for over 20 minutes trying to figure out why my lights wouldn’t turn on and I had just forgotten the fuse blade. I made this mistake two more times so please learn from me…
…and also make sure you have your negative wires connected to negative and your positive wires connected to positive…
If you have any further questions (or if you’re an electrical engineer who would like to offer some tips of your own), feel free to reach out or leave a comment below! Good luck and may good energy flow through you and your van.