Hey! This site is reader-supported and we earn commissions if you purchase products from retailers after clicking on a link from our site.
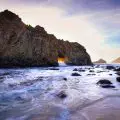
Want a hiking trip that will quite simply blow your mind? Then try Canyonlands National Park, with incredible pathways leading you down to phenomenal views, if you’re planning to do a full tour of Utah’s 5 national parks, then you’ll most certainly adore Canyonlands. With horizons dotted with beauty, and bedazzling sunsets that will have you sighing in awe, I’m fairly confident that this will be the best hiking trip you’ve ever had.
Have you ever read one of those adventurous books as a child, and reached a point in a story where the main character – or warrior – takes a seat upon the edge of a rock, looking down at the beautiful world beneath her? That’ll be you. Arms spread out behind you, whilst you bask in the glorious rays of sunshine caressing your face. A trip worth remembering I must say.
Table of Contents
- Where Is Canyonlands National Park?
- What Is Island In The Sky?
- Hiking In Canyonlands
- Best Hikes In Canyonlands
- Essentials For Hikes in Canyonlands
- Hikes!
- FAQ’s
Where Is Canyonlands National Park?
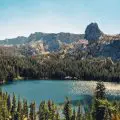
Located in Utah in the USA, Canyonlands National Park is one of many national parks in Utah and it’s magnificent. It’s very close to both the town of Moab and Arches National Park. If you’re planning to spend your holidays doing a lot of exploring then Arch and Canyonlands Nation Park, must be on your list! There are lots of trails at the canyonlands, some even perfect for overnight trips if you’re up for the adventure. The park preserves an attractive and colourful landscape eroded into many canyons, mesas and buttes by the Colorado river and the Green river.
What Is Island In The Sky?
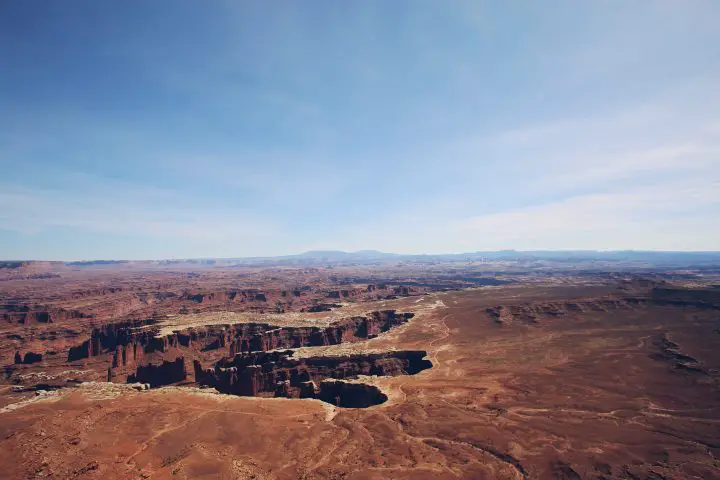
If you’re planning on visiting the Canyonlands then you’ll definitely wouldn’t want to miss visiting Island in The Sky. Island in the Sky, or Between the Rivers, is a commonly visited and easily reached area of the Canyonlands. It is a huge level sandstone mesa situated between the Green and Colorado rivers, home to winding canyons, gently flowing. The mesa lies at an elevation of 6000 feet, providing spectacular viewings of the canyons below. There is an access road that passes many magnificent viewpoints of the deep twirling canyons on either side, plus loads of short paths and longer trails, some across the plateau and a few that descend towards the rivers.
Hiking In Canyonlands
Going on an adventure is always riveting, but preparation is key, especially if you plan to hike along the trails of canyonlands National Park, because the endless winding paths can make your legs a little sore from all that walking, plus your tongue will lay limp in your mouth, as the sun beats down on your sweat soaked back. Here are some equipment you may want to take with you:
- Water – No matter where you’re hiking, and especially in the summer, water is your best friend, take as much as you can carry, and rehydrate your organs, as they work with you.
- Cairns – Follow these stacks of rocks that mark the right trail for when the path splits, or it’s difficult to see.
- No Signals – If you’re really into unwinding and becoming one with nature, then this trip is the one, because trust me, your mobile phone won’t catch a signal out there!
- Food – There’s no food hanging about in the park (don’t worry we’re not asking you to hunt either) make sure you bring plenty of food for the length of your hike. You can even bring some packed lunch in a cooler in the car for a perfect cool off between hiking.
- 7 Days Access – Take advantage of the seven days access your pass will get you, and come back multiple times during the week to explore the beautiful winding paths of the canyonlands, perhaps you’ll try a different trail next time!
- Summer Time – If you’re visiting in the summer, avoid hiking during the hottest part of the day, which is usually around 12 to 4pm.
- Snow – If you’re hiking in the winter, make sure you ask a ranger at the visitor centre which hikes are open or safe due to snow, you don’t want to be slipping down trails my friend.
Best Hikes In Canyonlands
So of course when you set foot into the canyonlands you’re going to naturally have the desire to run down each and every trail that stretches as far as your eyes can see. There are highs and lows, rocks that seem to touch the sky, and rivers that twist and wind beautifully. Here are the best hikes you will not regret going to:
- Mesa Arch Trail
- White Rim Overlook Trail
- Grand Viewpoint Trail
- Murphy Point Trail
- Upheaval Dome Trail
- Aztec Butte Trail
- False Kiva Trail
- Druid Arch Trail
- Chesler Park Loop Trail
- Syncline Loop Trail
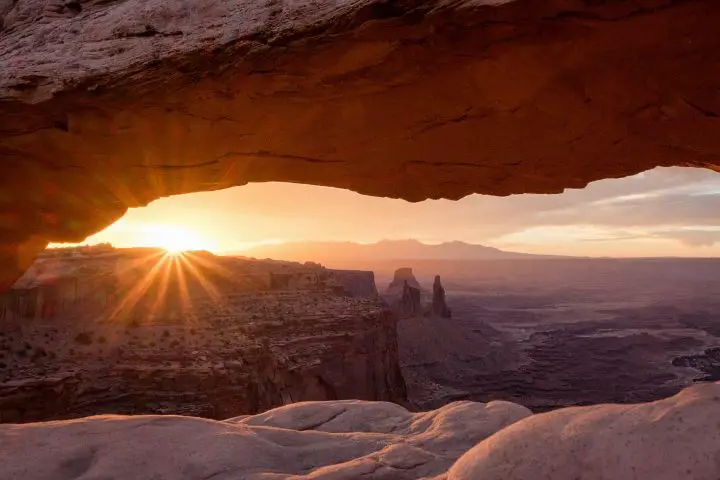
Mesa Arch Trail
Walking along this iconic half a mile trail, that catches the beautiful golden rays of the sun as it begins to ascend, painting the sky a wonderful auburn red, as you pass by many other visitors, who will have paused to drink in their surroundings, and take memorable pictures of their breathtaking surroundings. If you want a more expansive view, climb up the rocks on the left side of the trail, and you’ll get to see the entire view without the arch obscuring your vision, imagine basking in the glow of the naked universe, with the early morning gentle breeze kissing your cheeks.
You can even climb up the arch, but beware there is a risk of dropping on either side, so if you have kids with you keep them close by your side. You can capture beautiful scenic views under the arch, and more over it, as you’ll be witnessing the vast beauty of the canyonlands as far as your eyes can see! I’m sure by now you can agree that the Mesa Arch trail is absolutely worth your time, I mean if you were to Google “Canyonlands” right now, the first picture that’ll pop up would be quite identical to the one below, a view of ascending sunlight bouncing off of the arch. Truly the best place to hike if you’re thirsty for something to quite literally take your breath away.
White Rim Overlook Trail
Not to confuse this trail with the White Rim Trail this hike is only 1.8 miles and offers very little elevation, whereas the White Rim Trail is a 100-mile long scenic drive around the canyon rim. From the White Rim Overlook Trail, you’ll be able to glimpse the tiny Jeep’s pass and become overwhelmed at just how massive this canyon is. For an easier hike with a solid panoramic view, then this trail is a soul binding option with rewarding views that stretch beyond your visions ability.
This trail begins at the Gooseberry Trailhead where you’ll see a picnic area and the trailhead is just beyond that. Once you arrive at the junction, you’re going to turn right and continue over to the overlook trail. If you go right it’ll take you down the mesa and into Buck Canyon, so make sure you take that left! At the beginning of the trail, you’ll be walking on crunchy gravel, but as you keep walking further it gets more rough, and you’ll need to follow the cairns to get to the peninsula.
Follow the trail until your legs are screaming for a little break, and sip on some water whilst enjoying the exquisite 300-degree view, that’ll surely make your warm skin erupt with goose bumps at the sheer exposure of beauty. Since the final viewpoint faces the East, this trail is best in the late afternoon, when the sun is warming your back, illuminating the canyon with a brilliant orange glow.
The Colorado River lies below, a mesmerising expanse of canyons. Along the canyon rim is a layer of white thick salt rocks, the stars of the show, they outshine the surrounding stones, giving the landscape an elegant look, like little diamonds dotted across the rim, twinkling in the daylight.
Grand Viewpoint Trail
If you’re looking for dazzling views that require very little effort, similar to the White Rim Overlook Trail, then the Grand Viewpoint Trail is calling your name. It is another straight-forward and simple hike. The trailhead for the Grand Viewpoint Trail is at the end of Grand View Road – who would’ve thought – there is a solid view upon arrival.
You’ll want to hike deeper along the trail for an even better view, one that will seize you by the flesh and keep your feet glued to the ground, as you gaze in a trance at the celestial views. The trail is 2-miles and relatively flat for the duration of the hike, and happens to have excellent spots for watching the sunset. With little climbing to get to the peak, once you get to the end of the trail, there’s a rock you can climb to get 360-degree views of glorious nature, be careful not to get too close to the edge, it’s a long way down!
Murphy Point Trail
This peaceful trail follows the canyon rim until it opens up to a beautiful view overlooking Candlestick Tower, the Green River and White Rim Road! The trail to Murphy Point begins on some very plush and vibrant desert sand, you’ll walk through what feels like a rather expansive field dotted with opuntia cacti and summer wild flowers. As you get closer to the canyon edge, you’ll see the most amazing views moving closer with each step. You can hike this trail for sunrise or sunset, but the sunset vibes are too good to ignore, and if you’re only at the Canyonlands for a day, you won’t want to miss the sunrise at Mesa Arch Trail. It’s simply enchanting.
The trail eventually turns left down a slope before turning back to the right and straightening out. One final left turn puts you on course for the mesa’s edge at the southern face of Murphy Point. You’ll find enormous views, as you look all the way down to the mesa towards Grand Viewpoint and beyond at Junction Butte. The Murphy Point Trail has a rather small and almost invisible parking area, sometimes muddy 2.5 miles south of the Upheaval Road junction, at the start of a long disused dirt track.
Upheaval Dome Trail
Upheaval Dome is an expansive area of around 3 miles across where a rock formations poke out, and these formations have not shifted since they first formed millions of years ago. The spot is quite fascinating, as no one knows how the ominous rock was formed, and the mystery behind the appearance of this great specimen gives it a wilder appearance. You can add an extra mile onto your hike and go to the second viewpoint since it’ll give a better view of the dome, and you can see expansive views over the Canyonlands on the left.
The trail up the first overlook is easy but pretty steep, though the steps make it easier for walking, and can be done without hiking shoes. The last part of the trail, you’ll be walking on slick rock, so take care not to slip or go when its dry.
Once you get to the second overlook, you’ll find this part of the trail is steeper and goes along cliffs, about 3/4 of the wat through you’ll walk down massive slippery rock and right back up another. Hiking shoes with excellent grip, and maybe a hiking pole for extra assistance, are recommended for this part of the trail.
Aztec Butte Trail
A less popular hike, but still worthy of a visit is the Aztec Butte Trail, the highlights of this trail are Aztec granaries and not forgetting the view from the top butte that overlooks the middle portion of the Island In The Sky. The trailhead for Aztec Butte is down Upheaval Dome Road, past the turn for the Willow Flat Campground. The trail starts on comfortably flat, sandy ground that flows through juniper and sagebrush, around the first butte before you hit a junction. The trail to the left will take you to some ruins on the northwest side of the butte, whereas the trail to the right leads up to Aztec Butte.
Much like the trails we’ve covered so far in the Canyonlands, the views along Aztec Butte do not fall far behind, when does nature ever disappoint? With mesmerising blue sky, dotted with fluffy white clouds that seem closer as you’re perched at the top of the butte, squinting at the sky, and soaking in the beauty of the ruby red canyons below.
False Kiva Trail
A short hike, that is not maintained by the National Park Service is this False Kiva Trail, please remember to bring plenty of water with you, and you might want to download a copy of the trail, either on AllTrails or the Hiking Project App. Another thing worth mentioning is that the False Kiva Trail is a class II archaeological site, and whilst this is spectacular, vandalism has caused the alcove at the end of the trail to be closed. So you can appreciate the glorious views from a distance.
The closest trailhead and parking area to the False Kiva Trail is a little over 1000 feet away at the Alcove Spring Trail. As the trail comes nearer to the rim of the canyon the angle of descent becomes much steeper. The section of trail below the alcove may appear risky but it turns out to be wide enough and quite a comfortable hike.
Druid Arch Trail
Amid spectacular sandstone formations at the head of Elephant Canyon stands a massive arch unlike any other in canyon country. Druid Arch with its angular profile and two narrow, elongated openings, looks more like something you’d find at Stonehenge. This long hike is best accomplished during the spring or autumn when the temperatures are mild but not scalding. If you are planning to hike during the hot summer days, be sure to carry plenty of water, and get an early start. There is very little shade along the trail and sections of the hike involve trotting along a sandy wash.
The Druid Arch is located within the Needles District of Canyonlands National Park, which is generally and epic spot for overnight backpacking. To get to the Druid Arch you’ll need to make a 10.8 mile out and back trail from the Elephant Hill Trailhead. There are many different wats to get to Druid Arch, but this route is the most common used one, although you may find that you’re the only one walking this trail.
Look out for the markings of cairns as you navigate through the trail. From the trailhead you’ll hit a slot canyon and over a wash around 1.5 miles in, and from there you’ll hit a junction. Left goes to the Squaw Flat Campground and the right foes on the trail to Chesler Park, you’ll take a right. You will stumble upon many junctions but you’ll find some signs that’ll point you in the right direction.
You might find it beneficial if you have some type of navigation with you so you don’t take a wrong turn, something that will keep your GPS location, and guide you even when you’re at a place with no signal whatsoever, it’ll ease your nerves and act as a little virtual map. There is excitement waiting at every corner of this trail, seclusion and exploration needed for this trail is an amazing adventure; a challenge that you simply can’t reject. If you’re hiking during sunset, make sure you bring a headlamp since it can be easy to get lost in the dark, if you’re attentiveness slips for even a moment.
You’ll need a permit if you plan to stay overnight, bearing in mind that the hiking time will take up to 5 hours, so you can watch the sun disappear behind the sky and call it a day, or carry on till you hear the birds chirping, it all depends on your level of capacity.
Chesler Park Loop Trail
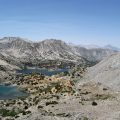
In the heart of Canyonlands National Park, Needles District is Chesler Park. This is an expansive grassy area surrounded by incredible rock formations in this district. The park is a central area for a lot of the day hikes and late night backpacking trips in this area.
This trail, like many others, begins at the Elephant Hill trailhead. The Chesler Park Loop is marked by cairns, small stacks of stones to help you find your way, so keep your eyes peeled for those as you walk along. As you begin your first mile, you’ll notice magnificent rock formations in the Needles and it’ll motivate you to push further, at the probable excitement that lays ahead.
Beyond the viewpoint the trail loops around Chesler Park, travelling through amazing landscapes of stunning multi-hued sandstone pillars, fins, spires, and knobs eroded by wind and water into fantastical shapes. On this trail you’ll see beautiful views over the Needles District, slot canyons, pinnacles, knobs and more that will take your breath away. You might want to elongate the duration of this trip and pay attention to your surroundings in much more detail, rather than glimpsing it and trotting along. Take a seat and drink in the red canyons beauty, consider making this a 2-day backpacking trip!
A long, strenuous hike requires plenty of water, and some snacks, to bring back your energy, as it is undoubtedly thirsty work, not to mention the slightly slim chances of you getting lost in the midst of your adventure. As long as you keep an eye out for cairns, you’ll be perfectly fine. Remote places like Canyonlands can be quite lethal, so make sure you’re properly equipped.
Syncline Loop Trail
If you fell in love with the scenery in and around Upheaval Dome, the Syncline Loop Trail is an amazing loop that takes you through two canyons that surround the dome. The route around is well marked and a great way to escape a cluster of hikers in the Island in the Sky. It’s recommended to go clockwise around this loop since you’ll beat some elevation and get some much-needed shade in certain areas.
If you want to extend this hike by two miles, then you can take a stony streambed up to see vibrant views of Upheaval Dome. There is a small spur that is an out and back type of trail that is optional only if you’re up for a detour. This trail is quite secluded and strenuous in some places, but its the perfect challenge if you want premium sights, that not many people get to see.
Essentials For Hikes in Canyonlands
- Headlamp
- Backpack
- Water Bottle
- Hat
- Hiking Shorts
- Hiking Top
- Sunscreen
Headlamp
Whether you plan to hike at sunrise or sunset, a headlamp is one of the most underrated pieces of camping and hiking equipment you could own. It’s also way better than using your phone light, since you can leave your hands free, and strap the light to your head, select your level of brightness, and be on your way. If you are thinking “but my phone light does the same” – can you strap your phone to your head? Didn’t think so. Personally when I’m going on outdoor adventures that require my undivided attention, and the fact that I could quite easily slip at some parts of a trail, I like to have my hands completely free, I hate to feel frustrated while trying to squint through my phones light at what’s in front of my face. From the distance you’ll look like a shining beacon, I mean what’s not to like?
Backpack
Carrying a day backpack that has all your essentials inside is much easier than suffering with no water, food, or map. Your essentials can even be a change of shoes if the oath you’re taking is much smoother than expected. You can throw in your camera as well, unless you prefer to carry it around your neck, snapping pictures as you trod along.
Water Bottle
If you’re planning to explore all the trails of Canyonlands National Park, then you’ll want to have a reusable water bottle. You might consider carrying around 2 to 4 litres of water, but that might not be enough as the summer days grow hotter, or milder temperatures in the spring or autumn can still have you feeling parched, especially with all that walking. Your bag will feel heavier, but every sip or glug you take from that bottle, will only lighten the overall weight you’re carrying in your backpack. You can buy insulted water bottles that’ll keep your water cold, so that you can enjoy a burst of coolness that’ll satisfy your dry throat.
Sweat pouring down your forehead, and drenching your back, you’ll be getting frustrated as you push along the trail. As well as the beautiful surroundings that you’ll most definitely appreciate there is the undeniable fatigue that’ll creep up on you. Water is the tiny heaven that’ll keep you going, trust me, don’t make the mistake of forgetting this gem.
Hiking Shorts
The ripened summer days, where the streams of sunlight chase the humans, especially on non-shaded trails throughout Canyonlands, not to mention the one inevitable problem that is chafing. Hot sweaty thighs rubbing together, a hot mess we don’t need! Wearing shorts where the seam doesn’t rub against the inner thighs is the most essential thing to have on, whilst hiking. You want to be comfortable on your adventures. Try getting some that have pockets, so you can carry your little virtual maps in them, and reach for them easily whenever you feel you’re getting lost.
Hiking Top
With the buckets of sweat you’ll be collecting on these hikes, you’ll want a thin comfortable top that’ll keep you cool without clinging to your body. Light colours help with this, so try going for white, yellow, pale blues and add a sun hat to the mix while you’re at it. You’ll have some sunglasses on to protect your eyes from the bright rays of the yellow globe in the sky, but what about your head? There’s no denying the strength of our bulb in the sky, and when it starts to target the tops of our heads, it’ll get you feeling irritated. Throw on a nice wide brim sun hat so that you can comfortably continue with your adventures, and actually enjoy everything you run into.
Sunscreen
Another extremely important tool to carry, especially if you’re hiking with kids. Without looking like a lobster once you return to your resting place, lather on plenty of sunscreen, all over the exposed parts of your skin, topping it up every 6 hours if you plan to spend the entire day hiking. Not only will this protect you from burning your skin, it’ll protect you from the harmful UV rays that emanate from the sun. Non-burned skin equals a happy hiker.
Hikes!
If you want to be slapped in the face by mother nature, then take a memorable trip down to Canyonlands National Park. Bask in the glory of the world that you have yet to explore, taking care of yourself and the nature that you’re presented with. Chase the sunrise and sunset with your cameras, and let the glorious beauty of each individual trail, leave a lingering impression, dragging you back next year.
FAQ’s
What Is The Best Hike In Canyonlands?
The most iconic hike is the Mesa Arch Trail, that has the rays of sunlight bouncing off the arch, you can climb on top of the arch and see everything much better.
What Trails To Do In Canyonlands?
Mesa Arch Trail, Grand View Point, White Rim Overlook, Murphy Point, Upheaval Dome Overlook, Aztec Butte. Syncline Loop, and Chesler Park Loop Trail.