Hey! This site is reader-supported and we earn commissions if you purchase products from retailers after clicking on a link from our site.
I love bread and I love to cook bread. The smell of fresh cooked bread is literally one of the best aromas that you’ll ever experience, and in this cooking tutorial I’ll share with you by best recipe for making a nice artisanal loaf of bread that needs limited proofing or rising time. It also requires limited kneading and can be easily cooked over an open fire in a cast iron Dutch oven pot or in a conventional oven that comes within your motorhome or camper.
For this recipe you’ll need the following ingredients:
- 3 Cups Flour (Bread or All Purpose)
- 1 Tsp. Salt
- 1/4 Tsp. Yeast
- ¼ Cup Melted Salted Butter (optional)
- 1 1/2 – 1 3/4 Cup Water @ 145ºF
To begin, let’s choose the proper flour. I like to use products that are non-genetically modified and are 100% organic. Sure, they’re a bit more expensive but the taste is usually cleaner, and the quality is far better than the average store brand flour that’s available in most of your supermarkets or big-box stores such as Walmart or Target.
While there are numerous brands of flour on the market, I recommend King Arthur Flour because it’s made in the United States with home-grown wheat that comes from the heartland of our country.
While you don’t necessarily need to sift your flour, I highly recommend that you do this into a large mixing bowl if you have a sifter on hand. This helps to prevent large air pockets in your bread dough and will help to keep your bread dough from becoming too “airy” during the baking process. Sifting the flour will also prevent the clumping of the flour which will add to the taste and quality of the bread.
While you can use a less expensive salt such as Morton’s iodized salt, I highly recommend that you don’t. Pure salt such as Salt Works pink Himalayan is far better when making this bread as it tastes better and works better for baking.
The next ingredient you’ll need is ¼ teaspoon of yeast. This can be an active dry yeast, or it could be a quick acting yeast. While both will work for this bread, I would recommend that you use an active dry yeast such as Red Star because it’s likely to have to have more longevity if stored in the proper environment and temperature.
Yes, you can purchase the 2 ¼ teaspoon packets of instant yeast, but I always keep a jar of active dry yeast in my freezer for making my bread. I find it to be more shelf stable than instant yeast and when stored correctly in an extremely cold environment such as a freezer or refrigerator it will last longer than individual packets.
Putting your bread together
After you have assembled the dry ingredients together, the next step is to add the hot water. This water should never be too hot and it’s best to keep it at a temperature lower than 145ºF so it can activate the yeast without killing it at the same time. Once that is done, thoroughly mix those ingredients together until it has reached a sticky consistency. Next, leave the dough in a mixing bowl and cover it with a wet towel in a warm area for the next two hours.
Once that is done, remove the dough from the bowl and punch it down. You’ll want to place the dough on your counter and knead it for one or two minutes adding a little flour to the surface of the counter and the dough to make it less sticky and easier to work with.
Now shape the dough into a ball like form and place it on a piece of parchment paper. Once you have done this, place the dough on the paper back into a bowl and let it rest for 30 minutes covered by a damp cloth or towel.
While you can bake this bread in a traditional loaf pan, I prefer to use a cast iron Dutch oven such like the one shown here because it makes the crust and lot crisper and crunchier. You’ll want to preheat your oven to 450º F, and you should also preheat the Dutch oven as well.
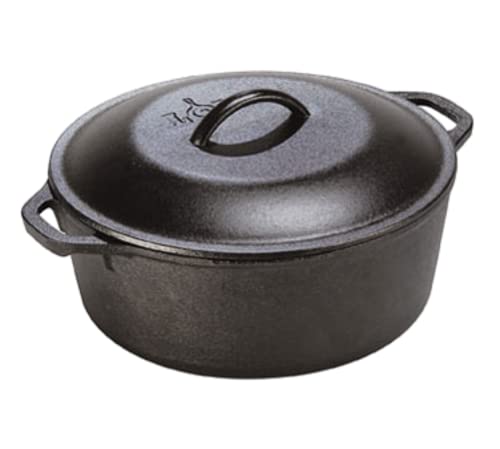
- 10-1/4 inches in diameter by 4 inches deep
- Nonstick when seasoned
- Retains heat for hours
Last update on 2024-07-17 / Affiliate links / Images from Amazon Product Advertising API
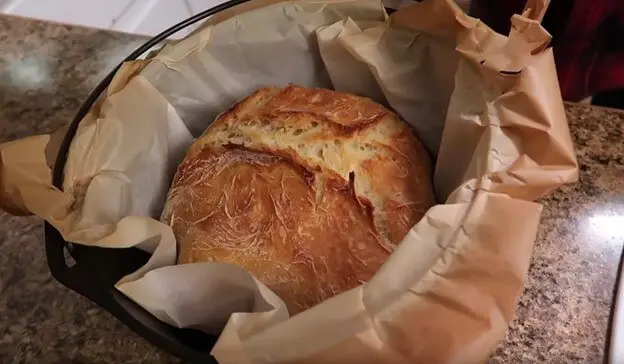
Place the dough on the parchment paper into the preheated Dutch oven and with the lid on bake for 25-35 minutes.
When you have baked the bread for the required time, remove from the oven and take the lid off the Dutch oven. Place it back into the oven and bake for another 5-8 minutes until the crust is a golden brown. At this time you can pour the melted butter over the loaf.
Carefully remove your loaf and let it rest on a cooling rack for a few minutes. Slice it up and enjoy for dinner or toast it up for breakfast and enjoy it with your jam or jelly.
Thanks for following along folks and safe travels to you all.