Hey! This site is reader-supported and we earn commissions if you purchase products from retailers after clicking on a link from our site.
In this series of articles, I will share some design tips and building instructions for creating a teardrop camper suitable for a beginner or intermediate RVer or handyman. Since these types of RVs are small, I will stick to the basics and we’ll leave advanced items such as solar power for another article later. First up (after choosing your trailer), you need to build the decking foundation for your teardrop trailer.
Timing & People Needs
2-3 hours. Some basic woodworking here to set the foundation of your teardrop trailer.
2 people needed. You can accomplish this project with one person, but 2 people is super useful to have one person hold parts in place when assembling the decking to make sure everything is aligned.
Materials You Need
| Material | How Much You Need | Cost Range | Where to Get It |
|---|---|---|---|
| 4’x8’x ½” pressure treated (PT) plywood | 1 sheet | $$ | Home Depot |
| 23/32 in. x 4 ft. x 8 ft. BC Sanded Pine Plywood | 1 sheet | $$ | Home Depot |
| 2”x2”x8’ pressure treaded (PT) boards | 3 boards | $ | Home Depot |
| 2”x2”x8’ standard boards | 2 boards | $ | Home Depot |
| ½” x 8” carriage bolts | 16 | $$ | Home Depot |
| ½” x 8” lock washers and nuts | 12 | $ | Home Depot |
| Black Rustoleum and brushes | 1-2 cans | $ | Home Depot |
| 4’x8’x1.5” sheet of foam insulation board | 1 sheet | $ | Home Depot |
| 4” drywall screws | 1 box | $ | Home Depot |
Tools You Need
Cost of Decking Your Trailer
If you already have the tools that you need, this project should cost you around $150-200.
Steps To Decking a Teardrop Trailer
- Prep your trailer for the decking
- Drill your holes
- Prep your base deck
- Set the frame
- Insulate your floor
Okay, now let’s dive into actually getting everything together. In each step, we have detailed instructions, photos, and some hand-drawn plans.
Prep Your Trailer For the Decking
Regardless of whether you purchase a new or used trailer, I recommend painting the frame with Rustoleum before you install any flooring. This is especially true if you are purchasing a used trailer for your teardrop build. Unless the current floor of your trailer is treated lumber and in excellent condition, I would also recommend that you use new decking when you begin this project.
If there is any rust on the trailer frame, make sure to sand it thoroughly before you apply the paint. For this step I would apply two coats of paint before moving on to the next step.
Pro tip: You may decide to use jack stands for this step as they will keep your trailer more level and stable. Place a jack stand under each corner of the trailer for this step and during the decking process. Also, while many people prefer to use spray paint, I would be more inclined to buy the same paint in a can and brush it on. This prevents wasted paint from overspray and saves time by not having to set up drop cloths or plastic sheeting
Drill Your Holes
Once your trailer has been properly prepped and painted, you’ll want to begin the decking process. Some manufacturers have pre-drilled holes for decking, and you’ll want to use these if your trailer is pre-drilled. You may also discover that these pre-drilled holes are sized using the metric system and if that’s the case, you’ll need to drill your holes in the lumber using the appropriate size drill bit. Also, your hardware for these holes will need to be adjusted to that size as well.
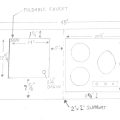
If you are drilling your own holes through the trailer frame, I recommend using four carriage bolts for both the left and right side of the trailer and two bolts on each crossbeam. Be sure to offset the bolt holes on each corner by three inches and the remaining two bolts on each side should be evenly spaced between the front and back of your frame. For the crossbars, I recommend offsetting these bolts 12” from either side.
Prep Your Base Deck
Once you’ve completed these tasks, you’re ready to move on to preparing your base deck for installation. For this step you’ll want to place your 4’x8’ sheet of pressure treated plywood on the frame of your trailer. Make sure that the plywood sheet is squared up to the frame and then using your “C” clamps, secure it in place.
From the underside, drill holes through the PT plywood using the holes you drilled through the frame of the trailer. Once you have done this step, remove the 4’x8’ sheet of PT plywood and place it on your sawhorses exactly as it sat on the trailer framework. The next step is to take your 4’x8’ sheet of flooring panel and using your “C” clamps, secure it squarely on the sheet of 4’x8’ of treated underlayment. Be sure to place it with the finished side up.
Set the Frame
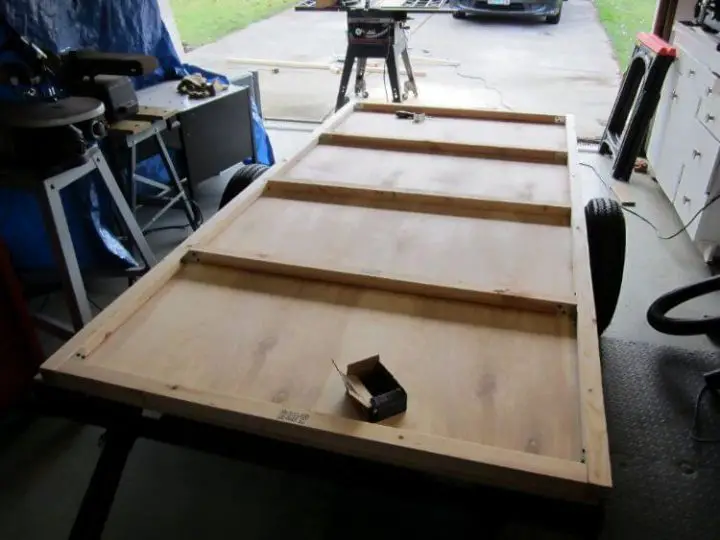
When you have the two sheets of plywood squared up and secured by your clamps, you’ll want to drill from the underside through your flooring piece. Once you have completed this step, set your flooring piece aside and start working on the framework. The best way to do this step is to lay out your treated 4’x8’x2” pieces and clamp them in place on the trailer frame. When your 2×2 frame components are secure, drill holes from the underside and set those pieces aside.
Now you’ll want to lay out your 4’x8’ sheet of pressure treated plywood onto the trailer and make sure that it’s square and it fits correctly. Using your construction adhesive and “C” clamps, place all the wooden 2”x2” framework pieces flush with the outer edges of the lower deck and then let them dry in place. Once completed it should look like this.
Insulate Your Floor
At this point, you still have not secured the decking onto the framework and that’s alright. What needs to be done now is to insulate your floor. That said, measure the void areas of your floor and using your utility knife cut a piece of foam insulation from your supplies list to fill each of those voids. Make sure the foam panels you cut for the voids are square and tight so you can skip any type of adhesive in those areas.
Once you have placed the foam insulation into the void areas of your decking, lay a bead of construction adhesive along the framework and then place the top sanded/finished 4’x8’ sheet into place and bolt the flooring down. Keep in mind that carriage bolts are designed to sink into the wood they are securing, so as you tighten them, be sure not to sink them too deeply into your decking. Try to get them flush with the surface.
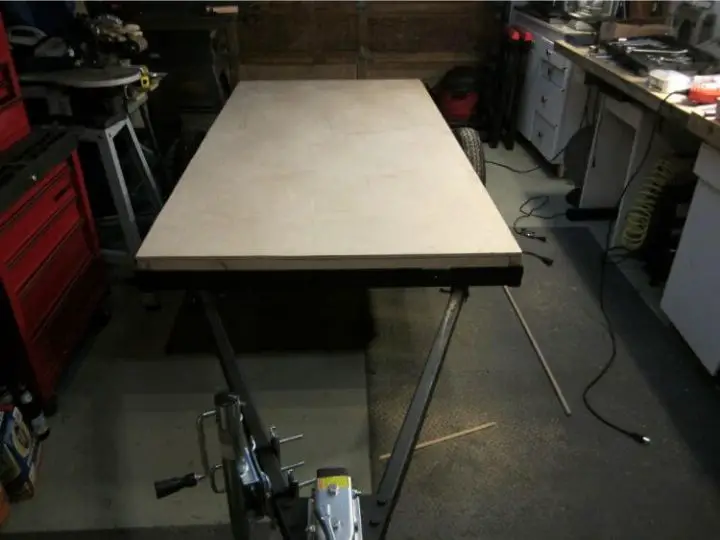
Once completed, your deck should look like this.
In the next part of this series, we’ll start building the walls and we’ll explore some design ideas for a few electrical and plumbing plans for this camper. We’ll also go over a list of tools and materials you’ll need for the next phase of the build. As always folks, if we ever meet up on the road someday, please say hello. Thanks for reading, and I hope to see you on the road during your travels.
Start reading part three: designing and building your walls.